2. Installing Robin Cloud Native Storage (CNS)
In this section, we will cover the pre-requisites, getting Robin CNS Software and installing Robin CNS on various Kubernetes distributions/versions.
2.1. Prerequisites
2.1.1. Supported Kubernetes versions
Robin CNS can be installed on the following Kubernetes Distributions/versions.
Kubernetes |
Version Supported |
OpenShift |
4.5, 4.4 |
Google Anthos |
1.16 and above |
GKE |
1.16 and above |
AKS |
1.16 and above |
EKS |
1.16 and above |
2.1.2. Port requirements on cloud platforms
If you are installing Robin on any cloud platform, the following ports need to be accessible for the installation to succeed and for Robin to operate correctly:
Ports |
Description |
29442 - 29470 |
Robin services |
Note
The above list of ports also apply to on-premises clusters. For the cloud platforms, when creating each rule to make the port accessible ensure that the protocol is TCP. In addition the cloud nodes should be able to communicate with one another on all ports via the IPv4 protocol.
Detailed below are the resources for managing ports on various cloud platforms.
AWS
Ports can be made accessible via security groups on AWS. Details on how to create security groups can be found here.
Robin requires both the access key and secret key of a user to be assed during installation. Details on how to create/manage AWS credentials can be found here.
GCP
Ports can be made accessible via firewall rules on GCP. Details on how to create appropriate firewall rules can be found here.
Instances on which Robin will be installed need to have full access to cloud APIs. This can be set during instance creation.
Azure
Ports can be made accessible via network security groups on Azure. Details on how to create network groups can be found here.
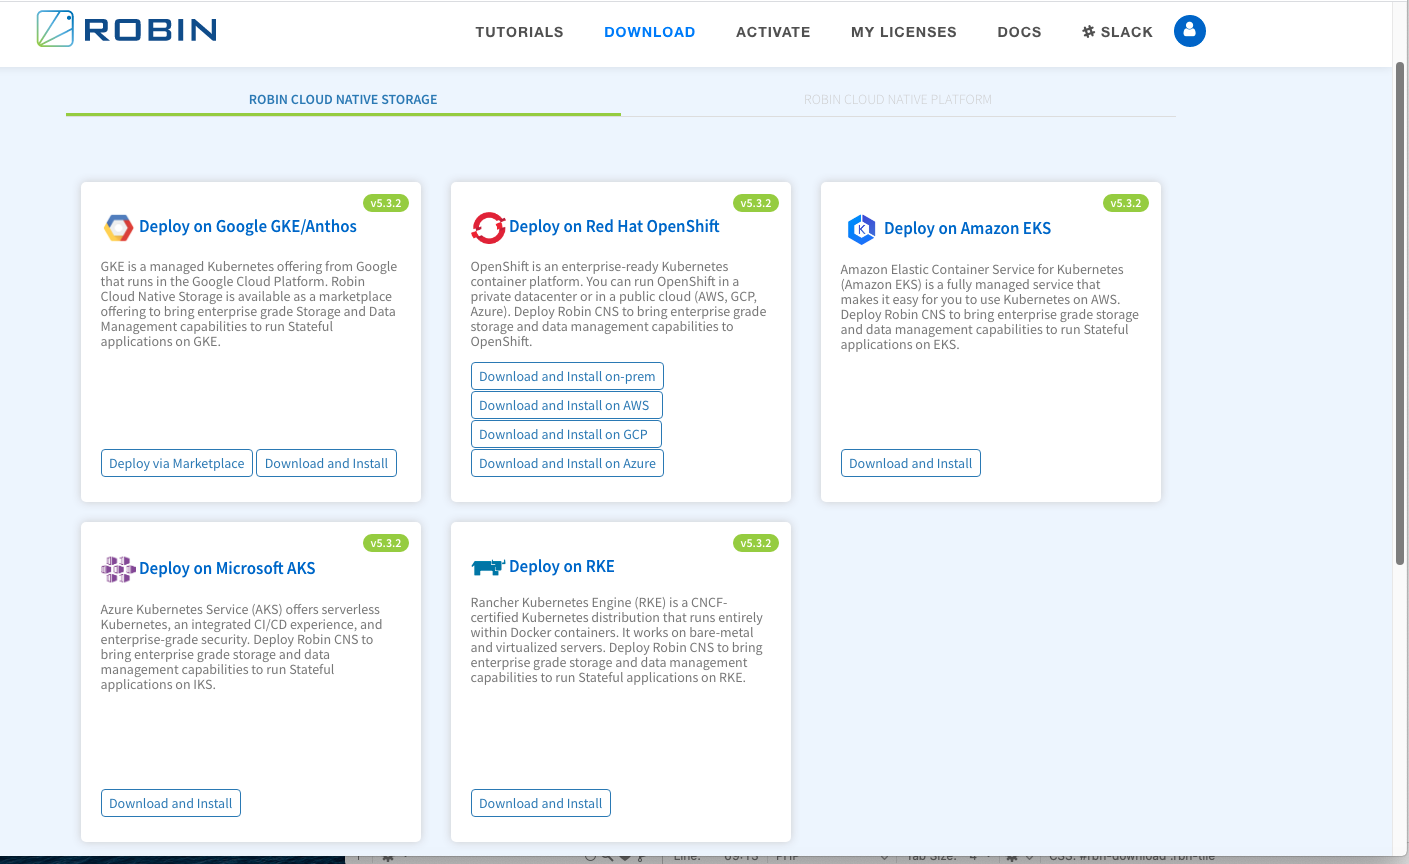
2.1.3. Downloading Robin CNS Software
Depending on the Kubernetes distribution there could be more than one way to install Robin. Please visit the following link to see all the install options available to your specific setup.
Note
You have to first register an account before you can access the download link for your environment.
2.2. Install on OpenShift
Robin CNS can be deployed on OpenShift using any of the methods below:
Using the Robin installer to deploy all necessary objects.
Using the Operator Lifecycle Manager to deploy the operator.
Installing Robin CNS via OperatorHub from the Openshift console.
Note
Throughout this documentation the oc command is equivalent to the kubectl command.
2.2.1. Prerequisites
Kubernetes user(s) who are running either the
kubectloroccommands shown below must have thecluster-adminrole currently assigned to them.The ports detailed here need to be accessible for the installation to succeed and for Robin to operate correctly.
In addition to the above requirements, one needs to create the appropriate Security Context Constraints. These can be created via the CLI. Define the SCC in a JSON or YAML file as shown below:
   kind: SecurityContextConstraints
   apiVersion: security.openshift.io/v1
   metadata:
     name: robin-scc
   allowPrivilegedContainer: true
   runAsUser:
     type: RunAsAny
   seLinuxContext:
     type: RunAsAny
   fsGroup:
     type: RunAsAny
   supplementalGroups:
     type: RunAsAny
   users:
   - my-admin-user
   groups:
   - my-admin-group


.. code-block:: text

        $ oc apply -f robin-scc.yaml
2.2.2. Install using the Robin Installer
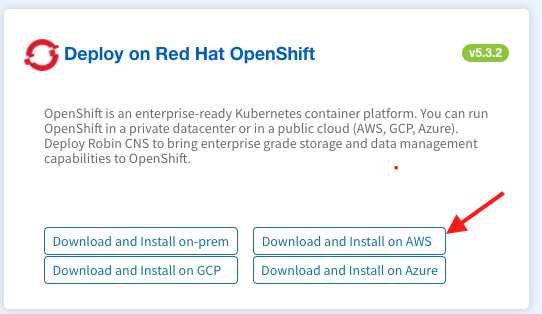
Follow the steps below to download and install Robin CNS for Openshift on AWS. Please proceed to Step 4 if you have already downloaded the installer.
Visit the following link and register an account.
From the Downloads page click Download and Install on AWS on the Deploy on Red Hat OpenShift tab.
Copy either the
wgetorcurlcommand and run it on your command line to download the installation tarfile. An example is shown below:$ wget "http://get.robin.io/download/storage?id=<USERID>&type=openshift-aws" -O robin-install.tar
Once the file is downloaded, run the below command to untar the contents into a new directory.
$ mkdir -p ./robin && tar -xf robin-install.tar -C ./robin
Move into the newly created directory, such that it is now your current working directory, and install Robin via the following commands:
$ cd robin
$ ./install-robin.sh --access-key=<AWS-ACCESS-KEY> --secret-key=<AWS-SECRET-KEY> -y
Validating Kubernetes cluster......Done

Confirm that ports 29442-29470 are open between kubernetes nodes
Make sure the cluster meets prerequisites mentioned at https://docs.robin.io/latest/install.html#minimum-node-requirements
Type yes to confirm that cluster meets the prerequisites:
yes
Validating kubernetes cluster permissions......Done
Validating robin cluster yaml......Done
Installing Robin operator...........Done
Installing Robin cluster............secret/cloud-cred-secret created
Done
Setting up robin client............Done

Activate robin license............Required

       $ robin license activate <USERID>

       Note: You can get your User ID after registering on https://get.robin.io. Above command will only work if the host on which the
             ROBIN client is running on has an internet connection. If this is not the case please retrieve the license key by using the
             below link and apply it using the command 'robin license apply <key>'.

             https://get.robin.io/activate?clusterid=

      For logging into robin cluster,
      Default username: admin
      Default password: Robin123
This concludes the install. Continue here to verify the installation and set up the product.
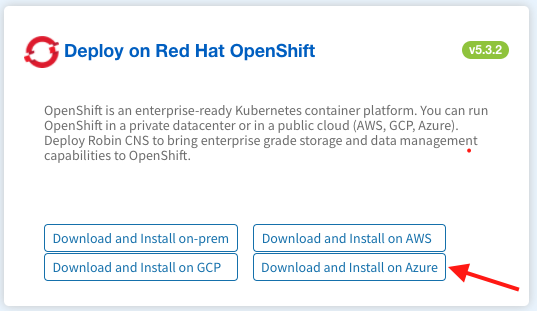
Follow the steps below to download and install Robin CNS for Openshift on AZURE. Please proceed to Step 4 if you have already downloaded the installer.
Visit the following link and register an account.
From the Downloads page click Download and Install on Azure on the Deploy on RedHat Openshift tab.
Copy either the
wgetorcurlcommand and run it on your command line to download the installation tarfile. An example is shown below:$ wget "http://get.robin.io/download/storage?id=<USERID>&type=openshift-azure" -O robin-install.tar
Once the file is downloaded, run the below command to untar the contents into a new directory.
$ mkdir -p ./robin && tar -xf robin-install.tar -C ./robin
Move into the newly created directory, such that it is now your current working directory, and install Robin via the following commands:
$ cd robin
$ ./install-robin.sh --app-id=XXXXXXXXXXXXXXXXXXXXXXX --tenant-id=XXXXXXXXXXXXXXXXXXXXX --secret-key=XXXXXXXXXXXXXXX  -y

Validating Kubernetes cluster......Done

Confirm that ports 29442-29470 are open between kubernetes nodes
Make sure the cluster meets prerequisites mentioned at https://docs.robin.io/latest/install.html#minimum-node-requirements
Type yes to confirm that cluster meets the prerequisites:
yes
Validating kubernetes cluster permissions......Done
Validating robin cluster yaml......Done
Installing Robin operator...........Done
Installing Robin cluster............secret/cloud-cred-secret created
Done
Setting up robin client............Done

Activate robin license............Required

       $ robin license activate <USERID>

       Note: You can get your User ID after registering on https://get.robin.io. Above command will only work if the host on which the
             ROBIN client is running on has an internet connection. If this is not the case please retrieve the license key by using the
             below link and apply it using the command 'robin license apply <key>'.

             https://get.robin.io/activate?clusterid=

      For logging into robin cluster,
      Default username: admin
This concludes the install. Continue here to verify the installation and set up the product.
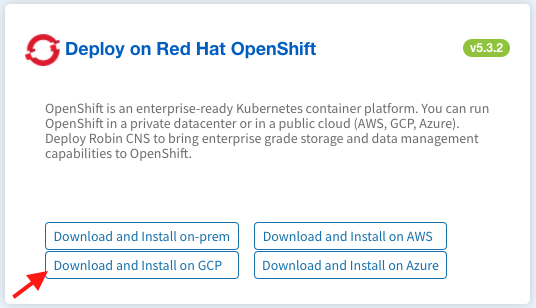
Follow the steps below to download and install Robin CNS for Openshift on GCP. Please proceed to Step 4 if you have already downloaded the installer.
Visit the following link and register an account.
From the Downloads page click Download and Install on GCP on the Deploy on RedHat Openshift tab.
Copy either the
wgetorcurlcommand and run it on your command line to download the installation tarfile. An example is shown below:$ wget "http://get.robin.io/download/storage?id=<USERID>&type=openshift-gcp" -O robin-install.tar
Once the file is downloaded, run the below command to untar the contents into a new directory.
$ mkdir -p ./robin && tar -xf robin-install.tar -C ./robin
Move into the newly created directory, such that it is now your current working directory, and install Robin via the following commands:
$ cd robin
$ ./install-robin.sh -y
Validating Kubernetes cluster......Done

Confirm that ports 29442-29470 are open between kubernetes nodes
Make sure the cluster meets prerequisites mentioned at https://docs.robin.io/latest/install.html#minimum-node-requirements
Type yes to confirm that cluster meets the prerequisites:
yes
Validating kubernetes cluster permissions......Done
Validating robin cluster yaml......Done
Installing Robin operator...........Done
Installing Robin cluster............secret/cloud-cred-secret created
Done
Setting up robin client............Done

Activate robin license............Required

       $ robin license activate <USERID>

       Note: You can get your User ID after registering on https://get.robin.io. Above command will only work if the host on which the
             ROBIN client is running on has an internet connection. If this is not the case please retrieve the license key by using the
             below link and apply it using the command 'robin license apply <key>'.

             https://get.robin.io/activate?clusterid=

      For logging into robin cluster,
      Default username: admin
This concludes the install. Continue here to verify the installation and set up the product.
Follow the steps below to download and install Robin CNS for Openshift OnPrem. Please proceed to Step 4 if you have already downloaded the installer.
Visit the following link and register an account.
From the Downloads page click Download and Install on-prem on the Deploy on Red Hat OpenShift tab.

Copy either the
wgetorcurlcommand and run it on your command line to download the installation tarfile. An example is shown below:$ wget "http://get.robin.io/download/storage?id=<USERID>&type=openshift-onprem" -O robin-install.tar
Once the file is downloaded, run the below command to untar the contents into a new directory.
$ mkdir -p ./robin && tar -xf robin-install.tar -C ./robin
Move into the newly created directory, such that it is now your current working directory, and install Robin via the following commands:
$ cd robin
$ ./install-robin.sh -y
Validating Kubernetes cluster......Done

Confirm that ports 29442-29470 are open between kubernetes nodes
Make sure the cluster meets prerequisites mentioned at https://docs.robin.io/latest/install.html#minimum-node-requirements
Type yes to confirm that cluster meets the prerequisites:
yes
Validating kubernetes cluster permissions......Done
Validating robin cluster yaml......Done
Installing Robin operator...........Done
Installing Robin cluster............secret/cloud-cred-secret created
Done
Setting up robin client............Done

Activate robin license............Required

       $ robin license activate <USERID>

       Note: You can get your User ID after registering on https://get.robin.io. Above command will only work if the host on which the
             ROBIN client is running on has an internet connection. If this is not the case please retrieve the license key by using the
             below link and apply it using the command 'robin license apply <key>'.

             https://get.robin.io/activate?clusterid=

      For logging into robin cluster,
      Default username: admin
This concludes the install. Continue here to verify the installation and set up the product.
2.2.3. Verify installation on Openshift
Once the installation is complete, you can get details about robin cluster by running the command:
$ oc get pods -n robinio -o wide
NAME                                     READY   STATUS    RESTARTS   AGE     IP             NODE                                         NOMINATED NODE   READINESS GATES
csi-attacher-robin-64d68c57c4-k6pmv      3/3     Running   0          3d23h   10.131.0.6     ip-10-0-167-211.us-west-1.compute.internal   <none>           <none>
csi-nodeplugin-robin-ftn4n               3/3     Running   0          3d23h   10.0.220.43    ip-10-0-220-43.us-west-1.compute.internal    <none>           <none>
csi-nodeplugin-robin-sf4s6               3/3     Running   0          3d23h   10.0.167.211   ip-10-0-167-211.us-west-1.compute.internal   <none>           <none>
csi-nodeplugin-robin-zz77z               3/3     Running   0          3d23h   10.0.128.218   ip-10-0-128-218.us-west-1.compute.internal   <none>           <none>
csi-provisioner-robin-7847568d5d-qbjqx   3/3     Running   0          3d23h   10.128.2.4     ip-10-0-128-218.us-west-1.compute.internal   <none>           <none>
csi-resizer-robin-7f65965b9-wwg6j        3/3     Running   0          3d23h   10.131.0.10    ip-10-0-167-211.us-west-1.compute.internal   <none>           <none>
csi-snapshotter-robin-0                  3/3     Running   0          3d23h   10.128.2.3     ip-10-0-128-218.us-west-1.compute.internal   <none>           <none>
robin-9hzmp                              1/1     Running   0          3d23h   10.0.220.43    ip-10-0-220-43.us-west-1.compute.internal    <none>           <none>
robin-operator-6944cb8c5-g8q7d           1/1     Running   0          3d23h   10.128.2.10    ip-10-0-128-218.us-west-1.compute.internal   <none>           <none>
robin-vwf96                              1/1     Running   0          3d23h   10.0.167.211   ip-10-0-167-211.us-west-1.compute.internal   <none>           <none>
robin-xx7rz                              1/1     Running   0          3d23h   10.0.128.218   ip-10-0-128-218.us-west-1.compute.internal   <none>           <none>
Run the below command to verify if Robin is successfully installed. For successful installs, the status section of the output will show as ‘Ready’ for ‘Phase’.
$ oc describe robincluster -n robinio

Status:
  connect_command:   kubectl exec -it robin-vwf96 -n robinio -- bash
  get_robin_client:  curl -k https://10.0.167.211:29442/api/v3/robin_server/download?file=robincli&os=linux > robin
  master_ip:         10.0.167.211
  Phase:             Ready
  pod_status:
    robin-9hzmp  ip-10-0-220-43.us-west-1.compute.internal  Running 10.0.220.43 false
    robin-vwf96  ip-10-0-167-211.us-west-1.compute.internal  Running 10.0.167.211 false
    robin-xx7rz  ip-10-0-128-218.us-west-1.compute.internal  Running 10.0.128.218 false
  robin_node_status:
    host_name:      ip-10-0-167-211.us-west-1.compute.internal
    join_time:      1600973314
    k8s_node_name:  ip-10-0-167-211.us-west-1.compute.internal
    Roles:          M*,S
    Rpool:          default
    State:          ONLINE
    Status:         Ready
    host_name:      ip-10-0-220-43.us-west-1.compute.internal
    join_time:      1600973337
    k8s_node_name:  ip-10-0-220-43.us-west-1.compute.internal
    Roles:          S,M
    Rpool:          default
    State:          ONLINE
    Status:         Ready
    host_name:      ip-10-0-128-218.us-west-1.compute.internal
    join_time:      1600973339
    k8s_node_name:  ip-10-0-128-218.us-west-1.compute.internal
    Roles:          M,S
    Rpool:          default
    State:          ONLINE
    Status:         Ready
Events:             <none>
You can then use the connect_command from the status section to connect to the Robin master pod.
$ kubectl exec -it robin-vwf96 -n robinio -- bash
Once you are inside the Robin Pod, run the below command to login to Robin CLI.
$ robin login admin
Password:
User admin is logged into Administrators tenant

*****
***** Your ROBIN License is NOT ACTIVATED...
***** Please register at https://get.robin.io/activate
***** to activate your license and access all ROBIN features.
*****
In order to activate your license via the CLI, first register by visiting https://get.robin.io/activate and retrieve your User ID. Next run the following command to activate your licese.
$ robin license activate XXXXXXXX
Run the below command to see all the nodes with Robin storage. The output should show Ready status and ONLINE for all the nodes.
$ robin host list
Id           | Hostname                                   | Version   | Status | RPool   | LastOpr | Roles | Isol Cores(SHR/DED/Total) | Non-Isol Cores | GPUs | Mem(Free/Alloc/Total) | HDD(#/Alloc/Total) | SSD(#/Alloc/Total) | Pod Usage | Joined Time
-------------+--------------------------------------------+-----------+--------+---------+---------+-------+---------------------------+----------------+------+-----------------------+--------------------+--------------------+-----------+----------------------
1600973281:1 | ip-10-0-167-211.us-west-1.compute.internal | 5.3.2-483 | Ready  | default | ONLINE  | M*,S  | 0/0/0                     | 2/20           | 0/0  | 2G/5G/7G              | -/-/-              | 2/-/400G           | 18/250    | 24 Sep 2020 18:48:34
1600973281:2 | ip-10-0-220-43.us-west-1.compute.internal  | 5.3.2-483 | Ready  | default | ONLINE  | S,M   | 0/0/0                     | 2/20           | 0/0  | 0.22G/7G/7G           | -/-/-              | 2/-/400G           | 28/250    | 24 Sep 2020 18:48:57
1600973281:3 | ip-10-0-128-218.us-west-1.compute.internal | 5.3.2-483 | Ready  | default | ONLINE  | M,S   | 0/0/0                     | 3/20           | 0/0  | 1G/6G/7G              | -/-/-              | 2/-/400G           | 19/250    | 24 Sep 2020 18:48:59
That’s it! This concludes the Robin install on Openshift.
Note
Please see the install options detailed below and edit the custom resource section of yaml file appropriately to adjust your deployment.
2.3. Install on Google GKE
GKE is a managed Kubernetes offering from Google that runs in the Google Cloud Platform. Robin Cloud Native Storage is available as a marketplace offering to bring enterprise grade Storage and Data Management capabilities to run Stateful applications on GKE. You can also download Robin CNS software and install manually. In this section we will cover both.
2.3.1. Prerequisites
The ports detailed here need to be accessible for the installation to succeed and for Robin to operate correctly.
Ensure the user installing Robin CNS is the Cluster Administrator within the Kubernetes cluster. For GKE installations, run following commands to add a user as a Cluster Administrator:
$ account=$(gcloud info | grep Account  | awk -F'[\\[\\]]' '{print $2}')

$ kubectl create clusterrolebinding robin-cluster-admin-binding --clusterrole=cluster-admin --user=$account
Note
For GKE installations, Robin needs nodes with Ubuntu image and cluster with
Compute Engine: Read WriteandStorage: FullAPI being enabled. Compute Engine API access is required to make sure disks are always accessible and easy way to provision disks within ROBIN. Storage API access is required for backing up applications in GCS. You can select theAccess scopeas one of the following while creating GKE cluster.Set access for each API and select individual permissions
Allow full access to all Cloud APIs
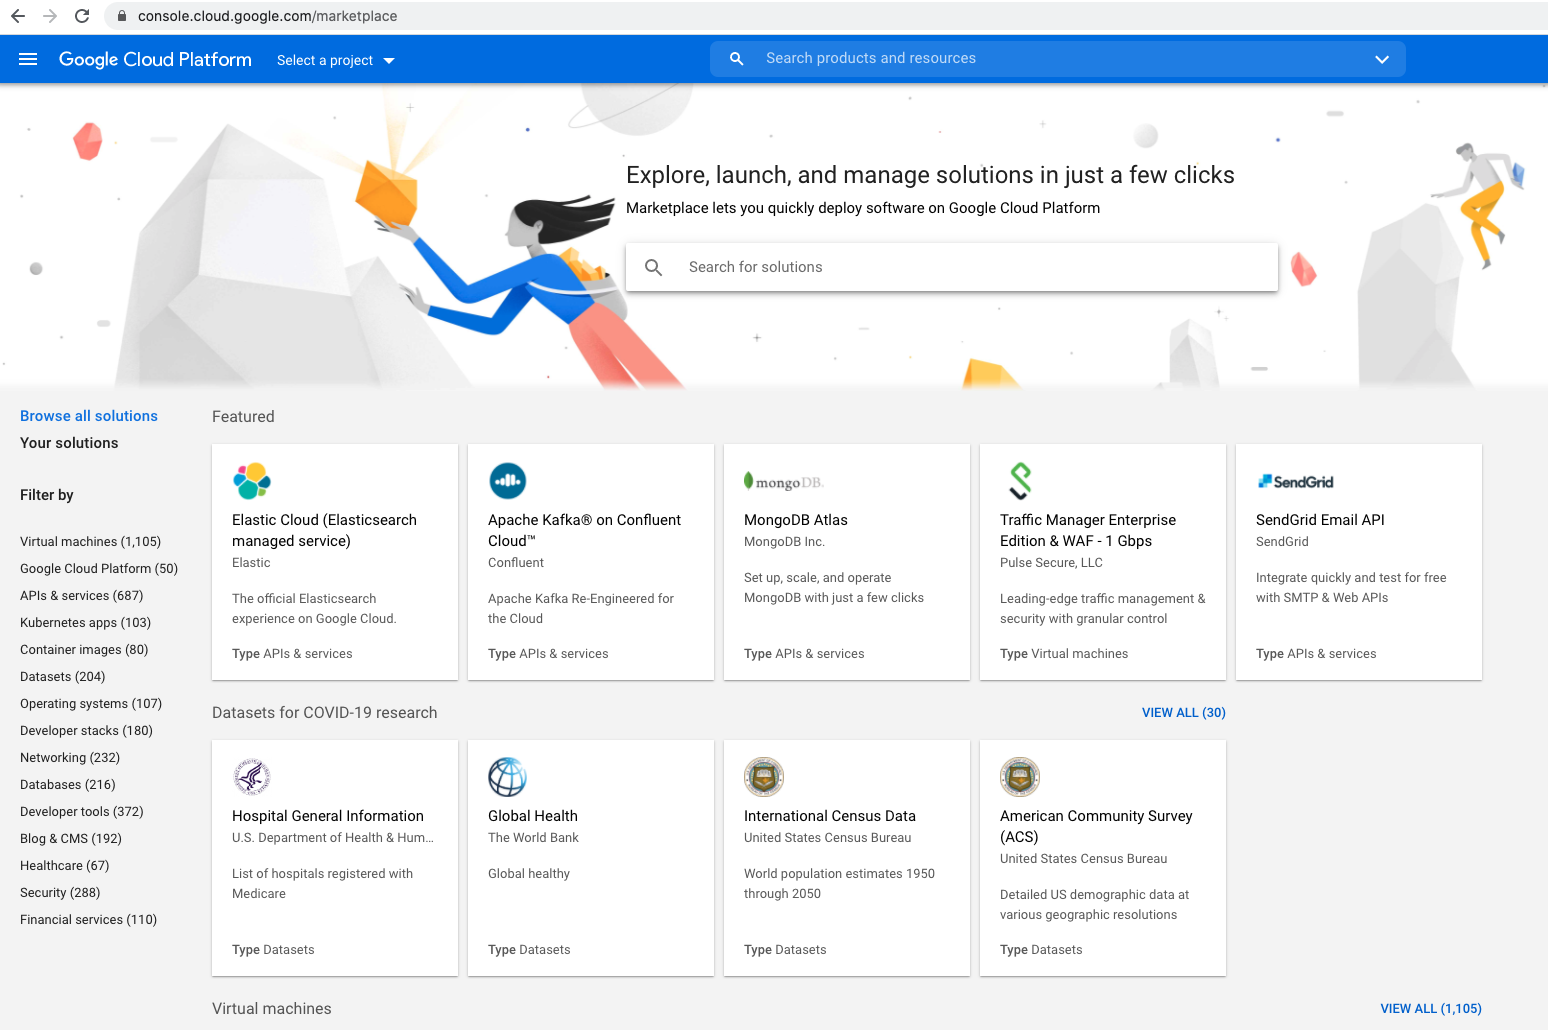
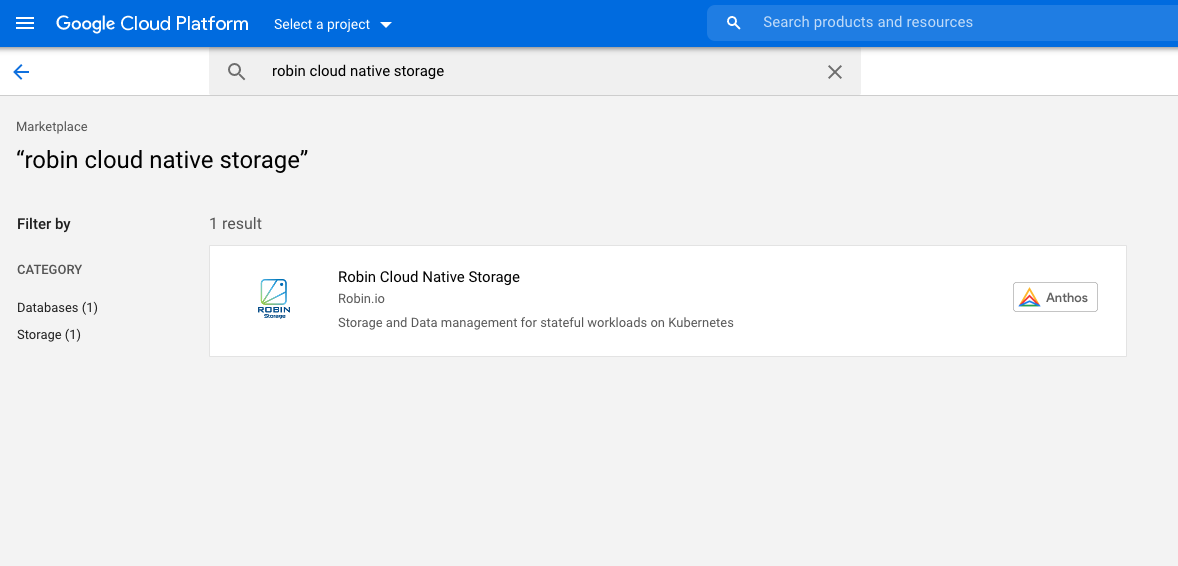
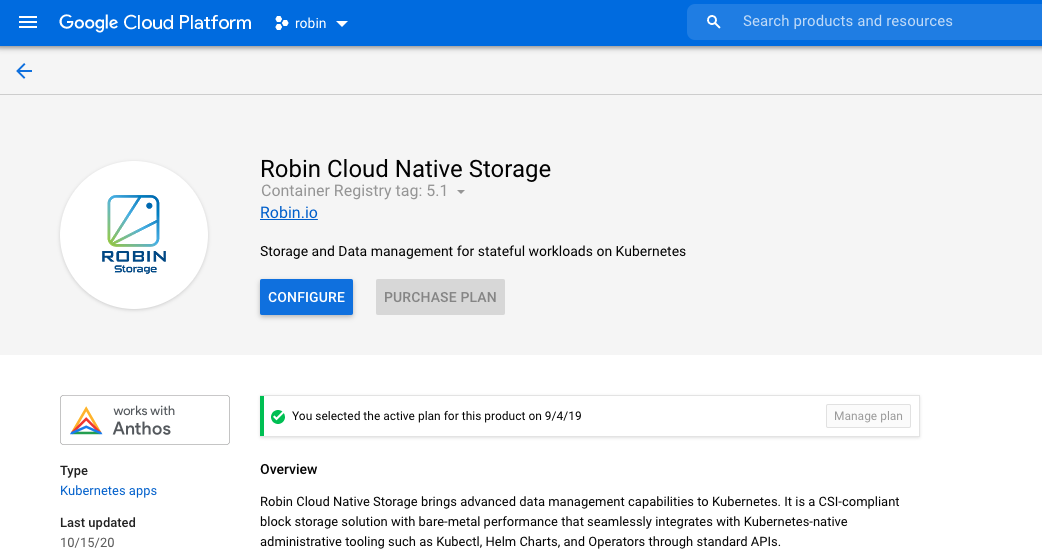
2.3.2. Install via Google Marketplace
Visit the marketplace
Search for
robin cloud native storageas shown below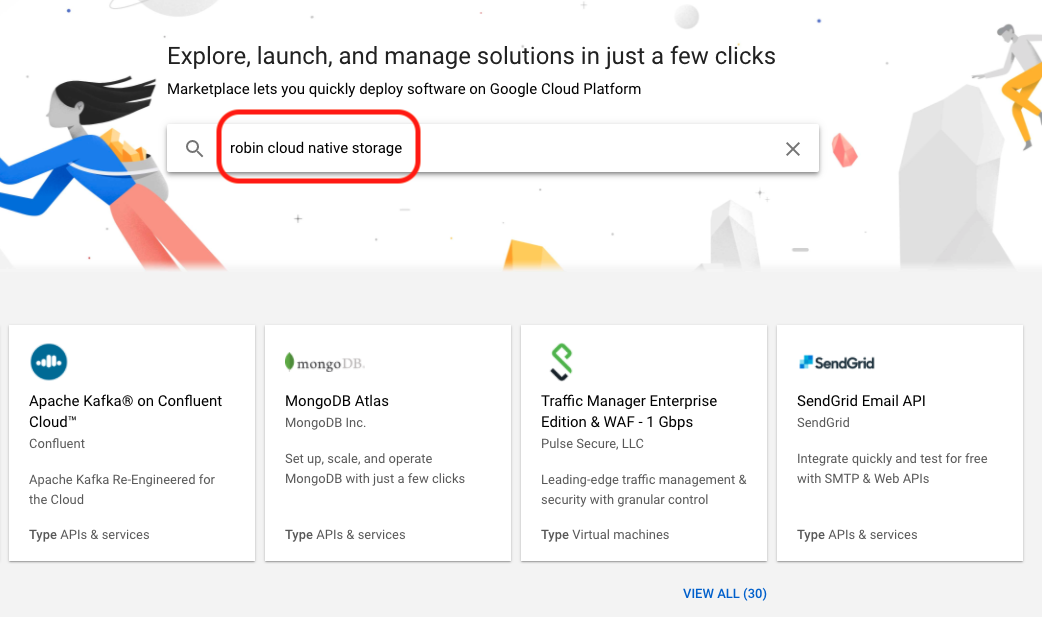
Select Robin Cloud Native Storage
Click on Configure
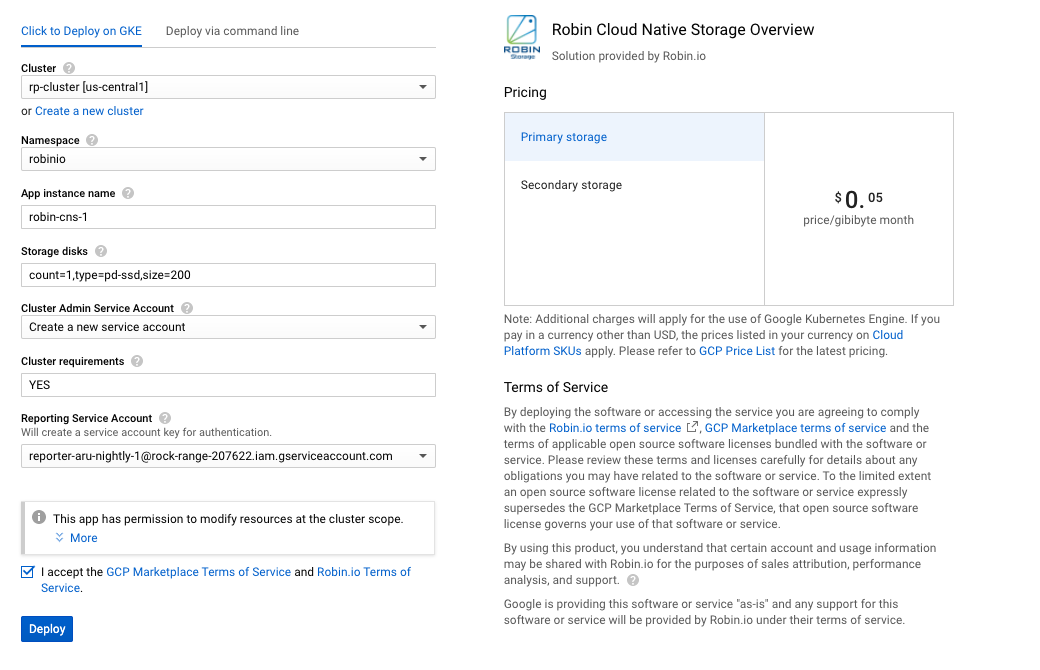
In the configuration page, select and existing GKE cluster or create a new cluster to deploy Robin CNS, Type ‘YES’ for Cluster requirements and click Deploy
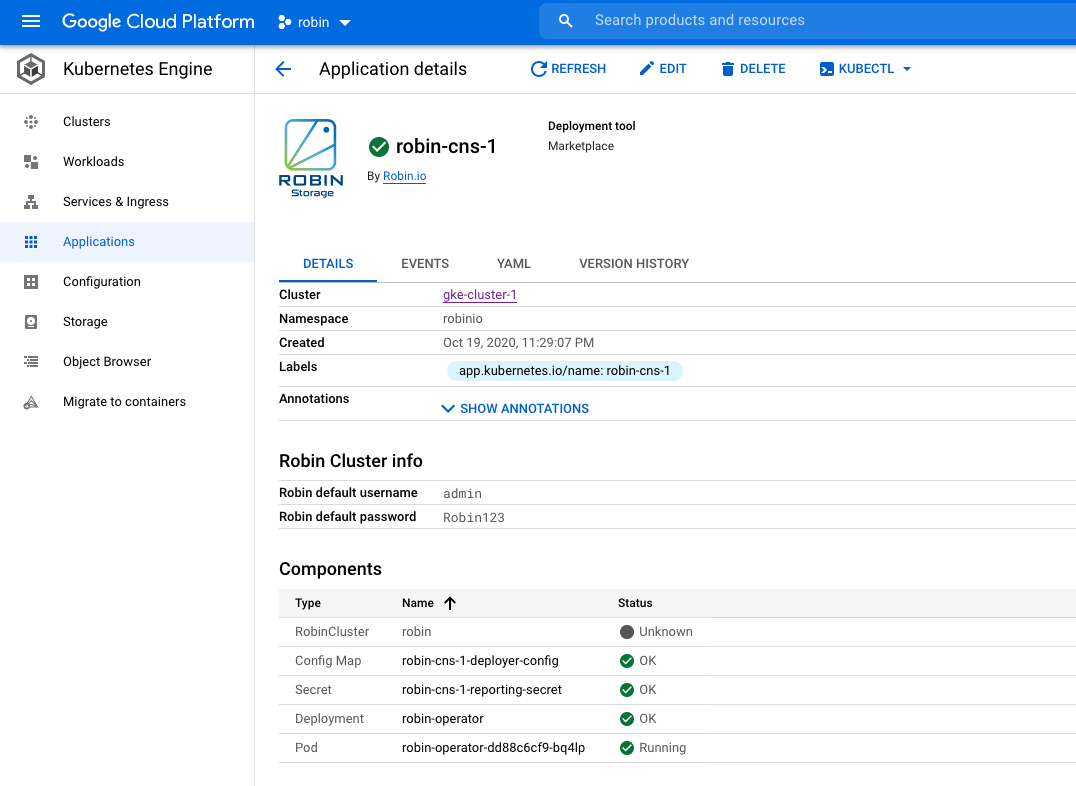
You will then be taken to the Application details page. You should see a similar output. Wait until all the components turn to OK or Running status.
This concludes the install. Continue to the installation verification section and set up the product
2.3.3. Install using Robin Installer
Follow the steps below to download and install Robin CNS for GKE. Please proceed to Step 4 if you already have the installer downloaded.
Visit the following link and register an account.
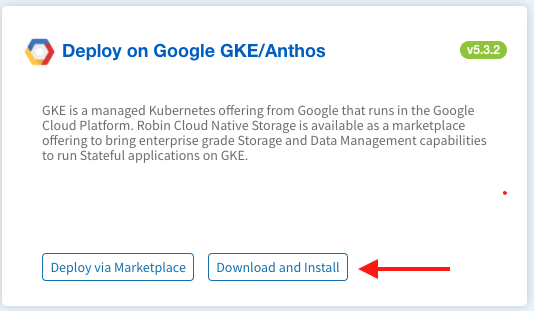
From the Downloads page click Download and Install on the Deploy on Google GKE/Anthos tab.
Copy either the
wgetorcurlcommand and run it on your command line to download the installation tarfile. An example is shown below:$ wget "http://get.robin.io/download/storage?id=<USERID>&type=gke" -O robin-install.tar
Once the file is downloaded, run the below command to untar the contents into a new directory.
$ mkdir -p ./robin && tar -xf robin-install.tar -C ./robin
Move into the newly created directory, such that it is now your current working directory, and install Robin via the following commands:
$ cd robin
$ ./install-robin.sh --cluster-name=mg-cluster --zone=us-central1 -y
Validating Kubernetes cluster......Done

Confirm that ports 29442-29470 are open between kubernetes nodes
Make sure the cluster meets prerequisites mentioned at https://docs.robin.io/latest/install.html#minimum-node-requirements
Type yes to confirm that cluster meets the prerequisites:
yes
Validating kubernetes cluster permissions......Done
Validating robin cluster yaml......Done
Installing Robin operator...........Done
Installing Robin cluster............secret/cloud-cred-secret created
Done
Setting up robin client............Done

Activate robin license............Required

       $ robin license activate <USERID>

       Note: You can get your User ID after registering on https://get.robin.io. Above command will only work if the host on which the
             ROBIN client is running on has an internet connection. If this is not the case please retrieve the license key by using the
             below link and apply it using the command 'robin license apply <key>'.

             https://get.robin.io/activate?clusterid=

      For logging into robin cluster,
      Default username: admin
      Default password: Robin123
This concludes the install. Continue here to verify the installation and set up the product.
2.4. Install on Google Anthos
GKE is a managed Kubernetes offering from Google that runs in the Google Cloud Platform. Robin Cloud Native Storage is available as a marketplace offering to bring enterprise grade Storage and Data Management capabilities to run Stateful applications on GKE. You can also download Robin CNS software and install manually. In this section we will cover both.
2.4.1. Prerequisites
The ports detailed here need to be accessible for the installation to succeed and for Robin to operate correctly.
Ensure the user installing Robin CNS is the Cluster Administrator within the Kubernetes cluster. For Anthos installations, run following commands to add a user as a Cluster Administrator:
$ account=$(gcloud info | grep Account  | awk -F'[\\[\\]]' '{print $2}')

$ kubectl create clusterrolebinding robin-cluster-admin-binding --clusterrole=cluster-admin --user=$account
2.4.2. Install using Robin Installer
Follow the steps below to download and install Robin CNS for Google Anthos. Please proceed to Step 4 if you already have the installer downloaded.
Visit the following link and register an account.
From the Downloads page click Download and Install on the Deploy on Google GKE/Anthos tab.
Copy either the
wgetorcurlcommand and run it on your command line to download the installation tarfile. An example is shown below:$ wget "http://get.robin.io/download/storage?id=<USERID>&type=gke" -O robin-install.tar
Once the file is downloaded, run the below command to untar the contents into a new directory.
$ mkdir -p ./robin && tar -xf robin-install.tar -C ./robin
Move into the newly created directory, such that it is now your current working directory, and install Robin via the following commands:
$ cd robin
$ ./install-robin.sh -y
Validating Kubernetes cluster......Done

Confirm that ports 29442-29470 are open between kubernetes nodes
Make sure the cluster meets prerequisites mentioned at https://docs.robin.io/latest/install.html#minimum-node-requirements
Type yes to confirm that cluster meets the prerequisites:
yes
Validating kubernetes cluster permissions......Done
Validating robin cluster yaml......Done
Installing Robin operator...........Done
Installing Robin cluster............secret/cloud-cred-secret created
Done
Setting up robin client............Done

Activate robin license............Required

       $ robin license activate <USERID>

       Note: You can get your User ID after registering on https://get.robin.io. Above command will only work if the host on which the
             ROBIN client is running on has an internet connection. If this is not the case please retrieve the license key by using the
             below link and apply it using the command 'robin license apply <key>'.

             https://get.robin.io/activate?clusterid=

      For logging into robin cluster,
      Default username: admin
      Default password: Robin123
This concludes the install. Continue here to verify the installation and set up the product.
2.5. Install on AKS
2.5.1. Prerequisites
The following pre-requisites must be met to install Robin CNS on AKS.
The ports detailed here need to be accessible for the installation to succeed and for Robin to operate correctly.
VM scale sets should be disabled on cluster.
Node should have the following operating system installed: Ubuntu (Kernel Version: 4.15.0-1096-azure).
2.5.2. Install using Robin Installer
Follow the steps below to download and install Robin CNS for AKS. Please proceed to Step 4 if you already have the installer downloaded.
Visit the following link and register an account.
From the Downloads page click Download and Install on the AKS tab.

Copy either the
wgetorcurlcommand and run it on your command line to download the installation tarfile. An example is shown below:$ wget "http://get.robin.io/download/storage?id=<USERID>&type=aks" -O robin-install.tar
Once the file is downloaded, run the below command to untar the contents into a new directory.
$ mkdir -p ./robin && tar -xf robin-install.tar -C ./robin
Move into the newly created directory, such that it is now your current working directory, and install Robin via the following commands:
$ cd robin
$ ./install-robin.sh --app-id=XXXXXXXXXXXXXXXXXX --tenant-id=XXXXXXXXXXXXXXXXXXXX --secret-key=XXXXXXXXXXXXXXX -y
Validating Kubernetes cluster......Done

Confirm that ports 29442-29470 are open between kubernetes nodes
Make sure the cluster meets prerequisites mentioned at https://docs.robin.io/latest/install.html#minimum-node-requirements
Type yes to confirm that cluster meets the prerequisites:
yes
Validating kubernetes cluster permissions......Done
Validating robin cluster yaml......Done
Installing Robin operator...........Done
Installing Robin cluster............secret/cloud-cred-secret created
Done
Setting up robin client............Done

Activate robin license............Required

       $ robin license activate <USERID>

       Note: You can get your User ID after registering on https://get.robin.io. Above command will only work if the host on which the
             ROBIN client is running on has an internet connection. If this is not the case please retrieve the license key by using the
             below link and apply it using the command 'robin license apply <key>'.

             https://get.robin.io/activate?clusterid=

      For logging into robin cluster,
      Default username: admin
      Default password: Robin123
This concludes the install. Continue here to verify the installation and set up the product.
2.6. Install on EKS
2.6.1. Prerequisites
The following pre-requisites must be met to install Robin CNS on EKS.
The ports detailed here need to be accessible for the installation to succeed and for Robin to operate correctly.
Nodes should have the following operating systems installed: Ubuntu (Kernel Version: 5.4.0-1024-aws or 5.4.0-1028-aws). The AMI Family to use for this OS is Ubuntu1804.
2.6.2. Install using Robin Installer
Follow the steps below to download and install Robin CNS for EKS. Please proceed to Step 4 if you already have the installer downloaded.
Visit the following link and register an account.
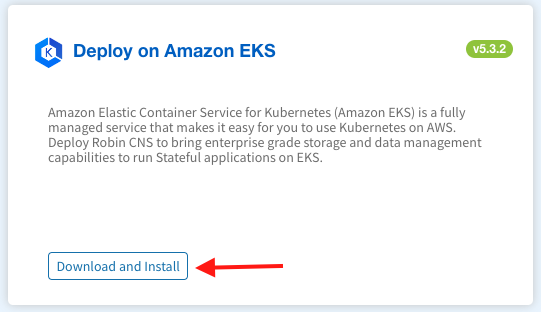
From the Downloads page click Download and Install on the EKS tab.
Copy either the
wgetorcurlcommand and run it on your command line to download the installation tarfile. An example is shown below:$ wget "http://get.robin.io/download/storage?id=<USERID>&type=eks" -O robin-install.tar
Once the file is downloaded, run the below command to untar the contents into a new directory.
$ mkdir -p ./robin && tar -xf robin-install.tar -C ./robin
Move into the newly created directory, such that it is now your current working directory, and install Robin via the following commands:
$ cd robin
$ ./install-robin.sh --secret-key=XXXXXXXXXXXXXXXXXXXXXXXXXXXX  --access-key=XXXXXXXXXXXXXXXXXXXXXXX -y
Validating Kubernetes cluster......Done

Confirm that ports 29442-29470 are open between kubernetes nodes
Make sure the cluster meets prerequisites mentioned at https://docs.robin.io/latest/install.html#minimum-node-requirements
Type yes to confirm that cluster meets the prerequisites:
yes
Validating kubernetes cluster permissions......Done
Validating robin cluster yaml......Done
Installing Robin operator...........Done
Installing Robin cluster............secret/cloud-cred-secret created
Done
Setting up robin client............Done

Activate robin license............Required

       $ robin license activate <USERID>

       Note: You can get your User ID after registering on https://get.robin.io. Above command will only work if the host on which the
             ROBIN client is running on has an internet connection. If this is not the case please retrieve the license key by using the
             below link and apply it using the command 'robin license apply <key>'.

             https://get.robin.io/activate?clusterid=

      For logging into robin cluster,
      Default username: admin
      Default password: Robin123
This concludes the install. Continue here to verify the installation and set up the product.
2.7. Install on RKE
2.7.1. Prerequisites
The following pre-requisites must be met to install Robin CNS on RKE.
The ports detailed here need to be accessible for the installation to succeed and for Robin to operate correctly.
The
kube-controllerpod must be present in order to sign certificates. To achieve this add akube-controllerentry within theservicessection of the Rancher configuration file as shown below.services: etcd: backup_config: enabled: true interval_hours: 12 retention: 6 creation: "12h" extra_args: election-timeout: "5000" heartbeat-interval: "500" retention: "72h" snapshot: false kube-api: always_pull_images: false pod_security_policy: false service_node_port_range: "30000-32767" kube-controller: extra_args: cluster-signing-cert-file: "/etc/kubernetes/ssl/kube-ca.pem" cluster-signing-key-file: "/etc/kubernetes/ssl/kube-ca-key.pem"
2.7.2. Install using Robin Installer
Follow the steps below to download and install Robin CNS for EKS. Please proceed to Step 4 if you already have the installer downloaded.
Visit the following link and register an account.
From the Downloads page click Download and Install on the RKE tab.
Copy either the
wgetorcurlcommand and run it on your command line to download the installation tarfile. An example is shown below:$ wget "http://get.robin.io/download/storage?id=<USERID>&type=rke" -O robin-install.tar
Once the file is downloaded, run the below command to untar the contents into a new directory.
$ mkdir -p ./robin && tar -xf robin-install.tar -C ./robin
Move into the newly created directory, such that it is now your current working directory, and install Robin via the following commands:
$ cd robin
$ ./install-robin.sh -y
Validating Kubernetes cluster......Done

Confirm that ports 29442-29470 are open between kubernetes nodes
Make sure the cluster meets prerequisites mentioned at https://docs.robin.io/latest/install.html#minimum-node-requirements
Type yes to confirm that cluster meets the prerequisites:
yes
Validating kubernetes cluster permissions......Done
Validating robin cluster yaml......Done
Installing Robin operator...........Done
Installing Robin cluster............secret/cloud-cred-secret created
Done
Setting up robin client............Done

Activate robin license............Required

       $ robin license activate <USERID>

       Note: You can get your User ID after registering on https://get.robin.io. Above command will only work if the host on which the
             ROBIN client is running on has an internet connection. If this is not the case please retrieve the license key by using the
             below link and apply it using the command 'robin license apply <key>'.

             https://get.robin.io/activate?clusterid=

      For logging into robin cluster,
      Default username: admin
      Default password: Robin123
This concludes the install. Continue here to verify the installation and set up the product.
2.8. Install Options
Shown below is a Robin CNS deployment YAML file wherein which all the configurable options are present.
apiVersion: manage.robin.io/v1
kind: RobinCluster
metadata:
  name: robin
  namespace: robinio
spec:
  image_version: <docker-image-name-version>
  k8s_provider: gke|openshift|eks|aks|pks|rke|robin|opensource
  host_type: gcp|physical|aws|azure
  node_selector: <node selector>
  source: <operatorhub|gcpmarketplace>
  # kms: robin/google
  # kms_keyring: <keyring_name>
  # options:
  #   cloud_cred_secret: aws-secret
  #   requests:
  #     cpu: "2"
  #     memory: "2Gi"
  #   limits:
  #     cpu: "2"
  #     memory: "2Gi"
Each option shown above is described below alongside whether or not they must to be present in the YAML file.
|
Required |
Image name/version in your docker registry |
|
Required |
Kubernetes Distribution name. The following values are
supported: |
|
Required |
The type of host on which the Kubernetes distribution
is running. The following values are supported: |
|
Optional |
Specify a selector to pick the nodes on which Robin CNS should be installed. For OpenShift v3 specify “node-role.kubernetes.io/compute=true” or for OpenShift v4 specify “node-role.kubernetes.io/master=’’” |
|
Optional |
If external key management needs to be provided. Valid values include: |
|
Optional |
Keyring name if google KMS is selected |
|
Optional |
Source of deployment yaml. Only specify this value if Robin CNS is deployed through one of the following portals: |
|
Required |
Name of secret containing cloud specific credentials. This is required for Azure, optional for AWS if EC2 instances are configured with the necessary IAM roles and optional for GCP deployments. |
|
Optional |
Request resource for robin pods |
|
Optional |
Set resource limits for robin pods |
2.9. Verify Installation
Once the installation is complete, you can get details about robin cluster by running
$ kubectl describe robinclusters -n robinio
You should see the status of all the ROBIN Nodes as “Ready”.
Note
If you have deployed ROBIN in different namespace then use that namespace in above command and in all the commands in this document which has “robinio” namespace in it.
You can also see ROBIN storage class is added.
$ kubectl get sc
Use the “Connect Command” value from the above output to connect to ROBIN pod. For example,
$ kubectl exec -it robin-rnnnd -n robinio bash
After logging into ROBIN container you can login as “admin” user. Default password is ‘Robin123’
$ robin login admin
You can verify the installation by running
$ robin host list
2.10. ROBIN License Activation
After installing ROBIN software on any platform, a notice will appear stating that the ROBIN license will expire in approximately two days whenever a command is run. This is an indication that the license is yet to be activated. In order to avoid a cluster lockdown you can activate your ROBIN cluster via one of the following methods.
If the license is not activated your ROBIN cluster will be locked after the allocated time.
2.10.1. Web License Activation
Activate your ROBIN license by clicking here. After following the instructions detailed on the website your ROBIN license should be activated and your cluster ready to use.
Note
You will be asked to provide the Robin CNS cluster id when activating your license. This can be discovered by running the robin license id command via the client or when you are connected to the Robin pod. In addition you can apply the generated key via the command robin license apply <key>
2.11. High Availability of ROBIN Services
Robin CNS manages High Availability of all management services that are deployed as part of Robin CNS installation. Robin CNS pods are deployed as part of a daemonset. Some pods are designated to run master services. Robin CNS configures 3 of these pods as manager pods which can host these master services.
If one of the kubernetes node goes down, ROBIN seamlessly starts master services on other manager pods.
If pod hosting ROBIN master services is removed from kuberenetes cluster, ROBIN will automatically designate another pod as manager pod so that it always has 3 master pods.
2.12. Uninstalling ROBIN
For uninstalling Robin CNS from Kubernetes cluster, run following command:
$ kubectl delete -f robin.yaml
$ kubectl delete clusterrolebinding -l robin.io/domain=ROBIN
$ kubectl delete rolebinding -l robin.io/domain=ROBIN -A
Run the below command to get a list of namespaces created with Robin and delete the namespaces one by one. Please make sure you are not accidentally deleting namespaces that contain non-robin applications.
$ kubectl get ns -l robin.io/domain=ROBIN
After reviewing the list, if you want to delete all the namespaces at once, you can run
$ kubectl delete ns -l robin.io/domain=ROBIN
2.12.1. Deleting objects created by OLM
If the ROBIN operator was deployed on an OpenShift cluster via the OLM method described above, run the following command to delete all the objects created within the robinio namespace:
$ oc delete namespace robinio
2.12.2. Deleting objects created via the Robin installer
If the Robin CNS operator was deployed on an existing Kubernetes cluster via the Robin installer in the steps described previously, one can run the following command to uninstall:
$ ./install-robin.sh --uninstall
Uninstalling Robin cluster......Done
Some Robin managed namespaces (t001-u000001 t001-u000002 t001-u000003 ) are not deleted, please run following command to delete those after
making sure there are no required kubernetes objects present in these namespaces
"kubectl delete ns -l robin.io/domain=ROBIN"
Note
The install-robin.sh script is shipped within the downloadable tarfile.