2. Installing Robin Cloud Native Storage (CNS)
In this section, we will cover the pre-requisites for installing Robin CNS, accessing the necessary software and installing Robin CNS on various Kubernetes distributions/versions.
2.1. Prerequisites
Detailed below are the general prerequisites that must be met for all Robin CNS installations in any environment. Environment specific prerequisites can be found within their individual sections.
2.1.1. Minimum Resource Requirements
The minimum compute requirements in order to install Robin CNS on a Kubernetes cluster are listed below:
Each node must have at least 4 CPUs.
Each node must have at least 4GB of memory.
In order to determine the resource capacity on an existing Kubernetes cluster the following command can be used:
$ kubectl get nodes -o custom-columns=Name:.metadata.name,OSImage:.status.nodeInfo.osImage,KubeVersion:.status.nodeInfo.kubeProxyVersion,CPU:.status.capacity.cpu,Memory:.status.capacity.memory,providerID:.spec.providerID
2.1.2. Supported Kubernetes versions
Robin CNS supports Kubernetes version 1.27 through 1.32.
2.1.3. Supported OS for worker nodes
CentOS 7/8
Red Hat 7/8
Ubuntu
Red Hat Enterprise Linux CoreOS
Container optimized OS (For GKE)
EdgeOS
Note
Windows-based operating systems are not supported by Robin CNS.
2.1.4. Kernel dependency
Minimum supported kernel version for Red Hat and CentOS based OS is 3.10.0-1062.xx.el7.x86_64. Run the command below to confirm that you are running the minimum supported kernel version:
$ uname -r
To upgrade, run the
yum updatecommand for the latest available kernel version.Ensure that the
target_core_userandtcm_loopkernel modules are loaded on all nodes within the cluster before starting the installation process.
$ lsmod | egrep '^target_core_user|^tcm_loop'
target_core_user       35043  0
tcm_loop               21028  3
In order to load the modules on an Ubuntu based machine, run the following commands:
$ sudo apt-get update

$ sudo apt-get install linux-modules-extra-<kernel-version>

$ sudo depmod -a

$ sudo modprobe tcm_loop

$ lsmod | grep tcm
tcm_loop 28672 3
target_core_mod 360448 5 tcm_loop,target_core_user
Note
The kernel version can be determined from the output of the
uname -rcommand.
2.1.5. Asynchronous I/O (AIO) configuration
For production environments, Robin recommends setting the aio-max-nr parameter value to 1048576 for each node of the cluster. For more information about the aio-max-nr parameter, see here.
The aio-nr parameter displays the current number of asynchronous non-blocking I/O (AIO) requests running on the node and the aio-max-nr parameter displays the maximum allowable limit of AIO concurrent requests per node.
You can view the aio-nr parameter value in the /proc/sys/fs/aio-nr virtual file and the aio-max-nr parameter value in the /proc/sys/fs/aio-max-nr virtual file for a node.
You can update the aio-max-nr parameter value for a node by adding the following line in the /etc/sysctl.conf file:
fs.aio-max-nr = 1048576
Complete the following steps to update the aio-max-nr parameter value for a node:
Update the
aio-max-nrparameter value to1048576in the/etc/sysctl.confby adding the following line:fs.aio-max-nr = 1048576Run the following command for the changes to take effect:
# sysctl --system
Run the following command to verify the updated
aio-max-nrparameter value:# sysctl -p /etc/sysctl.conf
2.1.6. User permissions
Ensure the user installing Robin CNS is the Cluster Administrator within the Kubernetes cluster.
2.1.7. Port and access requirements
If you are installing Robin CNS on any platform, the following ports need to be accessible for the installation to succeed and for Robin to operate correctly:
Ports |
Description |
29442 - 29470 |
Robin services |
These ports are not mandatory for Robin CNS installations but are necessary when applications have to be made accessible outside of the IKS cluster.
Note
The above list of ports also apply to on-premises clusters. For the cloud platforms, when creating each rule to make the port accessible ensure that the protocol is TCP. In addition the cloud nodes should be able to communicate with one another on all ports via the IPv4 protocol.
Detailed below are the resources to manage ports and access requirements:
GCP
Ports can be made accessible via firewall rules on GCP. Details on how to create appropriate firewall rules can be found here.
Instances on which Robin will be installed need to have full access to cloud APIs. This can be set during instance creation.
2.1.8. Supported Volumes Types
The following are the supported volume types:
GCP: pd-ssd, pd-standard
Google Anthos : independent-persistent
2.1.9. Storage requirements
The disks available for use by Robin CNS should meeting the following requirements:
A minimum of 25 GB of disk size is required for Robin CNS usage
Should not have any filesystem
Should not have any partitions created on the disk. If the partitions should be used for robin storage, there are manual steps involved to make this work.
Robin recommends having direct access to the storage disks without RAID controller in between. If RAID is to be used and caching is enabled at RAID controller level, then cache should be battery backed. This is to guarantee data consistency when power goes off. Overall, Robin does not recommend using RAID configuration and is discussed in more detail at here.
Note
Within the cluster, there needs to be at least one disk available for use by Robin CNS.
2.1.10. Tolerations requirements
Robin CNS provides tolerations for the following DaemonSets:
Robin
CSI-nodeplugin
Note
These DaemonSets can now tolerate any taint.
As a result, you can now deploy Robin CNS on control plane nodes with master tolerations.
2.1.11. Node Selector
To Install Robin CNS on only selected worker nodes, you must add labels to nodes before installation and pass those labels to the node-selector field of the installer.
Example:
# kubectl label nodes <node1> <node2> key1=value1

# ./install-robin.sh --node-selector="key1:value1"
2.2. Install options
You can specify the install parameters for Robin CNS in the following ways:
In
robin.yamlfileWith Robin installer command
Note
The robin.yaml file has more install parameters than the Robin installer command ./install-robin.sh.
2.2.1. Specify parameters in robin.yaml
The robin.yaml file enables you to provide the install options for Robin CNS. You can use the robin.yaml file to pass configuration details for hosts. To install Robin CNS, you need to specify the robin.yaml file in the --cr or -f option of the Robin install command ./install-robin.sh. The robin.yaml file has more install options than the Robin installer command.
The following is the format of robin.yaml file. You can use the following format to include any configurable option in the robin.yaml file.
apiVersion: manage.robin.io/v2
kind: RobinCluster
metadata:
  name: robin
  namespace: robinio
  labels:
    app.kubernetes.io/instance: robin
    app.kubernetes.io/managed-by: robin.io
    app.kubernetes.io/name: robin
spec:
  image_robin: <Robin_CNS_image> # for example, robinsys/robinimg:6.1.0-202
  k8s_provider: K8S_PROVIDER # possible values openshift,eks,gke,aks,iks,rke,upstream,anthos
  host_type: HOST_TYPE # possible values physical,ec2,gcp,azure,ibm
  namespace: NAMESPACE
  reporting_secret: REPORTING_SECRET
  source: DEPLOYMENT_SOURCE
  image_ubbagent: <UBB_agent_image> # for exapmle, robinsys/ubbagent:5.4.4-ent-1
  image_nfs_server: <NFS_server_image> # for example, robinsys/nfs-server:v6.5
  image_puller: <Robin_image_puller> # for example, robinsys/robin-image-puller:v1
  # image_registry_path: IMAGE_REGISTRY_PATH
  # image_pull_secret: IMAGE_PULL_SECRET
  # use_registry_for_csi: true  # Use image registry for CSI sidecar images (default: true)
  # options:
    # skip_csi_deploy: "1"       # Skip CSI deployment at install (default: 0)
    # robinlog_dir: ROBINLOG_DIR # Path where robin logs should be stored on the host, default: /home/robinds
    # robincrash_dir: ROBINCRASH_DIR # Path where robin crash are stored on the host, default: /home/robinds
    # robinds_dir: ROBINDS_DIR # Path where robin database will be storaed on the host, default: /home/robinds
    # cloud_cred_secret: CLOUD_CRED_SECRET
    # robin_devmode: "true"
    # generate_password: "true"
    # vault_addr: "VAULT_ADDR" # VAULT_CONFIG
    # vault_robin_keys_path: "VAULT_ROBIN_KEYS_PATH" # VAULT_CONFIG
    # vault_token: "VAULT_TOKEN" # VAULT_CONFIG
    # vault_skip_verify: "VAULT_SKIP_VERIFY" # VAULT_CONFIG
    # vault_namespace: "VAULT_NAMESPACE" # VAULT_CONFIG
    # ibm_iam_endpoint: IBM_IAM_EP
    # ibm_iaas_base_endpoint: IBM_IAAS_EP
    # ibm_containers_base_endpoint: IBM_CONTAINERS_BASE_EP
    # kms_endpoint: "KMS_ENDPOINT" # IBMPROTECT_CONFIG
    # ibmprotect_instance_id: "IBMPROTECT_INSTANCE_ID" # IBMPROTECT_CONFIG
    # http_proxy: HTTP_PROXY
    # https_proxy: HTTPS_PROXY
    # ftp_proxy: FTP_PROXY
    # proxy_certificate: PROXY_CERTIFICATE_PATH
    # gcp_key_secret: GCP_KEY_FILE
    # skip_k8s_auto_registration: "SKIP_K8S_AUTO_REGISTRATION"
    # auto_move_disks: "AUTO_MOVE_DISKS"
    # auto_add_storage_disks: "AUTO_ADD_STORAGE_DISKS"
    # disk_discovery: "DISK_DISCOVERY"
    # pv_folder_path: "PV_FOLDER_PATH"
    # pv_sc_name: "PV_SC_NAME"
    # pv_labels: "PV_LABELS"     # Should be robin.io/enabled:true
    # skip_setup_iptables: "1" # If this option is set, robin will not open required ports
    # csi_attacher_max_backoff: "ATTACHER_BACKOFF"
    # storage_encryption_enabled: "1"
    # fast_failover_enabled: "0"
    # nfs_watchdog_enabled: "1"
    # session_read_only_timeout: "60"
    # exit_on_read_only_exception: "1"
    # disable_external_service: "0"
    # robin_image_registry_prefix: IMAGE_REGISTRY_PATH
    # image_pull_secret: IMAGE_PULL_SECRET
  # patroni_options:
    # volume_size: "VOLUME_SIZE" # default value 10GB
    # storage_class: "STORAGE_CLASS" # default value local-storage
    # patroni_dir: "PATRONI_DIR" # default value /home/robinds/var/lib/pgsql/patroni
    # cpu_requests: "CPU_REQUESTS" # default 100m
    # cpu_limits: "CPU_LIMITS" # default 500m
    # memory_requests: "MEMORY_REQUESTS" # default 4G
    # memory_limits: "MEMORY_LIMITS" # default 4G
    # skip_postgres_operator: "1"
  # patroni_advanced_options:
    # PATRONI_ADVANCED_OPTIONS
  # storage_disks: STORAGE_DISKS
  # node_selector:
    # NODE_SELECTOR
  # tolerations:
    # DS_TOLERATIONS
  # kms: k8s/google/vault/ibmprotect
  # kms_keyring: "KEYRING_NAME"
  # kms_keyname: "KEY_NAME"
  # kms_location: "KMS_LOCATION"
  # ports:
    # SERVER_REST_PORT: 29442
  # images:
    # csi-attacher: k8s.gcr.io/sig-storage/csi-attacher:v4.3.0
    # csi-provisioner: k8s.gcr.io/sig-storage/csi-provisioner:v3.5.0
    # csi-node-driver-registrar: k8s.gcr.io/sig-storage/csi-node-driver-registrar:v2.8.0
    # livenessprobe: k8s.gcr.io/sig-storage/livenessprobe:v2.10.0
    # csi-resizer: k8s.gcr.io/sig-storage/csi-resizer:v1.8.0
    # csi-snapshotter: k8s.gcr.io/sig-storage/csi-snapshotter:v6.2.2
    # snapshot-controller: k8s.gcr.io/sig-storage/snapshot-controller:v6.2.2
  # adc_configuration_configmap_name: "ADC_CONFIGURATION_CONFIGMAP_NAME"
  # workload_identity_pool: "WORKLOAD_IDENTITY_POOL"
  # custom_config:
    # robin-patroni:  # PostgreSQL Patroni StatefulSet
      # node_selector:
        # PATRONI_NODE_SELECTOR
      # tolerations:
        # PATRONI_TOLERATIONS
      # annotations:
        # PATRONI_ANNOTATIONS
        # container.apparmor.security.beta.kubernetes.io/postgres: localhost/robin-apparmor
    # postgres-operator:  # PostgreSQL Operator Deployment
      # node_selector:
        # NODE_SELECTOR
      # tolerations:
        # TOLERATIONS
      # containers:
        # postgres-operator:
          # resources:
            # limits:
              # cpu: <cpu_limits>
              # memory: <memory_limits>
            # requests:
              # cpu: <cpu_requests>
              # memory: <memory_requests>
          # security_context:
            # CONTAINER_SECURITY_CONTEXT
            # appArmorProfile:
                # localhostProfile: robin-apparmor
                # type: Localhost
    # robin-master:  # Robin Master Deployment
      # node_selector:
        # MASTER_NODE_SELECTOR
      # tolerations:
        # MASTER_TOLERATIONS
      # security_context:
        # POD_SECURITY_CONTEXT
        # appArmorProfile:
            # localhostProfile: robin-apparmor
            # type: Localhost
      # init_containers:
        # robincerts:
          # resources:
            # limits:
              # cpu: <cpu_limits>
              # memory: <memory_limits>
            # requests:
              # cpu: <cpu_requests>
              # memory: <memory_requests>
      # containers:
        # robinrcm:
          # resources:
            # limits:
              # cpu: <cpu_limits>
              # memory: <memory_limits>
            # requests:
              # cpu: <cpu_requests>
              # memory: <memory_requests>
          # security_context:
            # CONTAINER_SECURITY_CONTEXT
    # robin-worker:  # Robin Agent/Worker DaemonSet
      # node_selector:
        # NODE_SELECTOR
      # tolerations:
        # TOLERATIONS
      # security_context:
        # POD_SECURITY_CONTEXT
        # appArmorProfile:
            # localhostProfile: robin-apparmor
            # type: Localhost
      # init_containers:
        # robincerts:
          # resources:
            # limits:
              # cpu: <cpu_limits>
              # memory: <memory_limits>
            # requests:
              # cpu: <cpu_requests>
              # memory: <memory_requests>
      # containers:
        # robinrcm:
          # resources:
            # limits:
              # cpu: <cpu_limits>
              # memory: <memory_limits>
            # requests:
              # cpu: <cpu_requests>
              # memory: <memory_requests>
          # security_context:
            # CONTAINER_SECURITY_CONTEXT
    # robin-iomgr:  # Robin IOMgr DaemonSet
      # node_selector:
        # NODE_SELECTOR
      # tolerations:
        # TOLERATIONS
      # security_context:
        # POD_SECURITY_CONTEXT
        # appArmorProfile:
            # localhostProfile: robin-apparmor
            # type: Localhost
      # init_containers:
        # robincerts:
          # resources:
            # limits:
              # cpu: <cpu_limits>
              # memory: <memory_limits>
            # requests:
              # cpu: <cpu_requests>
              # memory: <memory_requests>
      # containers:
        # iomgr:
          # resources:
            # limits:
              # cpu: <cpu_limits>
              # memory: <memory_limits>
            # requests:
              # cpu: <cpu_requests>
              # memory: <memory_requests>
          # security_context:
            # CONTAINER_SECURITY_CONTEXT
    # robin-tcmuproxy:  # Robin TCMU Proxy DaemonSet
      # node_selector:
        # NODE_SELECTOR
      # tolerations:
        # TOLERATIONS
      # security_context:
        # POD_SECURITY_CONTEXT
        # appArmorProfile:
            # localhostProfile: robin-apparmor
            # type: Localhost
      # containers:
        # tcmu:
          # resources:
            # limits:
              # cpu: <cpu_limits>
              # memory: <memory_limits>
            # requests:
              # cpu: <cpu_requests>
              # memory: <memory_requests>
          # security_context:
            # CONTAINER_SECURITY_CONTEXT
    # csi-nodeplugin-robin:  # CSI Node Plugin DaemonSet
      # node_selector:
        # NODE_SELECTOR
      # tolerations:
        # TOLERATIONS
      # security_context:
        # POD_SECURITY_CONTEXT
        # appArmorProfile:
            # localhostProfile: robin-apparmor
            # type: Localhost
      # init_containers:
        # robincerts:
          # resources:
            # limits:
              # cpu: <cpu_limits>
              # memory: <memory_limits>
            # requests:
              # cpu: <cpu_requests>
              # memory: <memory_requests>
      # containers:
        # driver-registrar:
          # security_context:
            # CONTAINER_SECURITY_CONTEXT
        # robin:
          # resources:
            # limits:
              # cpu: <cpu_limits>
              # memory: <memory_limits>
            # requests:
              # cpu: <cpu_requests>
              # memory: <memory_requests>
          # security_context:
            # CONTAINER_SECURITY_CONTEXT
    # csi-attacher-robin:  # CSI Attacher Deployment
      # node_selector:
        # NODE_SELECTOR
      # tolerations:
        # TOLERATIONS
      # security_context:
        # POD_SECURITY_CONTEXT
        # appArmorProfile:
            # localhostProfile: robin-apparmor
            # type: Localhost
      # containers:
        # csi-attacher:
          # security_context:
            # CONTAINER_SECURITY_CONTEXT
        # robin:
          # resources:
            # limits:
              # cpu: <cpu_limits>
              # memory: <memory_limits>
            # requests:
              # cpu: <cpu_requests>
              # memory: <memory_requests>
          # security_context:
            # CONTAINER_SECURITY_CONTEXT
        # liveness-probe:
          # security_context:
            # CONTAINER_SECURITY_CONTEXT
    # csi-provisioner-robin:  # CSI Provisioner Deployment
      # node_selector:
        # NODE_SELECTOR
      # tolerations:
        # TOLERATIONS
      # security_context:
        # POD_SECURITY_CONTEXT
        # appArmorProfile:
            # localhostProfile: robin-apparmor
            # type: Localhost
      # containers:
        # csi-provisioner:
          # security_context:
            # CONTAINER_SECURITY_CONTEXT
        # robin:
          # resources:
            # limits:
              # cpu: <cpu_limits>
              # memory: <memory_limits>
            # requests:
              # cpu: <cpu_requests>
              # memory: <memory_requests>
          # security_context:
            # CONTAINER_SECURITY_CONTEXT
        # liveness-probe:
          # security_context:
            # CONTAINER_SECURITY_CONTEXT
    # csi-resizer-robin:  # CSI Resizer Deployment
      # node_selector:
        # NODE_SELECTOR
      # tolerations:
        # TOLERATIONS
      # security_context:
        # POD_SECURITY_CONTEXT
        # appArmorProfile:
            # localhostProfile: robin-apparmor
            # type: Localhost
      # containers:
        # csi-resizer:
          # security_context:
            # CONTAINER_SECURITY_CONTEXT
        # robin:
          # resources:
            # limits:
              # cpu: <cpu_limits>
              # memory: <memory_limits>
            # requests:
              # cpu: <cpu_requests>
              # memory: <memory_requests>
          # security_context:
            # CONTAINER_SECURITY_CONTEXT
        # liveness-probe:
          # security_context:
            # CONTAINER_SECURITY_CONTEXT
    # csi-snapshotter-robin:  # CSI Snapshotter Deployment
      # node_selector:
        # NODE_SELECTOR
      # tolerations:
        # TOLERATIONS
      # security_context:
        # POD_SECURITY_CONTEXT
        # appArmorProfile:
            # localhostProfile: robin-apparmor
            # type: Localhost
      # containers:
        # csi-snapshotter:
          # security_context:
            # CONTAINER_SECURITY_CONTEXT
        # robin:
          # resources:
            # limits:
              # cpu: <cpu_limits>
              # memory: <memory_limits>
            # requests:
              # cpu: <cpu_requests>
              # memory: <memory_requests>
          # security_context:
            # CONTAINER_SECURITY_CONTEXT
    # robin-patroni-monitor:    # PostgreSQL Patroni Monitor Deployment
      # node_selector:
        # NODE_SELECTOR
      # tolerations:
        # TOLERATIONS
      # security_context:
        # POD_SECURITY_CONTEXT
        # appArmorProfile:
            # localhostProfile: robin-apparmor
            # type: Localhost
      # containers:
        # patroni-monitor:
          # resources:
            # limits:
              # cpu: <cpu_limits>
              # memory: <memory_limits>
            # requests:
              # cpu: <cpu_requests>
              # memory: <memory_requests>
          # security_context:
            # CONTAINER_SECURITY_CONTEXT
Note
To configure AppArmor profile for Robin components except robin-patroni and postgres-operator for Ubuntu 24 OS, you must specify AppArmor profiles at Pod level using the security_context key. For robin-patroni component, you must specify AppArmor profile at Pod level using the annotations key. For postgres-operator component, you must specify AppArmor profile at container level using the security_context key. For more informaion, see Configure a Security Context for a Pod or Container.
Each option shown above is described below alongside whether or not they must to be present in the YAML file.
|
Required |
Name and version of the Robin CNS image as per docker registry. The format of Robin CNS image: |
|
Required |
Name of the Kubernetes distribution. The following values are supported:
|
|
Required |
Type of host on which the Kubernetes distribution is running. The following values are supported:
|
|
Required |
Namespace in which all Robin CNS-related objects will be spawned. Default value: |
|
Required |
Secret name created for the license key generated by Google marketplace pertaining to the service account. |
|
Required |
Source of deployment yaml. Only specify this value if Robin CNS is deployed through one of the following portals: |
|
Required |
Version of UBB agent image. The format of the UBB agent image: |
|
Required |
Version of NFS server image. The format of the NFS server image: |
|
Optional |
Path to the registry from which images will be pulled. |
|
Optional |
K8s secret containing the credentials to pull images. |
|
Optional |
Path to the directory where Robin logs will be stored on the host. Default value: |
|
Optional |
Path to the directory where Robin crash logs will be stored on the host. Default value: |
|
Optional |
Path to the directory where Robin database will be stored on the host. Default value: |
|
Required |
Name of secret containing cloud specific credentials. This is required for Azure and IBM, optional for AWS if EC2 instances are configured with the necessary IAM roles, and optional for GCP deployments. |
|
Optional |
Automatically generate the random password for the admin user. To know the generated password for the admin user, run the following command: # kubectl get secret --namespace robinio
default-admin-user -o jsonpath="
{.data.password}" | base64 --decode; echo
If this option is not provided, then the default password for the admin user will be |
|
Optional |
URL of the Vault server. The format of the Vault address: |
|
Optional |
Path to the folder where the key for Robin CNS is stored. |
|
Optional |
Token for the Vault server. |
|
Optional |
Skip the verification for the Vault server. |
|
Optional |
Namespace where the Vault server is deployed. |
|
Optional |
Proxy server to be used for cloud APIs over HTTP. By default, it is not set. |
|
Optional |
Proxy server to be used for cloud APIs over HTTPS. By default, it is not set. |
|
Optional |
Proxy server to be used for cloud APIs over FTP. By default, it is not set. |
|
Optional |
Certificate for the Proxy server. |
|
Optional |
Key secret for Google Cloud Platform (GCP). |
|
Optional |
Skip the auto registration of the created applications to the Robin CNS. Apps created will not get auto-registered in Robin CNS. Default value: |
|
Optional |
Enable automatically attach/detach of disks on cloud-based clusters when nodes become unreachable. Default value: |
|
Optional |
Add storage disks to the cluster automatically. Default value: The following are the valid values:
|
|
Optional |
Type of disk-discovery to be used by Robin CNS for storage. Default value: The following are the valid values:
|
|
Optional |
Path to PV folder. |
|
Optional |
Name of StorageClass for PV. |
|
Optional |
Labels for PV. Example: |
|
Optional |
Skip to set up IP tables rule. If this option is set, Robin will not open the required ports. |
|
Optional |
Set the backoff time for CSI attacher Pods. Example: |
|
Optional |
Skip deployment of CSI components and Robin StorageClasses during installation. Default value: Valid values:
Use this option when CSI components and Robin StorageClasses should not be deployed on the cluster. Example: |
|
Optional |
Enable to secure the in-transit data while transferring from one node to another node. By default, this option is disabled. |
|
Optional |
Disable auto fast failover of Pods that use Robin Storage. By default, this option is enabled. |
|
Optional |
Disk for storage. If disks need to be provisioned as part of the installation, a string containing the count, type and size (in GB) of each disk can be specified. Valid disk types for GCP based machines include: |
|
Optional |
Specify a selector to pick the nodes on which Robin CNS should be installed. For OpenShift v3 specify “node-role.kubernetes.io/compute=true” or for OpenShift v4 specify “node-role.kubernetes.io/master=’’” |
|
Optional |
Specify a selector to pick the node for the master node role on which Robin CNS should be installed and Patroni instance will come up.
Example: |
|
Optional |
This parameter is applicable to Patroni PV creation. Specify this parameter to schedule Patroni Pods on nodes with labels for Patroni. It will create Patroni Pods on the nodes with local PV. Example: |
|
Optional |
Tolerations for Robin DaemonSet Pods to be deployed on nodes with master taints |
|
Optional |
Specify this parameter if any nodes have a taint for Patroni pods and you want the Robin Patroni Pods to scheduled on that node.
Note: You must add the custom Patroni tolerations after the default Patroni tolerations as provided in the |
|
Optional |
Specify this parameter if a master node has a taint for pods and you want Robin to schedule Pods on that node.
Note: You must add the custom master tolerations after the default master tolerations as provided in the |
|
Optional |
Name of the key management service to use. The following are the valid values:
|
|
Optional |
Name of the keyring associated with the KMS if Google KMS is provided. |
|
Optional |
Customize ports for using Robin services. |
|
Optional |
Request resource for Robin Pods. |
|
Optional |
Set resource limits for Robin Pods. |
|
Optional |
Enable or disable |
Patroni options |
||
|
Optional |
The size of the volume for one replica, default value: |
|
Optional |
Storage class for the PV. Default and only supported value is |
|
Optional |
Local directory to be used if storage class is |
|
Optional |
CPU requests for each Patroni Pod. Default value: |
|
Optional |
CPU limits for each Patroni Pod. Default value: |
|
Optional |
Memory requests for each Patroni Pod. Default value: |
|
Optional |
Memory limits for each Patroni Pod. Default value: |
|
Optional |
Use this parameter if Zalando Postgres operator is already installed on your cluster. If the value is set to 1, Robin CNS install or upgrade operation skips Postgres operator installation.
Note: You must make sure that the existing Zalando Postrgres operator is running version 1.10.0 or higher.
With the install script, you can use the |
Images |
||
|
Optional |
Version of CSI attacher image. Example: csi-attacher: k8s.gcr.io/sig-storage/csi-attacher:v4.3.0 |
|
Optional |
Version of CSI provisioner image. Example: csi-provisioner: k8s.gcr.io/sig-storage/csi-provisioner:v3.5.0 |
|
Optional |
Version of CSI node driver image. Example: csi-node-driver-registrar: k8s.gcr.io/sig-storage/csi-node-driver-registrar:v2.8.0 |
|
Optional |
Version of Liveness probe image. Example: livenessprobe: k8s.gcr.io/sig-storage/livenessprobe:v2.10.0 |
|
Optional |
Version of CSI resizer image. Example: csi-resizer: k8s.gcr.io/sig-storage/csi-resizer:v1.8.0 |
|
Optional |
Version of CSI snapshotter image. Example: csi-snapshotter: k8s.gcr.io/sig-storage/csi-snapshotter:v6.2.2 |
|
Optional |
Version of Snapshot controller image. Example: snapshot-controller: k8s.gcr.io/sig-storage/snapshot-controller:v6.2.2 |
Custom Pod configuration for Robin components
The custom_config field in the robin.yaml file allows customization of individual Robin component Pods. You can configure tolerations, node selectors, Pod and container security contexts, resource requests/limits, and Pod annotations independently for each component.
Note
The custom_config field is supported only in manage.robin.io/v2 CRs. Ensure your RobinCluster CR uses apiVersion: manage.robin.io/v2 before using this feature.
Supported Robin components:
Component key |
Description |
|
PostgreSQL Patroni StatefulSet |
|
PostgreSQL Operator Deployment |
|
Robin Master Deployment |
|
Robin Agent/Worker DaemonSet |
|
Robin IOMgr DaemonSet |
|
Robin TCMU Proxy DaemonSet |
|
CSI Node Plugin DaemonSet |
|
CSI Attacher Deployment |
|
CSI Provisioner Deployment |
|
CSI Resizer Deployment |
|
CSI Snapshotter Deployment |
|
PostgreSQL Patroni Monitor Deployment |
Configurable fields per component:
tolerations- Add Pod tolerations to schedule component Pods on tainted nodes.node_selector- Constrain component Pods to nodes matching specific labels.security_context- Set Pod-level security context such asrunAsUser,runAsGroup,fsGroup, andAppArmor profile.annotations- Add annotations for Pods. Note: To enableAppArmor profileforrobin-patronicomponent, use this annotation key.init_containers- Add init container for components (keyed by name).containers- Add containers for components (keyed by name).
Each entry under init_containers and containers is keyed by the container name and supports the following:
security_context— Add container-level security context. Note: To enableAppArmor profileforpostgres-operatorcomponent, use thissecurity_contextkey at container level.resources— Addrequestsandlimitsforcpuandmemory.
Example:
custom_config:
  robin-patroni:
    annotations:
      container.apparmor.security.beta.kubernetes.io/patroni: runtime/default
  robin-master:
    node_selector:
      kubernetes.io/os: linux
    containers:
      robinrcm:
        resources:
          requests:
            cpu: "500m"
            memory: "2Gi"
          limits:
            cpu: "2"
            memory: "8Gi"
  robin-worker:
    tolerations:
      - key: dedicated
        operator: Equal
        value: storage
        effect: NoSchedule
    security_context:
      runAsNonRoot: false
  robin-iomgr:
    containers:
      iomgr:
        security_context:
          allowPrivilegeEscalation: false
2.2.2. Specify parameters with Robin installer
The following parameters can be specified with the Robin CNS install command ./install-robin.sh:
Parameter |
Description |
|---|---|
|
Access key for Amazon web service (AWS). |
|
Secret key for AWS. |
|
App ID for Azure. |
|
Tenant ID for Azure. |
|
Cluster name of Google Kubernetes Engine (GKE). |
|
Zone name where GKE cluster is running. |
|
Generate a yaml. |
|
Path to |
|
Specify a selector to pick up the nodes on which Robin CNS will be installed. |
|
Path to the registry where Robin images are stored. |
|
K8s secret containing the credentials to pull images. |
|
Skip the load balancer. |
|
Disk for storage. If disks need to be provisioned as part of the installation, a string containing the count, type and size (in GB) of each disk can be specified. Valid disk types for GCP based machines include: |
|
Uninstall Robin CNS. |
|
Upgrade Robin CNS. |
|
Version of Robin CNS. |
|
Do not prompt the user for confirmation of evacuation. |
|
URL of the Vault server. The format of the Vault address: |
|
Path to the folder where the key for Robin CNS is stored in the Vault Server. |
|
Token for the Vault server. |
|
Path to the CA certificate for the Vault server. |
|
Path to the client certificate for the Vault server. |
|
Path to the key of the client certificate for Vault server. |
|
Namespace in which Vault server is installed. |
|
Skip verification of Vault server. Default value: |
|
Keyring name associated with the key management service (KMS) if Google KMS is provided. |
|
Path to the JSON file containing the Service account key for the appropriate Service Account on Google Cloud. |
|
Path to certificate of the Proxy server. |
|
Path to registry to pull Robin images. |
|
Check TCMU kernel module and network ports required by CNS. |
|
Check the Kernel version. |
|
Type of node’s IP address. Default value: |
|
Creates a tar of logs files. |
|
Path to the folder where Robin database will be stored on the host. Default: |
|
Path to the folder where Robin logs will be stored on the host. Default: |
|
Path to the folder where Robin crash logs will be stored on the host. Default: |
|
Skip auto registration of the created applications to the Robin CNS. Apps created will not get auto-registered in Robin CNS. Default value: |
|
Execute prechecks on nodes before installing Robin CNS. |
|
Skip to move storage disks automatically. |
|
Skip to add storage disks automatically to Robin CNS. |
|
Validate all nodes of the cluster. |
|
Type of disk-discovery to be used by Robin CNS for storage. Default value:
|
|
Name of StorageClass for PV. |
|
Path to PV folder. |
|
Labels for PV. For example, |
|
Secret name created for the license key generated by Google marketplace pertaining to the service account. |
|
Automatically generates the random password for the admin user. To know the generated password for the admin user, run the following command: # kubectl get secret --namespace robinio
default-admin-user -o jsonpath="{.data.password}"
| base64 --decode; echo
If this option is not provided, then the default password for the admin user will be Robin123. |
|
Skip to set up IP tables rule. If this option is set, Robin will not open the required ports. |
|
Specify a selector to pick the node for the master node role on which Robin CNS should be installed and Patroni instance will come up. You can label a node and use the label to select the node. For example, –master-node-selector=”color:red,org:robin” |
|
Enables mTLS enabled metadata encryption in transit. |
|
Use this option if Zalando Postgres operator is already installed on your cluster. |
Note
The robin.yaml file has more install parameters than the Robin installer command.
2.3. Pre-install Checks
Robin CNS provides the automatic pre-installation checks feature. You can run these checks before installing Robin CNS.
The Pre-installation checks are done at the cluster level and node level.
Cluster Level Checks
The following are the cluster-level checks:
Supported Kubernetes distribution.
Minimum CPU
Minimum memory
Node Level Checks
Checks whether the following Kernel modules are present: - tcm_loop - target_core_user
To run the pre-install checks, run the following command:
./install-robin.sh --execute-prechecks
Example
# ./install-robin.sh --execute-prechecks --repo=robineng
Creating robin-precheck namespace and service account ............ Done
Creating cluster-wide prechecks job ............ Done
Creating node prechecks daemonset ............ Done
Waiting for prechecks to complete ............ Done
Generating precheck report ............ Done
Cleaning up precheck deployments ............ Done

Cluster/Node prechecks report is generated at /tmp/cns-prechecks-report-1685433893.txt .
(Note: please use cat or less -R to view the file)

CLUSTER WIDE PRECHECKS

Checking kubernetes distribution (GKE IKS AKS RKE OpenShift) ......  OK
Checking minimum memory (each node should have minimum 4Gi memory) ......  OK
Checking minimum cpus (each node should have minimum 4 cpus) ......  OK

NODE hypervvm-72-42.robinsystems.com PRECHECKS

Checking target_core_user kernel module ......  OK
Checking tcm_loop kernel module ......  OK

NODE hypervvm-72-44.robinsystems.com PRECHECKS

Checking target_core_user kernel module ......  OK
Checking tcm_loop kernel module ......  OK

NODE hypervvm-72-45.robinsystems.com PRECHECKS

Checking target_core_user kernel module ......  OK
Checking tcm_loop kernel module ......  OK
2.3.1. Disable robin-master-ext Service before installing or upgrading
The robin-master-ext service allows you to access the Robin CLI without accessing any of the Robin pods or logging into the Robin cluster and access the cluster
using the CNS GUI. For more information, see Manage External Master service.
Note
If you do not want to use this service, you can disable it before install or upgrade using the disable_external_service option available in the robin.yaml file. The robin.yaml file is part of the Robin CNS tar file.
To disable the robin-master-ext service, complete the following steps:
Open the
robin.yamlfile using any text editor, such as vim, to edit the file.If any configurable options are commented out, uncomment them.
Change the value for the
disable_external_serviceoption to1.Save the changes to the robin.yaml file.
Run the following command to verify:
kubectl get svc -n robinio
In the command output, the robin-master-ext service should no longer be listed.
2.4. Install on Google Anthos
Anthos is a managed platform from Google that allows for the unification of multiple environments across on-premises, edge, and in multiple public clouds with a Google Cloud-backed control plane. Robin Cloud Native Storage is available as an offering to bring enterprise grade Storage and Data Management capabilities to run Stateful applications on Anthos. You can download Robin CNS software and install using a shipped installation script or install it manually via the CLI. In this section we will cover both.
Note
You can install Robin CNS on a Google Anthos cluster with IPv4/IPv6 dual-stack networking. For more information, see IPv4/IPv6 dual-stack networking. The prerequisites and steps for installing Robin CNS on the Cloud also apply to Google Anthos installed on a bare metal setup.
2.4.1. Prerequisites
All general prequisites detailed here must be met.
The ports detailed here need to be accessible for the installation to succeed and for Robin to operate correctly.
Ensure the user installing Robin CNS is the Cluster Administrator within the Kubernetes cluster. For Anthos installations, run following commands to add a user as a Cluster Administrator:
$ account=$(gcloud info | grep Account  | awk -F'[\\[\\]]' '{print $2}')

$ kubectl create clusterrolebinding robin-cluster-admin-binding --clusterrole=cluster-admin --user=$account
2.4.2. Install using Robin Installer
Follow the steps below to get and install Robin CNS for Google Anthos.
Contact Robin Support team for Robin CNS software binaries.
After getting the Robin CNS from the support team, run the following command to untar the contents into a new directory.
$ mkdir -p ./robin && tar -xf robin-install.tar -C ./robin
Move into the newly created directory, such that it is now your current working directory, and install Robin CNS via the following command:
Note
To customize the installation with more parameters, see the various installation parameters detailed here.
# cd robin
# ./install-robin.sh -y
Validating Kubernetes cluster......Done

Confirm that ports 29442-29470 are open between kubernetes nodes
Make sure the cluster meets prerequisites mentioned at https://docs.robin.io/latest/install.html#minimum-node-requirements
Type yes to confirm that cluster meets the prerequisites:
yes
Validating kubernetes cluster permissions......Done
Validating robin cluster yaml......Done
Installing Robin operator...........Done
Installing Robin cluster............secret/cloud-cred-secret created
Done
Setting up robin client............Done

Activate robin license............Required

       # robin license activate --userid <USERID>

       Note: You can get your User ID after registering on https://get.robin.io. Above command will only work if the host on which the
             ROBIN client is running on has an internet connection. If this is not the case please retrieve the license key by using the
             below link and apply it using the command 'robin license apply <key>'.

             https://get.robin.io/activate?clusterid=

      For logging into robin cluster,
      Default username: admin
      Default password: Robin123
This concludes the install. Continue here to verify the installation and set up the product.
2.4.3. Install via CLI
Follow the steps below to manually install Robin CNS for Google Anthos using CLI commands.
Clone the
robin-storagerepository using the command shown below:$ git clone https://github.com/RobinSystems/robin-storage-gke-marketplace.git Cloning into 'robin-storage-gke-marketplace'... remote: Enumerating objects: 142, done. remote: Counting objects: 100% (12/12), done. remote: Compressing objects: 100% (11/11), done. remote: Total 142 (delta 2), reused 9 (delta 1), pack-reused 130 Receiving objects: 100% (142/142), 84.59 KiB | 0 bytes/s, done. Resolving deltas: 100% (64/64), done.
Move into the newly created directory, such that it is now your current working directory, and create the application CRD within the Anthos cluster if it is not already available with the following command:
$ cd robin-storage-gke-marketplace/
$ kubectl apply -f app-crd.yaml
customresourcedefinition.apiextensions.k8s.io/applications.app.k8s.io configured
Create the
robinionamespace if it is not present using the below command:$ export NAMESPACE=robinio $ kubectl create ns ${NAMESPACE} namespace/robinio createdVisit the following link and download a license key from the Deploy via Command Line tab.
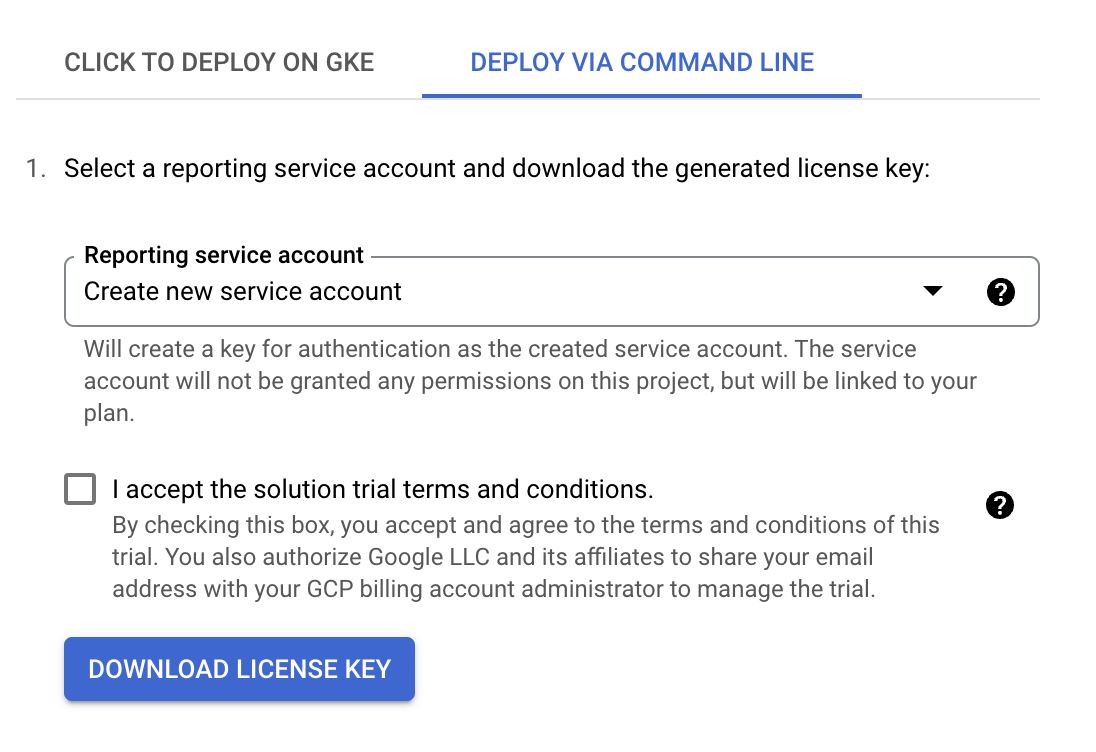
Once the license key is downloaded, run the below command to apply it.
$  kubectl apply -f license.yaml -n robinio
secret/robin-cns-license-335206 created

$ export REPORTING_SECRET="robin-cns-license-335206"
Note
The value for the
REPORTING_SECRETenvironment variable should be the name of the Kubernetes secret created after the license YAML is applied.Run the following commands in order to setup the appropriate variables, apply the necessary YAML files and install Robin:
$ export APP_INSTANCE_NAME=robin
$ export HOST_TYPE=physical
$ export TAG=5.3.10
$ export IMAGE_ROBIN_OPERATOR="gcr.io/robinio-public/robin-storage/robin-operator:${TAG}"
$ export IMAGE_ROBIN="gcr.io/robinio-public/robin-storage:${TAG}"
$ export IMAGE_UBBAGENT="gcr.io/robinio-public/robin-storage/ubbagent:${TAG}"
$ export IMAGE_ROBIN_DEPLOYER="gcr.io/robinio-public/robin-storage/deployer:${TAG}"
$ export IMAGE_CRJOB="gcr.io/robinio-public/robin-storage/crjob:${TAG}"
$ export CLUSTER_REQUIREMENTS="yes"
$ export STORAGE_DISKS=""
$ export ROBINDS_DIR="/home/robinds"
$ export ROBINLOG_DIR="/home/robinds"
$ export ROBINCRASH_DIR="/home/robinds"
$ export UPDATE_COREDNS="0"
$ export DNS_SERVICE="kube-system/kube-dns"

$ awk 'FNR==1 {print "---"}{print}' sa.yaml.template | envsubst '$APP_INSTANCE_NAME $NAMESPACE $IMAGE_ROBIN_OPERATOR $IMAGE_ROBIN $SERVICE_ACCOUNT $IMAGE_PROVISIONER_V04 $IMAGE_PROVISIONER_V10 $REPORTING_SECRET $IMAGE_UBBAGENT $IMAGE_ROBIN_DEPLOYER $CLUSTER_REQUIREMENTS $STORAGE_DISKS $HOST_TYPE $IMAGE_CRJOB $UPDATE_COREDNS $DNS_SERVICE' > "sa_manifest.yaml"

$ kubectl apply -f "sa_manifest.yaml" --namespace "${NAMESPACE}"
serviceaccount/robin-deployer-sa created
clusterrole.rbac.authorization.k8s.io/robin:robinio:deployer-cr0 created
clusterrolebinding.rbac.authorization.k8s.io/robin:robinio:deployer-crb0 created

$ export SERVICE_ACCOUNT="${APP_INSTANCE_NAME}-deployer-sa"

$ awk 'FNR==1 {print "---"}{print}' manifest/*   | envsubst '$APP_INSTANCE_NAME $NAMESPACE $IMAGE_ROBIN_OPERATOR $IMAGE_ROBIN $SERVICE_ACCOUNT $IMAGE_PROVISIONER_V04 $IMAGE_PROVISIONER_V10 $REPORTING_SECRET $IMAGE_UBBAGENT $IMAGE_ROBIN_DEPLOYER $CLUSTER_REQUIREMENTS $STORAGE_DISKS $HOST_TYPE $ROBINDS_DIR $ROBINLOG_DIR $ROBINCRASH_DIR $IMAGE_CRJOB $UPDATE_COREDNS $DNS_SERVICE' > "${APP_INSTANCE_NAME}_manifest.yaml"

$ kubectl apply -f "${APP_INSTANCE_NAME}_manifest.yaml" --namespace "${NAMESPACE}"
application.app.k8s.io/robin created
customresourcedefinition.apiextensions.k8s.io/robinclusters.manage.robin.io created
configmap/robin-cr created
deployment.apps/robin-operator created
job.batch/robin-cr created
deployment.apps/robin-monitor created
This concludes the install. Continue here to verify the installation and set up the product.
2.5. Install on Google GKE
GKE is a managed Kubernetes offering from Google that runs in the Google Cloud Platform. Robin Cloud Native Storage is available as a marketplace offering to bring enterprise grade Storage and Data Management capabilities to run Stateful applications on GKE. You can also download Robin CNS software and install using the shipped installation script or manually via the CLI. In this section we will cover all these options.
2.5.1. Prerequisites
All general prequisites detailed here must be met.
The ports detailed here need to be accessible for the installation to succeed and for Robin to operate correctly.
Ensure the user installing Robin CNS is the Cluster Administrator within the Kubernetes cluster. For GKE installations, run following commands to add a user as a Cluster Administrator:
$ account=$(gcloud info | grep Account  | awk -F'[\\[\\]]' '{print $2}')

$ kubectl create clusterrolebinding robin-cluster-admin-binding --clusterrole=cluster-admin --user=$account
Note
For GKE installations, Robin needs cluster with
Compute Engine: Read WriteandStorage: FullAPI being enabled. Compute Engine API access is required to make sure disks are always accessible and easy way to provision disks within ROBIN. Storage API access is required for backing up applications in GCS. You can select theAccess scopeas one of the following while creating GKE cluster.Set access for each API and select individual permissions
Allow full access to all Cloud APIs
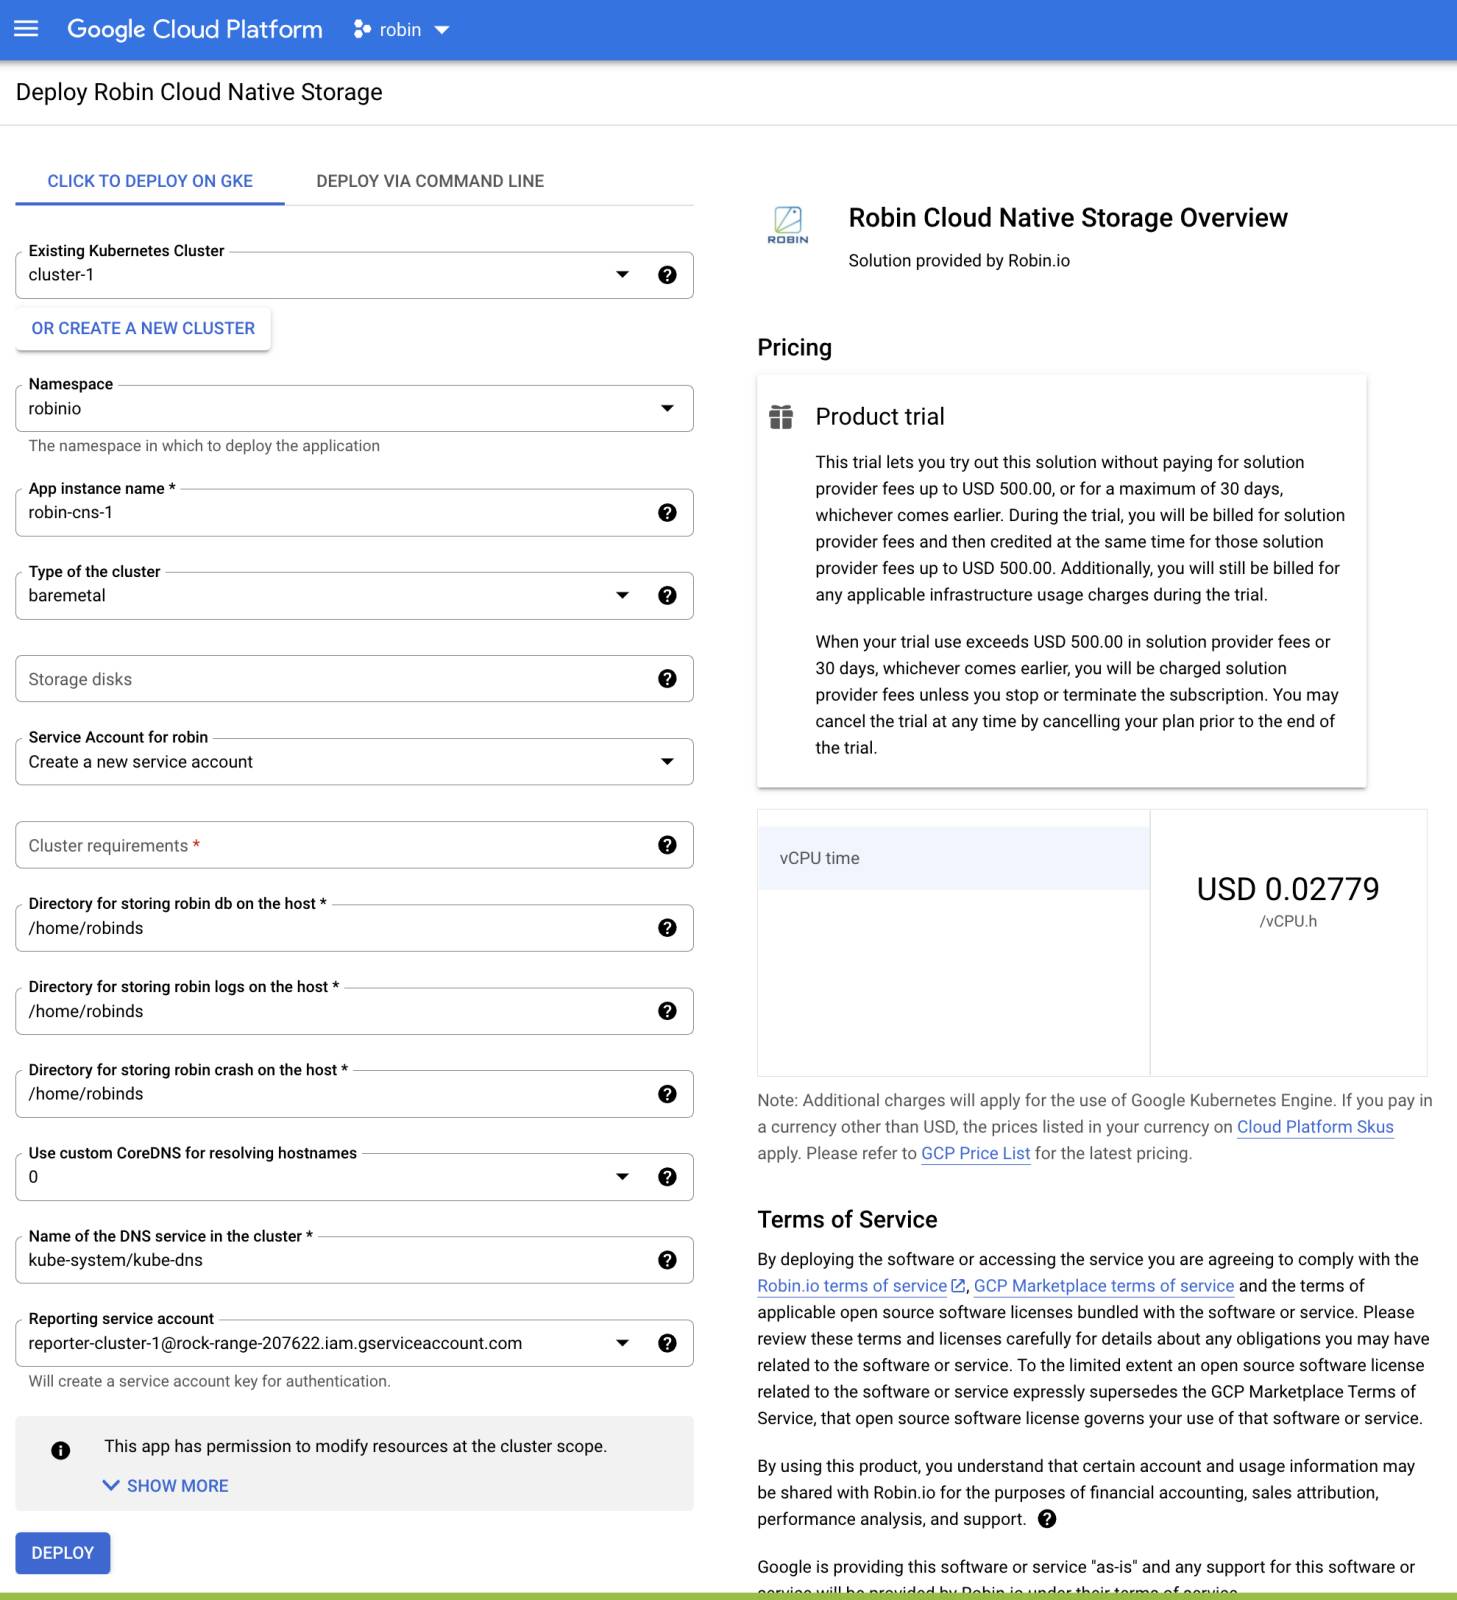
2.5.2. Install via Google Marketplace
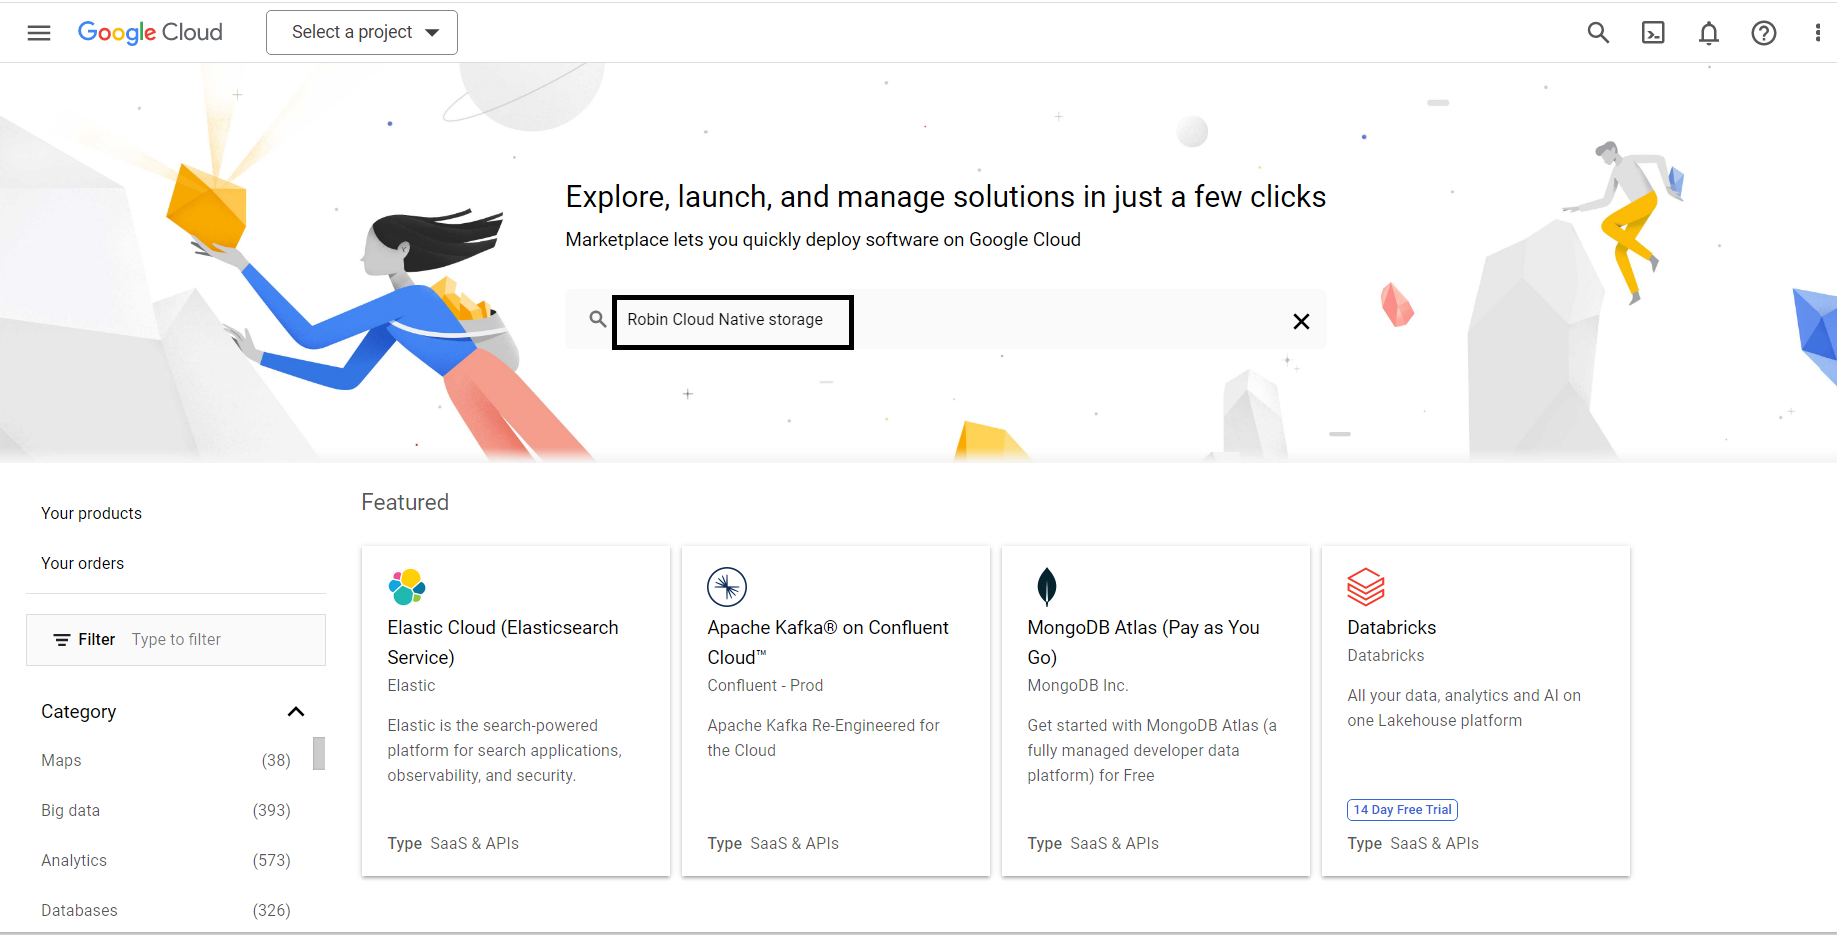
Access the marketplace and search for
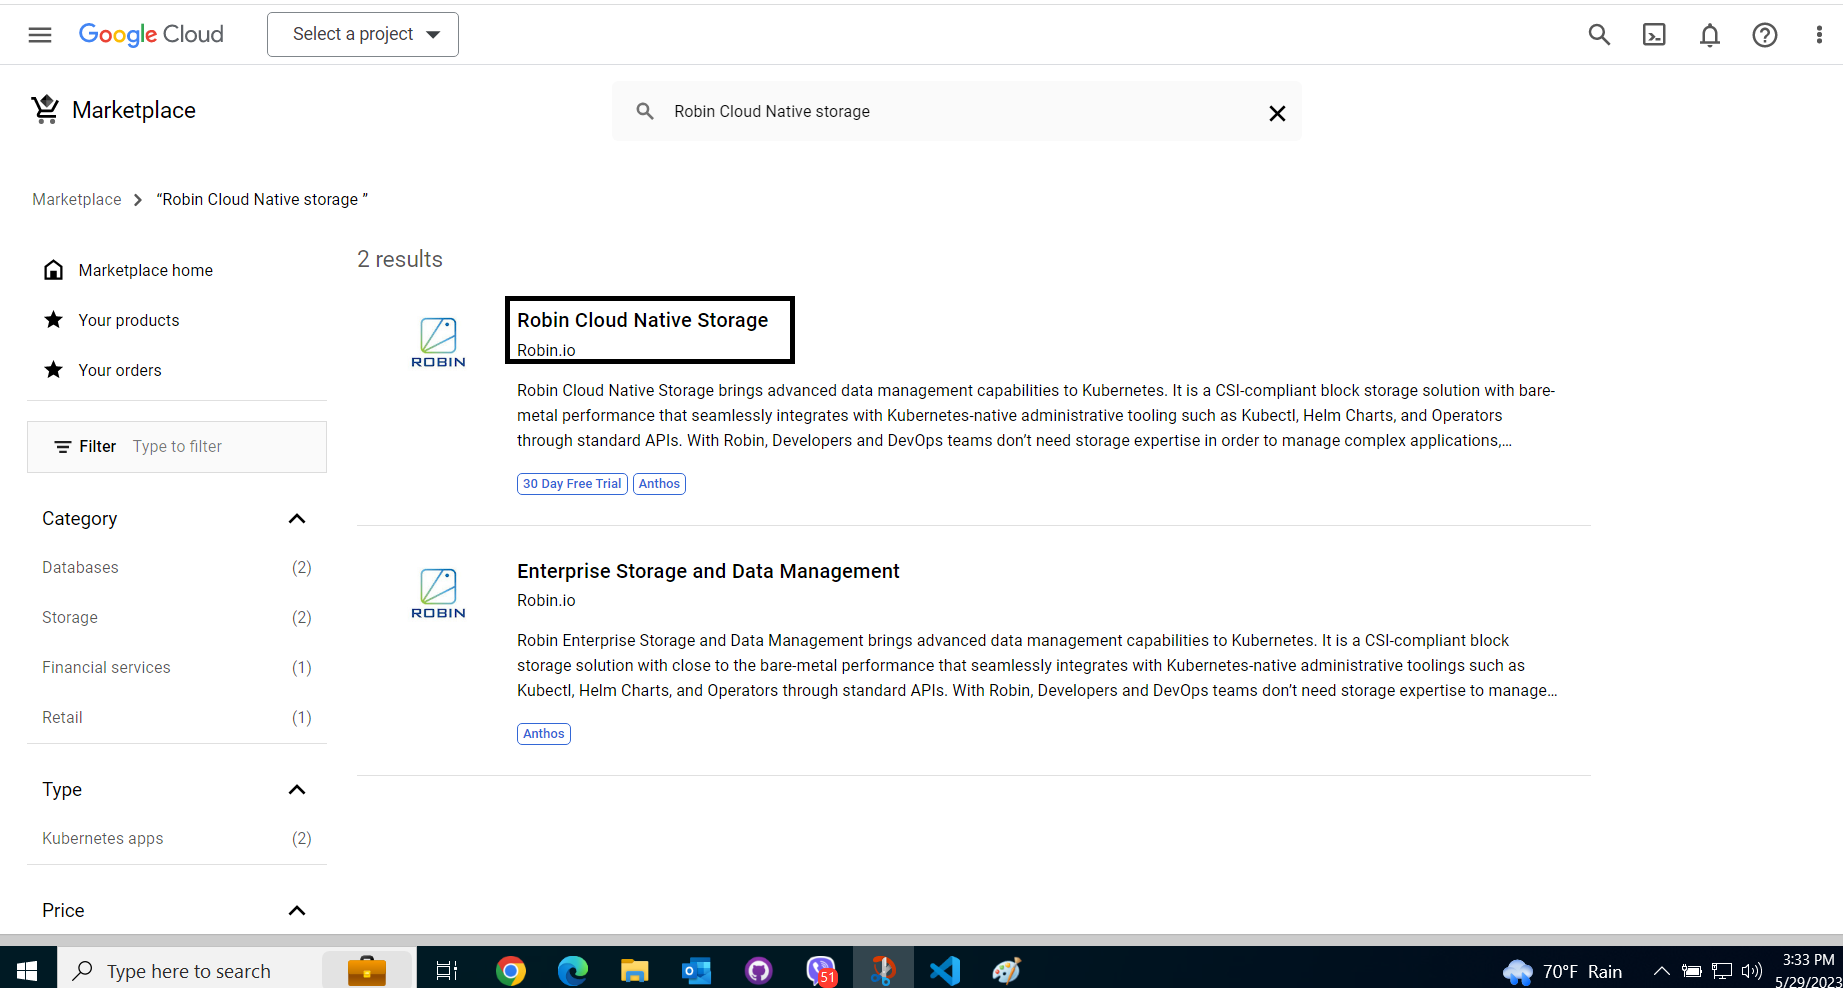
Robin Cloud Native storage.
From the search results, select Robin Cloud Native Storage.
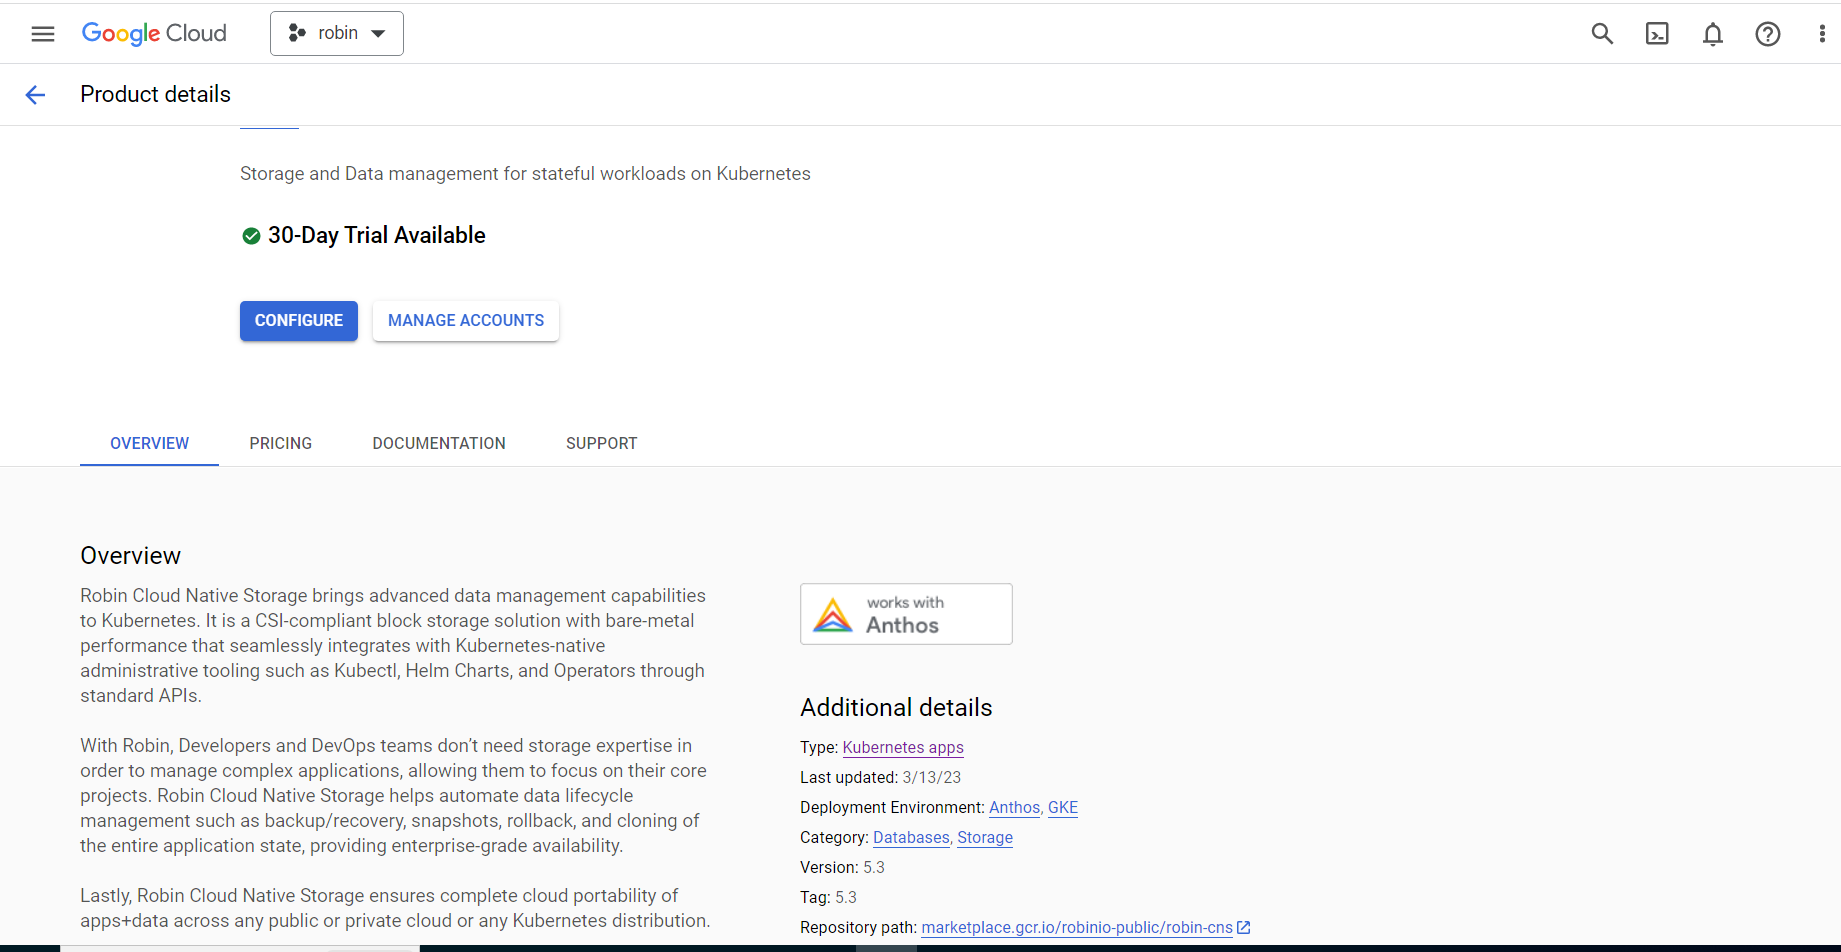
In the Product details page, click Configure.
In the Deploy Robin Cloud Native Storage page, select an existing GKE cluster or create a new cluster to deploy Robin CNS. Fill each of the options appropriately and type ‘YES’ for Cluster requirements parameter. Accept the GCP Marketplace Terms of Service and click Deploy.
You will be taken to the Application details page. You should see a similar output as displayed in the following screenshot.
Wait until all the components turn to OK or Running status.
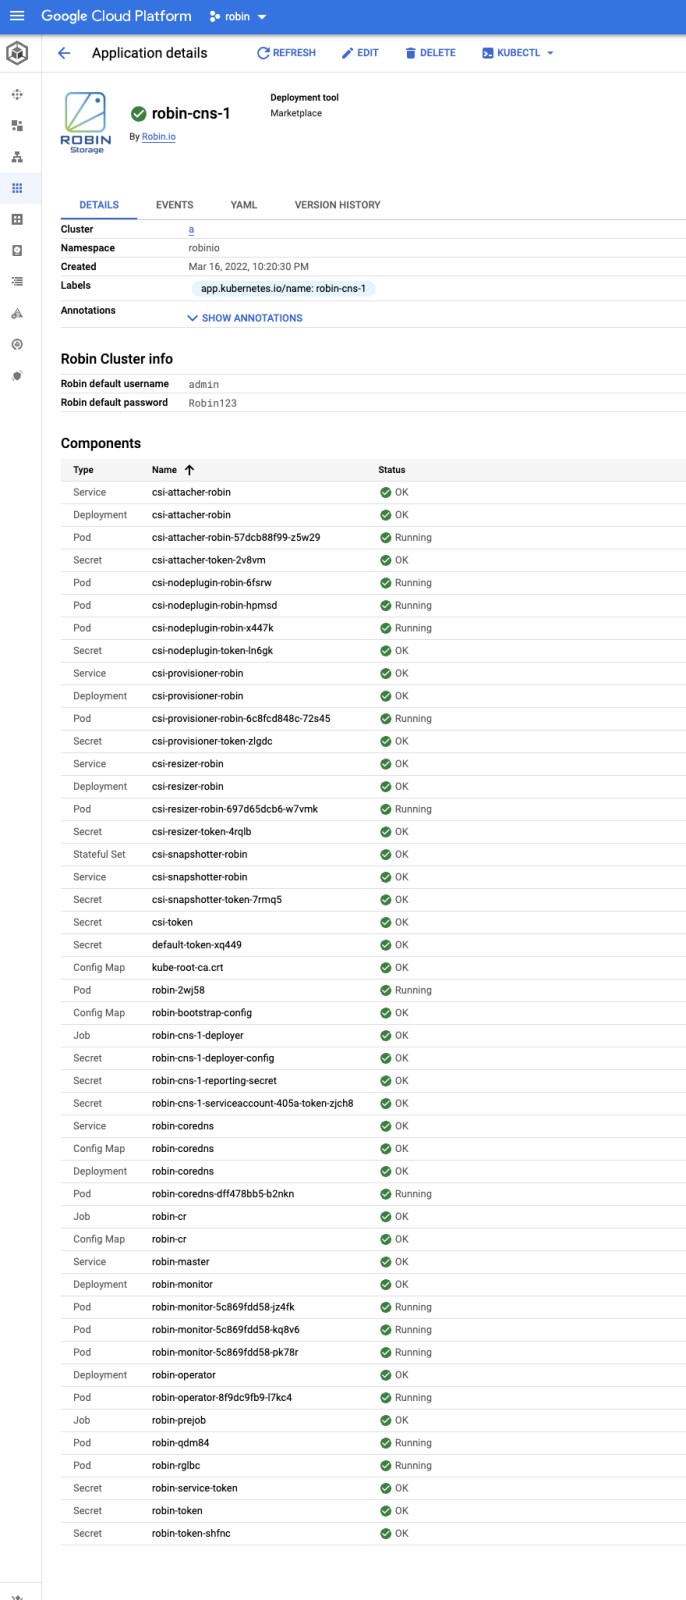
After installing Robin CNS, verify the installation and set up your cluster.
Note
Billing for Robin CNS when deploying on Google Marketplace is done on an hourly basis and is dependant on the total number of CPUs in the cluster. The exact formula to calculate the total cost is as follows: #TotalCPUs x #Hours x $ per CPU per hour. In addition, to find the number of CPUs on a single node the cat /proc/cpuinfo command can be used.
2.5.3. Install using Robin Installer
Follow the steps below to download and install Robin CNS for GKE.
Contact Robin Support team for Robin CNS software binaries.
After getting the Robin CNS from the support team, run the following command to untar the contents into a new directory.
$ mkdir -p ./robin && tar -xf robin-install.tar -C ./robin
Move into the newly created directory, such that it is now your current working directory, and install Robin via the following commands:
Note
To customize the installation with more parameters, see the various installation parameters detailed here.
# cd robin
# ./install-robin.sh --cluster-name=<cluster_name> --zone-name=<zone_name> -y
Validating Kubernetes cluster......Done

Confirm that ports 29442-29470 are open between kubernetes nodes
Make sure the cluster meets prerequisites mentioned at https://docs.robin.io/latest/install.html#minimum-node-requirements
Type yes to confirm that cluster meets the prerequisites:
yes
Validating kubernetes cluster permissions......Done
Validating robin cluster yaml......Done
Installing Robin operator...........Done
Installing Robin cluster............secret/cloud-cred-secret created
Done
Setting up robin client............Done

Activate robin license............Required

       # robin license activate --userid <USERID>

       Note: You can get your User ID after registering on https://get.robin.io. Above command will only work if the host on which the
             ROBIN client is running on has an internet connection. If this is not the case please retrieve the license key by using the
             below link and apply it using the command 'robin license apply <key>'.

             https://get.robin.io/activate?clusterid=

      For logging into robin cluster,
      Default username: admin
      Default password: Robin123
This concludes the install. Continue here to verify the installation and set up the product.
2.5.4. Install via CLI
Follow the steps below to manually install Robin CNS for GKE using CLI commands.
Clone the
robin-storagerepository using the command shown below:$ git clone https://github.com/RobinSystems/robin-storage-gke-marketplace.git Cloning into 'robin-storage-gke-marketplace'... remote: Enumerating objects: 142, done. remote: Counting objects: 100% (12/12), done. remote: Compressing objects: 100% (11/11), done. remote: Total 142 (delta 2), reused 9 (delta 1), pack-reused 130 Receiving objects: 100% (142/142), 84.59 KiB | 0 bytes/s, done. Resolving deltas: 100% (64/64), done.
Move into the newly created directory, such that it is now your current working directory, and create the application CRD within the Anthos cluster if it is not already available with the following command:
$ cd robin-storage-gke-marketplace/
$ kubectl apply -f app-crd.yaml
customresourcedefinition.apiextensions.k8s.io/applications.app.k8s.io configured
Create the
robinionamespace if it is not present using the below command:$ export NAMESPACE=robinio $ kubectl create ns ${NAMESPACE} namespace/robinio createdVisit the following link and download a license key from the Deploy via Command Line tab.
Once the license key is downloaded, run the below command to apply it.
$  kubectl apply -f license.yaml -n robinio
secret/robin-cns-license-335206 created

$ export REPORTING_SECRET="robin-cns-license-335206"
Note
The value for the
REPORTING_SECRETenvironment variable should be the name of the Kubernetes secret created after the license YAML is applied.Run the following commands in order to setup the appropriate variables, apply the necessary YAML files and install Robin:
$ export APP_INSTANCE_NAME=robin
$ export HOST_TYPE=gcp
$ export TAG=5.3.10
$ export IMAGE_ROBIN_OPERATOR="gcr.io/robinio-public/robin-storage/robin-operator:${TAG}"
$ export IMAGE_ROBIN="gcr.io/robinio-public/robin-storage:${TAG}"
$ export IMAGE_UBBAGENT="gcr.io/robinio-public/robin-storage/ubbagent:${TAG}"
$ export IMAGE_ROBIN_DEPLOYER="gcr.io/robinio-public/robin-storage/deployer:${TAG}"
$ export IMAGE_CRJOB="gcr.io/robinio-public/robin-storage/crjob:${TAG}"
$ export CLUSTER_REQUIREMENTS="yes"
$ export STORAGE_DISKS=""
$ export ROBINDS_DIR="/home/robinds"
$ export ROBINLOG_DIR="/home/robinds"
$ export ROBINCRASH_DIR="/home/robinds"
$ export UPDATE_COREDNS="0"
$ export DNS_SERVICE="kube-system/kube-dns"

$ awk 'FNR==1 {print "---"}{print}' sa.yaml.template | envsubst '$APP_INSTANCE_NAME $NAMESPACE $IMAGE_ROBIN_OPERATOR $IMAGE_ROBIN $SERVICE_ACCOUNT $IMAGE_PROVISIONER_V04 $IMAGE_PROVISIONER_V10 $REPORTING_SECRET $IMAGE_UBBAGENT $IMAGE_ROBIN_DEPLOYER $CLUSTER_REQUIREMENTS $STORAGE_DISKS $HOST_TYPE $IMAGE_CRJOB $UPDATE_COREDNS $DNS_SERVICE' > "sa_manifest.yaml"

$ kubectl apply -f "sa_manifest.yaml" --namespace "${NAMESPACE}"
serviceaccount/robin-deployer-sa created
clusterrole.rbac.authorization.k8s.io/robin:robinio:deployer-cr0 created
clusterrolebinding.rbac.authorization.k8s.io/robin:robinio:deployer-crb0 created

$ export SERVICE_ACCOUNT="${APP_INSTANCE_NAME}-deployer-sa"

$ awk 'FNR==1 {print "---"}{print}' manifest/*   | envsubst '$APP_INSTANCE_NAME $NAMESPACE $IMAGE_ROBIN_OPERATOR $IMAGE_ROBIN $SERVICE_ACCOUNT $IMAGE_PROVISIONER_V04 $IMAGE_PROVISIONER_V10 $REPORTING_SECRET $IMAGE_UBBAGENT $IMAGE_ROBIN_DEPLOYER $CLUSTER_REQUIREMENTS $STORAGE_DISKS $HOST_TYPE $ROBINDS_DIR $ROBINLOG_DIR $ROBINCRASH_DIR $IMAGE_CRJOB $UPDATE_COREDNS $DNS_SERVICE' > "${APP_INSTANCE_NAME}_manifest.yaml"

$ kubectl apply -f "${APP_INSTANCE_NAME}_manifest.yaml" --namespace "${NAMESPACE}"
application.app.k8s.io/robin created
customresourcedefinition.apiextensions.k8s.io/robinclusters.manage.robin.io created
configmap/robin-cr created
deployment.apps/robin-operator created
job.batch/robin-cr created
deployment.apps/robin-monitor created
This concludes the install. Continue here to verify the installation and set up the product.
2.6. Install Robin CNS with Google KMS
Robin CNS supports integration of Google Cloud Key Management (KMS) Service as a key management service (KMS). Google Cloud KMS is a cloud-based service that allows you to generate, store, and manage cryptographic keys, which are essential for encryption and decryption operations. For more information, see Google Cloud Key Management.
Robin CNS uses Google KMS to store the master key, which serves as a Key Encryption Key (KEK) for encrypting other keys.
Note
Google KMS integration is supported only for newly installed clusters, not for clusters upgraded from previous Robin CNS versions.
Google KMS integration is only supported during Robin CNS installation. Post-installation integration is not supported.
2.6.1. Prerequisites
All general prerequisites mentioned in the Prerequisites section must be met.
Specific prerequisites for Anthos clusters mentioned in the Anthos section and for GKE clusters mentioned in the GKE section must be met.
Access to a Kubernetes cluster running on a supported version of GKE or Google Anthos must be available.
A keyring and a key inside the associated keyring must be created in Google KMS in the same Google Cloud project where the cluster is created.
Create a JSON file with the name
gcp.jsoncontaining the Service Account key for the appropriate Service Account on Google Cloud with the following permissions:cloudkms.cryptoKeyVersions.useToDecrypt
cloudkms.cryptoKeyVersions.useToEncrypt
To create and download the Service account key, see Create a service account key.
Note
You can also use the Cloud KMS CryptoKey Encrypter/Decrypter role, which already has the above permissions.
2.6.2. Necessary Parameters
You must add the following parameters in the spec.options section of the robin.yaml file to integrate Robin CNS with Google KMS:
kms- Googlekms-keyring- Name of the keyring associated with the Google KMS.kms_keyname- Name of the key created in the associated keyringkms_location- Zone of the Google KMSgcp_key_secret- Key secret for Google Cloud Platform (GCP).
2.6.3. Installation Steps
Complete the following steps to integrate Robin CNS with Google KMS:
Contact Robin Support team for Robin CNS software binaries.
After getting the Robin CNS from the support team, run the following command to untar the contents into a new directory.
# mkdir -p ./robin && tar -xf robin-install.tar -C ./robin
Change to the newly created directory, such that it is now your current working directory:
# cd <robin>
Create the
robinionamespace:# kubectl create ns robinio
Create a GCP key secret in the
robinionamespace with the Service Account key using thegcp.jsonfile:# kubectl create secret generic <gcp_key_secret> --from-file=gcp.json=gcp.json -n robinio
Add the following parameters in the
spec.optionssection of therobin.yamlfile:kms- Name of the key management servicekms-keyring- Name of the keyring associated with the Google KMS.kms_keyname- Name of the key created in the associated keyringkms_location- Zone of the Google KMSgcp_key_secret- Key secret for Google Cloud Platform (GCP) created in step 5.
Install Robin CNS:
# ./install-robin.sh --repo=robineng --image-pull-secret=<GCP_key_secret>
Example
# ./install-robin.sh --repo=robineng --image-pull-secret=abcd
Validating Kubernetes cluster......Done
Make sure the cluster meets prerequisites mentioned at https://docs.robin.io/storage/latest/install.html#prerequisites
Type yes to confirm that cluster meets the prerequisites: Validating kubernetes cluster permissions......Done
Validating robin cluster yaml......Done
Installing Robin operator...........Done
Installing Robin cluster............Done
Setting up robin client............Done

Activate robin license............Required

      $ robin license activate <USERID>

      Note: You can get your User ID after registering on https://get.robin.io. Above command will only work if the host on which the
            ROBIN client is running on has an internet connection. If this is not the case please retrieve the license key by using the
            below link and apply it using the command 'robin license apply <key>'.

            https://get.robin.io/activate?clusterid=YGZk0gX1NcYWkDQDM5P0wENjNHNjNcQzAyOi75QF0ERyRcND0GREU1Q0z8QDQxPWjj.SFoclkjXWNcYGcbYV8e.Xz_

      For logging into robin cluster,
      Default username: admin
      Default password: Robin123 but if opted for --generate-password then get your password using "kubectl get secret --namespace robinio default-admin-user -o jsonpath="{.data.password}" | base64 --decode; echo".
You can access Robin UI at https://192.0.2.249:29443
Verify Google KMS parameters in the
robin config listcommand:# robin config list | grep kms cluster | kms | google cluster | kms_keyname | test-demo2 cluster | kms_keyring | test-demo2 cluster | kms_location | global cluster | kms_version | v2
Note
To customize the installation with more parameters, see the installation parameters mentioned in the Install options.
2.7. Install on an air-gapped Cluster
An air-gapped Kubernetes cluster is a cluster that is behind a firewall without access to the Internet. You can install Robin on an air-gapped cluster by following the instructions provided in this topic.
2.7.1. Prerequisites
All general prequisites detailed here must be met.
A driver node with Docker and the
kubectlclient installed.The aforementioned driver node should also have access to the Internet for downloading the following: container images required to install Robin, Robin installation script, and Robin deployment YAML files.
A Kubernetes or OpenShift cluster already deployed on your choice of infrastructure.
A container registry with sufficient space for the Robin image and other images.
2.7.2. Installation Steps
From the designated driver node, download the following Docker images:
Use the suggested
docker pullcommands to download each image respectively from the above links.Note
From the Tags tab on the above links, you can copy specific commands for the required Robin CNS version and download the images.
Example
$ docker pull robinsys/robinimg:5.4.4-146
From the same driver node, download the following CSI and other images:
registry.k8s.io/sig-storage/csi-attacher:v4.3.0registry.k8s.io/sig-storage/csi-node-driver-registrar:v2.8.0registry.k8s.io/sig-storage/csi-provisioner:v3.5.0registry.k8s.io/sig-storage/csi-resizer:v1.8.0registry.k8s.io/sig-storage/csi-snapshotter:v6.2.1registry.k8s.io/sig-storage/csi-snapshotter:v6.2.2registry.k8s.io/sig-storage/livenessprobe:v2.10.0robineng/robin-image-puller:v1robineng/robin-operator:5.4.4-146ghcr.io/zalando/spilo-15:3.0-p1ghcr.io/zalando/spilo-15:3.0-p1ghcr.io/zalando/spilo-15:3.0-p1registry.opensource.zalan.do/acid/postgres-operator:v1.10.0robineng/robinimg:5.4.4-146
Note
Use the
docker pullcommand to download all the images individually.Example
$ docker pull registry.k8s.io/sig-storage/csi-attacher:v4.3.0Note
You must download all the above images. They are listed with the repository name and image version.
Push the Robin, CSI and other images from the driver node to a cloud container registry that is accessible by all nodes within the target Kubernetes cluster. You can use the
docker pushcommand to push the images.Example
$ docker push artifactory.robinsystems.com/docker/robinsys/robinimg:5.4.4-146
$ docker push artifactory.robinsystems.com/docker/registry.k8s.io/sig-storage/csi-attacher:v4.3.0
Note
Be sure to include the registry path, image name, and version tag when pushing the images to cloud container registry. In the above example, the registry is at
artifactory.robinsystems.comAccess one of the nodes within the Kubernetes cluster that has access to the previously utilized container registry and create the
robinionamespace as shown below:$ kubectl create ns robinio
Note
A namespace with the name
robinioexactly must be created.(Optional) If your cloud registry is only accessible using login credentials, then a secret needs to be created in the
robinionamespace with the appropriate credentials as shown below:$ kubectl create secret docker-registry regcred --docker-server=artifactory.robinsystems.com --docker-username=<username> --docker-password=<password> -n robinio --docker-email=a@a.com
Note
The steps to create secret might differ depending on the cloud platform that you are using.
(Optional) If there already exists a secret that can be used to access cloud container registry in which all the necessary images are stored, copy it to the
robinionamespace using the given commands:$ kubectl get secret <secret_name> --export -o yaml > <filename> $ kubectl create -f <filename> -n robinio
From the driver node with
kubectlinstalled, access get.robin.io and follow the on-screen instructions to download therobin-install.tarfile for the desired Robin version. Ensure the tarfile downloads successfully onto your driver node.Copy the preciously download installation tarfile onto a node within your Kubernetes cluster. Next, create a new directory and extract the contents of the tar into it via the following command:
$ mkdir -p ./robin && tar -xf robin-install.tar -C ./robin
Move into the newly created directory, such that it is now your current working directory, and install Robin via the following commands:
Note
To customize the installation with more parameters, see the various installation parameters detailed here.
# cd ./robin
# ./install-robin.sh --version=5.4.4-146 --image-registry-path=us.icr.io/robin-5-4-4 -y --image-pull-secret=all-icr-io
Validating Kubernetes cluster......Done
Validating kubernetes cluster permissions......Done
Validating robin cluster yaml......Done
Installing Robin operator...........Done
Installing Robin cluster............Done
Setting up robin client............Done

Activate robin license............Required

      # robin license activate --userid <USERID>

      Note: You can get your User ID after registering on https://get.robin.io. Above command will only work if the host on which the
            ROBIN client is running on has an internet connection. If this is not the case please retrieve the license key by using the
            below link and apply it using the command 'robin license apply <key>'.

            https://get.robin.io/activate?clusterid=

      For logging into robin cluster,
      Default username: admin
      Default password: Robin123
Note
The command used in the final step of this process can have the options associated with specific environment type appended to it if needed. This is particularly the case when integrating with an external KMS.
2.7.3. Verify Robin Installation on an air-gapped cluster
Check if the Pods created in the robinio namespace are in the Running Status other than Patroni pre-install Pods by issuing the following command:
root@eqx04-flash06:~# kubectl get pods -n robinio
NAME                                              READY   STATUS      RESTARTS   AGE
csi-attacher-robin-7568fc89cf-fwtst               3/3     Running     0          11h
csi-nodeplugin-robin-5bnk2                        3/3     Running     0          11h
csi-nodeplugin-robin-d8f7p                        3/3     Running     0          11h
csi-nodeplugin-robin-hrwzj                        3/3     Running     0          11h
csi-nodeplugin-robin-kdvfc                        3/3     Running     0          11h
csi-nodeplugin-robin-vxhgn                        3/3     Running     0          11h
csi-provisioner-robin-67c96bbc5-pp6nt             3/3     Running     0          11h
csi-resizer-robin-7c498f6665-kkkwt                3/3     Running     0          11h
csi-snapshotter-robin-744ddb9d47-mt779            3/3     Running     0          11h
robin-iomgr-429vm                                 1/1     Running     0          11h
robin-iomgr-cwld2                                 1/1     Running     0          11h
robin-iomgr-j4t66                                 1/1     Running     0          11h
robin-iomgr-j7gqx                                 1/1     Running     0          11h
robin-iomgr-jq5df                                 1/1     Running     0          11h
robin-master-6f84c6fdb8-mcf9v                     1/1     Running     0          11h
robin-operator-6798bdcd85-rqltq                   1/1     Running     0          11h
robin-patroni-0                                   1/1     Running     0          11h
robin-patroni-1                                   1/1     Running     0          11h
robin-patroni-2                                   1/1     Running     0          11h
robin-patroni-postgres-operator-c6f65cdf5-p2x54   1/1     Running     0          11h
robin-patroni-pre-install-hook-j8576              0/1     Completed   0          11h
robin-patroni-pre-install-hook-pbrzn              0/1     Completed   0          11h
robin-patroni-pre-install-hook-wkrbd              0/1     Completed   0          11h
robin-prejob-5d4p2                                0/1     Completed   0          11h
robin-worker-7blv6                                1/1     Running     0          11h
robin-worker-8dkpf                                1/1     Running     0          11h
robin-worker-nclcl                                1/1     Running     0          11h
robin-worker-smzzz                                1/1     Running     0          11h
robin-worker-vxxcp                                1/1     Running     0          11h
Additional verification steps alongside the one above can be found here.
2.8. Install with local PersistentVolume using Robin Installer
Robin CNS supports disk and local PersistentVolume (PV) based discovery for storage. You can select the local PVs during Robin CNS installation.
Disk - When you choose the disk-based discovery during Robin CNS installation, Robin discovers all disks on the host and starts formatting these disks for its use.
Local PersistentVolume (PV) - When you choose local PV-based discovery during Robin CNS installation, Robin creates PVCs for the local PVs on the host and claims them for its use. Robin does not discover disks attached to the nodes but only uses local PV disks for its use.
Local PV enables you to access local storage through the standard PVC interface. For more information about local PV, see local PersistentVolume.
2.8.1. Prerequisites
The following prerequisites must be met to install Robin CNS with local PV:
2.8.2. Necessary Parameters
You must pass the following parameters with Robin installation command to use local PV-based discovery:
disk-discovery- Type of disk-discovery to be used by Robin CNS for storage. Valid values arediskandpv. The default value isdisk.pv-sc-name- Name of the StorageClass for local PV.pv-folder-path- Path to the PersistentVolume (PV) folder created on all nodes which contain symlinks to the devices.pv-labels- (optional) Label selector for selecting local PV to use by Robin CNS. If you provide any key-value pair then Robin claims and adds that specific local PV only. For example,robin.io/enabled:true. If you do not provide any key-value pair then Robin claims and adds all local PVs for its use.
2.8.3. How it works
When you install Robin CNS, Robin creates PVCs for the local PVs and claims them to be used for Software Defined Storage.
After creating PVCs, the status of PVs moves from the Available state to the Bound state so other applications cannot use these PVs.
2.8.4. Installation steps
Perform the following steps to install Robin CNS using the local PV:
Contact Robin Support team for Robin CNS software binaries.
After getting the tar file, run the following command to untar the contents into a new directory.
# mkdir -p ./robin && tar -xf robin-install.tar -C ./robin
Move into the newly created directory, so that it is your current working directory and run the following command to install Robin CNS using the local PV:
# cd robin
# ./install-robin.sh --disk-discovery=pv --pv-folder-path=/mnt/mnt-disks --pv-labels=robin.io/enabled:true --pv-sc-name=mnt-disks

     Validating Kubernetes cluster......Done
     Validating kubernetes cluster permissions......Done
     Validating robin cluster yaml......Done
     Installing Robin operator...........Done
     Installing Robin cluster............Done
     Setting up robin client............Done

     Activate robin license............Required

*****
     ***** Your ROBIN License is NOT ACTIVATED...
     ***** Please register at https://get.robin.io/activate
***** to activate your license and access all ROBIN features.
     *****

        $ robin license activate <USERID>

                 Note: You can get your User ID after registering on https://get.robin.io. Above command will only work if the host on which the
                ROBIN client is running on has an internet connection. If this is not the case please retrieve the license key by using the
                below link and apply it using the command 'robin license apply <key>'.

                https://get.robin.io/activate?clusterid=XXXXXXXXXXXXXXXXXXXXXXXXXXXXXX.XXXXXXX.XXXXXXXXXXXXXXX.XX

              For logging into robin cluster,
              Default username: admin
              Default password: Robin123
     You can access Robin UI at https://192.0.2.100:29443
After installing Robin CNS, verify the installation and set up your cluster.
2.9. Verify Installation
2.9.1. Verify Robin Cluster State and Status
Once the installation is complete, verify the Robin cluster state and status by referring to the robincluster custom resource as shown below. After a successful installation, the state and status of each node within the cluster should be ONLINE and Ready respectively.
# kubectl describe robinclusters -n robinio
Name:         robin
Namespace:
Labels:       app.kubernetes.io/instance=robin
              app.kubernetes.io/managed-by=robin.io
              app.kubernetes.io/name=robin
Annotations:  <none>
API Version:  manage.robin.io/v2
Kind:         RobinCluster
Metadata:
  Creation Timestamp:  2026-05-28T12:03:31Z
  Generation:          1
  Resource Version:    198923523
  UID:                 e792594a-6b8a-4ba2-9f73-f7d7c51e3f35
Spec:
  host_type:            physical
  image_nfs_server:     robineng/nfs-server:v6.5
  image_pull_secret:    aish-cred
  image_puller:         robineng/robin-image-puller:v1
  image_registry_path:
  image_robin:          robineng/robinimg:6.1.0-202
  image_ubbagent:       robineng/ubbagent:5.4.4-ent-1
  k8s_provider:         gke
  Namespace:            robinio
  Options:
    auto_add_storage_disks:       1
    csi_attacher_max_backoff:     15s
    disk_discovery:               pv
    exit_on_read_only_exception:  1
    image_pull_secret:            aish-cred
    pv_folder_path:               /mnt/fast-disks
    pv_sc_name:                   fast-disks
    session_read_only_timeout:    60
    skip_setup_iptables:          1
  Source:                         spec
  use_registry_for_csi:           true
Status:
  activation_reason:  Enterprise deployment mode
  activation_status:  Succeeded
  connect_command:    kubectl exec -it robin-master-576bcd4845-5knq5 -n robinio -- bash
  deployment_mode:    Enterprise
  get_robin_client:   curl -k 'https://10.9.73.83:29442/api/v3/robin_server/download?file=robincli&os=linux' > robin
  last_updated_ts:    2026-05-29-11:12:30
  master_ip:          10.9.73.83
  Phase:              Ready
  phase_reason:

  pod_status:
    robin-master-576bcd4845-5knq5  hypervvm-73-83.robinsystems.com  Running 10.9.73.83
    robin-worker-b5xrr  hypervvm-73-81.robinsystems.com  Running 10.9.73.81
    robin-worker-ncccq  hypervvm-73-83.robinsystems.com  Running 10.9.73.83
    robin-worker-msr6g  hypervvm-73-82.robinsystems.com  Running 10.9.73.82
    robin-worker-v8jjm  hypervvm-73-85.robinsystems.com  Running 10.9.73.85
    robin-worker-vv58z  hypervvm-73-84.robinsystems.com  Running 10.9.73.84
  robin_node_status:
    current_version:   6.1.0-202
    host_name:         hypervvm-73-85.robinsystems.com
    join_time:         1779970176
    k8s_node_name:     hypervvm-73-85.robinsystems.com
    maintenance_mode:  DISABLED
    Roles:             S
    Rpool:             default
    State:             ONLINE
    Status:            Ready
    current_version:   6.1.0-202
    host_name:         hypervvm-73-81.robinsystems.com
    join_time:         1779970177
    k8s_node_name:     hypervvm-73-81.robinsystems.com
    maintenance_mode:  DISABLED
    Roles:             S
    Rpool:             default
    State:             ONLINE
    Status:            Ready
    current_version:   6.1.0-202
    host_name:         hypervvm-73-84.robinsystems.com
    join_time:         1779970178
    k8s_node_name:     hypervvm-73-84.robinsystems.com
    maintenance_mode:  DISABLED
    Roles:             S
    Rpool:             default
    State:             ONLINE
    Status:            Ready
    current_version:   6.1.0-202
    host_name:         hypervvm-73-82.robinsystems.com
    join_time:         1779970180
    k8s_node_name:     hypervvm-73-82.robinsystems.com
    maintenance_mode:  DISABLED
    Roles:             S
    Rpool:             default
    State:             ONLINE
    Status:            Ready
    current_version:   6.1.0-202
    host_name:         hypervvm-73-83.robinsystems.com
    join_time:         1779970179
    k8s_node_name:     hypervvm-73-83.robinsystems.com
    maintenance_mode:  DISABLED
    Roles:             S
    Rpool:             default
    State:             ONLINE
    Status:            Ready
Events:                <none>
Note
If you have deployed Robin CNS in a different namespace, then specify it instead of robinio in the above command.
2.9.2. Log in to Robin CNS
Use the Connect Command value from the above output to connect to the Robin Pod.
Example
$ kubectl exec -it robin-master-5b597c567d-5cvnr -n robinio -- bash
After logging into Robin container you can login as “admin” user with the default password of ‘Robin123’ and run Robin commands as shown below:
$ robin login admin --password Robin123
$ robin host list
It is recommended that you change your default password to a new one. For more information, see Change Password.
2.9.3. Verify KMS Registeration
In addition, if a key management service (KMS) was specified as part of the installation run the below command to verify it is registered with Robin.
# robin config list cluster kms
  Section | Attribute | Value
  --------+-----------+------------
  cluster | kms       | ibmprotect
Lastly in order to ensure the Robin storage class is available and can be used for provisioning, issue the following command.
$ kubectl get sc
NAME              PROVISIONER                    RECLAIMPOLICY   VOLUMEBINDINGMODE      ALLOWVOLUMEEXPANSION   AGE
local-storage     kubernetes.io/no-provisioner   Delete          WaitForFirstConsumer   false                  14h
robin (default)   robin                          Delete          WaitForFirstConsumer   true                   13h
robin-immediate   robin                          Delete          Immediate              true                   13h
robin-repl-3      robin                          Delete          WaitForFirstConsumer   true                   13h
robin-rwx         robin                          Delete          WaitForFirstConsumer   true                   13h
2.10. ROBIN License Activation
After installing ROBIN software on any platform, a notice will appear stating that the ROBIN license will expire in approximately two days whenever a command is run. This is an indication that the license is yet to be activated. In order to avoid a cluster lockdown you can activate your ROBIN cluster via one of the following methods.
If the license is not activated your ROBIN cluster will be locked after the allocated time.
2.10.1. Web License Activation
Activate your ROBIN license by clicking here. After following the instructions detailed on the website your ROBIN license should be activated and your cluster ready to use.
Note
You will be asked to provide the Robin CNS cluster id when activating your license. This can be discovered by running the robin license id command via the client or when you are connected to the Robin pod. In addition you can apply the generated key via the command robin license apply <key>
2.10.2. CLI License Activation
In order to activate your license via the CLI, first register here and retrieve your User ID. Next run the following command:
# robin license activate --userid <USERID>
|
User ID generated after registering at https://get.robin.io |
This will activate your ROBIN license and ensure your cluster is ready to use.
2.11. Data Integrity
Checksum is a simple mathematical operation performed on a set of data to generate a fixed-size value that represents the integrity of the data. The generated checksum is often compared with a reference checksum to detect errors or inconsistencies that might have occurred during data transmission and storage.
Robin CNS does over-the-wire inline checksum validation for all read and write IOs to detect corruption that could happen during data transfers.
Robin calculates the checksum of every data block persisted on a storage device and stores it along with the metadata for the data block. In order to improve performance by minimizing disk IO, the Robin CNS storage stack pulls a batch of metadata blocks into memory at a time. While it reads the block’s metadata from the disk, it doesn’t store them in-memory. If the checksums were stored in-memory for the blocks, then the memory footprint for this metadata would increase. Also, modern flash media already performs checksums, and error recovery is automatically done at the FTL layer. Due to these reasons we have intentionally disabled inline checksum validation during the read operations.
Data blocks can be validated for checksum correctness offline by a utility called devck (currently available via Robin Customer Support). A Volume rebuild command can rebuild corrupted blocks from healthier replica copies in the event of corruption.
2.12. Uninstalling ROBIN
2.12.1. Deleting objects created via the Robin installer
If the Robin CNS operator was deployed on an existing Kubernetes cluster via the Robin installer in the steps described previously, one can run the following command to uninstall:
$ ./install-robin.sh --uninstall
Uninstalling Robin cluster......Done
Some Robin managed namespaces (t001-u000001 t001-u000002 t001-u000003 ) are not deleted, please run following command to delete those after
making sure there are no required kubernetes objects present in these namespaces
"kubectl delete ns -l robin.io/domain=ROBIN"
Note
The install-robin.sh script is shipped within the downloadable tarfile.
2.12.2. Deleting objects created via Kubernetes
2.12.2.1. Cleanup for automated installations
For uninstalling Robin CNS from Kubernetes cluster via kubectl, run the following commands:
$ kubectl delete -f robin.yaml
$ kubectl delete clusterrolebinding -l robin.io/domain=ROBIN
$ kubectl delete rolebinding -l robin.io/domain=ROBIN -A
Run the below command to get a list of namespaces created with Robin and delete the namespaces one by one. Please make sure you are not accidentally deleting namespaces that contain non-robin applications.
$ kubectl get ns -l robin.io/domain=ROBIN
After reviewing the list, if you want to delete all the namespaces at once, you can run
$ kubectl delete ns -l robin.io/domain=ROBIN
2.12.2.2. Cleanup for manual installations
Note
The below instructions for cleanup only apply to Anthos/GKE clusters where Robin CNS was setup using the commands detailed here and NOT via the Robin installer.
In order to uninstall Robin CNS from a Anthos/GKE Kubernetes cluster via kubectl, run the following commands:
$ export APP_INSTANCE_NAME=robin
$ export NAMESPACE=robinio

$ kubectl delete -f ${APP_INSTANCE_NAME}_manifest.yaml --namespace "${NAMESPACE}"
$ kubectl delete serviceaccount "${APP_INSTANCE_NAME}-deployer-sa" -n "${NAMESPACE}"
$ kubectl delete clusterrolebinding "$APP_INSTANCE_NAME:$NAMESPACE:deployer-crb0"
$ kubectl delete clusterrole "$APP_INSTANCE_NAME:$NAMESPACE:deployer-cr0"
$ kubectl delete application,deployment --namespace ${NAMESPACE} --selector app.kubernetes.io/name=$APP_INSTANCE_NAME
$ kubectl delete -f license.yaml -n ${NAMESPACE}
$ kubectl delete ns robinio
2.12.3. Deleting objects created by OLM
If the ROBIN operator was deployed on an OpenShift cluster via the OLM method described above, run the following command to delete all the objects created within the robinio namespace:
$ oc delete namespace robinio
Note
The commands starting with oc are applicable for the OpenShift environment.
2.12.4. Deleting objects created via GCP UI
Note
The below instructions for cleanup only apply to GKE clusters where Robin CNS was setup using the steps detailed here.
In order to uninstall Robin CNS from a GKE Kubernetes cluster via the Google Cloud Platform UI navigate to the Application details page, select the instance of Robin CNS to be deleted, and click the delete action at the top of the screen. You should see a screen similar to the one below.

After confirming the deletion of the application, run the following command on the GKE cluster:
$ export APP_INSTANCE_NAME=robin
$ kubectl delete robincluster ${APP_INSTANCE_NAME}