4. Using Robin CNS in Kubernetes
The Container Storage Interface (CSI) is a standard for exposing storage to workloads on Kubernetes. To enable automatic creation/deletion of volumes for CSI Storage, a Kubernetes resource called StorageClass must be created and registered within the Kubernetes cluster. Associated with the StorageClass is a CSI provisioner plugin that does the heavy lifting at disk and storage management layers to provision storage volumes based on the various attributes defined in the StorageClass.
By default, Robin ships with the following four StorageClasses:
robin- This StorageClass is considered the default Robin StorageClass. It does not have any features enabled and can be used for standard RWO volumes.robin-repl-3- This StorageClass can be used to create volumes that need 3 replicas with a fault domain ofhostexclusively.robin-immediate- This StorageClass will create volumes as soon as their respective volume claim is created without waiting for a first consumer.robin-rwx- This StorageClass can be used to create RWX volumes with 2 replicas and faultdomain ashostexclusively.
Each StorageClass that uses Robin as the primary provisioner can be configured with the parameters described below. These parameters enable users to customize a Storageclass as needed and are optional with some having default values.
apiVersion: storage.k8s.io/v1
kind: StorageClass
metadata:
    name: <"storage-class-name">
provisioner: robin
reclaimPolicy: Delete
parameters:
    media: <SSD, HDD>
    blocksize: <"512", "4096">
    fstype: <ext4, xfs>
    protection: <replication, quorum-replication>
    replication: <"2", "3">
    faultdomain: <disk, host, rack>
    faultdomain_customlabel: <key>
    compression: <LZ4>
    encryption: <CHACHA20, AES256, AES128>
    workload: <ordinary, throughput, latency, dedicated>
    snapshot_space_limit: <"50">
    rpool: <"default">
    robin.io/storagetolerations: <key:value>
    host_tags: <key:value>
    hydration: <true, false>
|
The media type Robin should use to allocate PersistentVolumes.
Two values are supported: |
|
By default Robin uses |
|
By default, the logical block device created by Robin is formatted
using |
|
Type of Protection for a volume for data consistency. The valid values are
Note You must set the |
|
Number of replicas for a volume. By default, Robin does not enable replication for the Robin volume. You can set it to |
|
The fault domain to be used when “replication” is turned on. Setting the
right fault domain maximizes data safety. Setting it to |
|
Enables a user to form a custom faultdomain by specifying a key that is used as the Kubernetes label for nodes within the cluster. For example, if two nodes are tagged with the labels “color:red” and “color:blue” respectively, the key “color” can be used as a custom faultdomain label to ensure these hosts are considered as residing in different domains. Note: When you specify the |
|
By default, inline data compression is disabled. It can be enabled by
setting it to |
|
By default data-at-rest encryption is not enabled. To enable it set it
to |
|
|
|
This is how much space that is set aside for snapshots for this volume. For example, if volume size is 100GB, value of “30” here would be 30GB space reserved for snapshots. New snapshot creation will fail once this limit is reached. |
|
Resource pools are a construct in Robin which allow you to group nodes in
the cluster together for allocation purposes. Pools provide resource isolation. The default resource pool is |
|
Comma separated key-value pairs of the Storagetaints added to the nodes with |
|
Comma separated key-value pairs of labels or tags added to the nodes using the |
|
Copies data from the backup stored in an external cloud storage repository, to a cluster’s disks where volume needs to be imported. This parameter is optional and is only used for importing a volume using the Kubernetes specification. Valid values are |
Note
For the blocksize and replication attributes, the values they are configured with must be quoted strings to adhere to CSI specification. For example, the value for blocksize should be passed as “4096” (quoted) and NOT as 4096 (unquoted).
4.1. Using Robin CNS Storage Class to Provision Storage
4.1.1. Supported access modes to Provision Storage
Robin supports the following access modes to provision storage:
ReadWriteOnce (RWO)
ReadOnlyMany (ROX)
ReadWriteMany (RWX)
ReadWriteOncePod (RWOP)
For more information, see Access Modes.
4.1.2. Basic Use Case
The most straightforward use case for a PVC is to have it utilized by a Pod. The following steps can be used to achieve this.
Create a PersistentVolumeClaim with Robin CNS StorageClass
First configure YAML similar to the one shown below for a PersistentVolumeClaim (PVC) using the Robin CNS StorageClass.
apiVersion: v1
kind: PersistentVolumeClaim
metadata:
   name: mypvc

spec:
   accessModes:
       - ReadWriteOnce
   resources:
       requests:
          storage: 10Gi
   storageClassName: robin
Run the following command to create the PVC defined in above yaml:
$ kubectl create -f mypvc.yaml
persistentvolumeclaim/mypvc created
Note
Notice that under metadata/annotations we have spcified the storage class as
storageClassName: robin. This results in the Robin CNS Storage Class to be be picked up.Verify the desired PVC exists and was created successfully by running the following command:
$ kubectl get pvc
NAME                        STATUS    VOLUME                                     CAPACITY   ACCESS MODES   STORAGECLASS   AGE
mypvc                       Pending                                                                        robin          7s
Attach the PersistentVolumeClaim to a simple Pod:
Configure a Pod YAML, similar to the one showcased below, wherein which the volume we created previously is referenced.
kind: Pod
apiVersion: v1
metadata:
    name: myweb
spec:
    volumes:
      - name: htdocs
        persistentVolumeClaim:
          claimName: mypvc
    containers:
      - name: myweb0
        image: nginx
        ports:
            - containerPort: 80
              name: "http-server"
        volumeMounts:
            - mountPath: "/usr/share/nginx/html"
              name: htdocs
Run the following command to actually create the Pod:
$ kubectl create -f mypod.yaml
We can confirm that the PersistentVolumeClaim is bound to the pod and a PersistantVolume is created by issuing the following commands:
$ kubectl get pvc
NAME                        STATUS   VOLUME                                     CAPACITY   ACCESS MODES   STORAGECLASS   AGE
mypvc                       Bound    pvc-7a18d80c-6c26-4585-a949-24d9005e3d7f   10Gi       RWO            robin          6m1s

$ kubectl get pv
NAME                                       CAPACITY   ACCESS MODES   RECLAIM POLICY   STATUS   CLAIM                               STORAGECLASS   REASON   AGE
pvc-7a18d80c-6c26-4585-a949-24d9005e3d7f   10Gi       RWO            Delete           Bound    default/mypvc                       robin                   5m32s
4.1.3. Attach a volume to a Pod as readOnly
Robin supports the readOnly mode for a volume using Kubernetes CSI provisioner. When a volume is in the readOnly mode, the write requests will not be served, only the read requests will be served on this volume. To attach a volume to a Pod as readOnly, you must specify the following parameter in the Pod YAML in the spec.volumes.persistentVolumeClaim:
readOnly: true
Complete the following steps to attach a volume to a Pod as readOnly:
Create a Pod YAML with the PVC name you want to attach to a Pod as
readOnlyusing the following example:kind: Pod apiVersion: v1 metadata: name: my-csi-robin-app-clone-ro labels: app.kubernetes.io/instance: robin app.kubernetes.io/managed-by: robin.io app.kubernetes.io/name: robin spec: containers: - name: my-frontend image: busybox:stable volumeMounts: - mountPath: "/data" name: my-csi-robin-volume-clone command: [ "sleep", "1000000" ] volumes: - name: my-csi-robin-volume-clone persistentVolumeClaim: claimName: csi-pvc-robin-clone readOnly: true
Run the following command to create a Pod:
# kubectl create -f mypod.yaml
4.1.4. Customizing Volume Provisioning
Let’s say that we’d like to create a PVC which meets the following requirements:
Data is replicated 3-ways
The Pod should continue to have access to data even if 2 of the 3 disks or the nodes on which these disks are hosted go down
The data must be compressed
The data should only reside on SSD media
This is accomplished by specifying these requirements under metadata/annotations section of the PVC Spec as described in the YAML below. Please notice that each annotations are prefixed with robin.io/. Except fstype, Annotations can take exact same parameters as in Robin CNS Storage Class YAML detailed above and would override the corresponding parameters specified in the StorageClass.
apiVersion: v1
kind: PersistentVolumeClaim
metadata:
   name: proteced-compressed-pvc
   annotations:
      robin.io/replication: "3"
      robin.io/faultdomain: host
      robin.io/compression: LZ4
      robin.io/media: SSD

spec:
   accessModes:
       - ReadWriteOnce
   resources:
       requests:
          storage: 1Gi
   storageClassName: robin
Note
PVC annotations will be deprecated in future releases.
Run the following command to create the PVC:
$ kubectl create -f newpvc.yaml
persistentvolumeclaim/proteced-compressed-pvc created

$ kubectl get pvc
NAME                        STATUS    VOLUME                                     CAPACITY   ACCESS MODES   STORAGECLASS   AGE
mypvc                       Bound     pvc-7a18d80c-6c26-4585-a949-24d9005e3d7f   10Gi       RWO            robin          62m
proteced-compressed-pvc     Pending                                                                        robin          47s
Note
The number 3 is quoted as “3” when specifying the robin.io/replication annotation. This is as per the Kubernetes Spec. Not doing so would result in an error being thrown by Kuberentes.
4.1.5. Restricting Volume Placement
The restrict volume placement allows you to restrict and specify a volume creation on specific nodes. This feature is implemented by using the storage taint and storage toleration to restrict volume creation on specific nodes. This feature is similar to the Kubernetes taints and tolerations for Pods.
A new parameter named host_tags is added to the StorageClass to allow a volume creation on the desired nodes.
4.1.5.1. Point to consider for restricting volume placement
You must add the equivalent storage tolerations to the storage class to create the volumes onto nodes having storage taints.
A storage toleration allows a volume to be created on a node that has storage taint but does not guarantee it. When you add the labels or tags to that node, it guarantees to place a volume on the respective node.
After adding storage taints to the nodes, the existing volume on these nodes will not be moved anywhere.
After creating a volume using the storage tolerations, adding or removing tags from the nodes will not move existing volumes from the nodes.
Complete the following steps to create a PVC on specific node:
Add the labels to the desired node:
# kubectl label node <node_name> <key:value>
Example
# kubectl label node rakuten-37.robinsystems.com tier:gold
node/rakuten-37.robinsystems.com labeled
Add Storagetaint to the desired node:
# kubectl annotate node <node_name> robin.io/storagetaint=<key:value>
Example
# kubectl annotate node rakuten-37.robinsystems.com robin.io/storagetaint='mysql:True'
node/rakuten-37.robinsystems.com annotate
Create a storageclass.yaml file with the
robin.io/storagetolerationsandhost_tagsparameters using the following example:apiVersion: storage.k8s.io/v1 kind: StorageClass metadata: name: robin-storage-toleration labels: app.kubernetes.io/instance: robin app.kubernetes.io/managed-by: robin.io app.kubernetes.io/name: robin provisioner: robin reclaimPolicy: Delete allowVolumeExpansion: true volumeBindingMode: Immediate parameters: media: SSD rpool: default compression: LZ4 replication: "2" faultdomain: host encryption: CHACHA20 robin.io/storagetolerations: "mysql:True" host_tags: "tier:gold"
Create a StorageClass using the storageclass.yaml file created in step 3:
# kubectl create -f <storageclass.yaml>
Example
# kubectl create -f robin-sc.yaml
storageclass.storage.k8s.io/robin-storage-toleration created
Create a pvc.yaml file to create a PVC using the following example:
 apiVersion: v1
 kind: PersistentVolumeClaim
 metadata:
     name: test-pvc
 spec:
     accessModes:
       - ReadWriteOnce
     resources:
       requests:
         storage: 100Gi
     storageClassName: robin-storage-toleration
Create a PVC using the pvc.yaml file created in step 5:
# kubectl create -f <pvc.yaml>
Example
# kubectl create -f pvc.yaml
persistentvolumeclaim/test-pvc created
4.1.6. Create an Encrypted Volume
An encrypted volume can be used to secure application data. The following steps can be used to create an encrypted volume.
Configure the PersistentVolumeClaim YAML
First, you need to configure YAML similar to the one shown below for PersistentVolumeClaim (PVC) using the Robin CNS StorageClass.
apiVersion: v1
kind: PersistentVolumeClaim
metadata:
   name: robinvol
   annotations:
       robin.io/media: HDD
       robin.io/encryption: AES128

spec:
   accessModes:
         - ReadWriteOnce
   resources:
       requests:
          storage: 5Gi
   storageClassName: robin
Create the PersistentVolumeClaim
Run the following command to create the encrypted PVC defined in the above YAML:
# kubectl create -f robinvol.yaml
persistentvolumeclaim/robinvol created
4.1.7. Using Robin CNS in a StatefulSet
In a StatefulSet a PVC is not directly referenced as in the above examples, but instead a volumeClaimTemplate is used to describe the type of PVC that needs to be created as part of the creation of the StatefulSet resource. This is accomplished via the following YAML:
apiVersion: v1
kind: Service
metadata:
  name: nginx
  labels:
      app: nginx
spec:
  ports:
  - port: 80
    name: web
  clusterIP: None
  selector:
    app: nginx
---
apiVersion: apps/v1
kind: StatefulSet
metadata:
  name: web
spec:
  serviceName: "nginx"
  replicas: 2
  selector:
    matchLabels:
      app: nginx
  template:
    metadata:
      labels:
        app: nginx
    spec:
      containers:
      - name: nginx
        image: k8s.gcr.io/nginx-slim:0.8
        ports:
        - containerPort: 80
          name: web
        volumeMounts:
        - name: www
          mountPath: /usr/share/nginx/html
  volumeClaimTemplates:
  - metadata:
      name: www
      annotations:
        robin.io/replication: "2"
        robin.io/media: SSD
    spec:
      accessModes: [ "ReadWriteOnce" ]
      resources:
        requests:
          storage: 1Gi
      storageClassName: robin
The following commands can be used to create the Statefulset and ensure the correct PVCs are used:
$ kubectl create -f myweb.yaml
service/nginx created
statefulset.apps/web created


$ kubectl get statefulset
NAME   READY   AGE
web    2/2     12s

$ kubectl get pvc
NAME        STATUS   VOLUME                                     CAPACITY   ACCESS MODES   STORAGECLASS   AGE
www-web-0   Bound    pvc-2b97d8fc-479d-11e9-bac1-00155d61160d   1Gi        RWO            robin          8s
www-web-1   Bound    pvc-436536e6-479d-11e9-bac1-00155d61160d   1Gi        RWO            robin          8s

$ kubectl get pv
NAME                                       CAPACITY   ACCESS MODES   RECLAIM POLICY   STATUS   CLAIM               STORAGECLASS   REASON   AGE
pvc-2b97d8fc-479d-11e9-bac1-00155d61160d   1Gi        RWO            Delete           Bound    default/www-web-0   robin                   10s
pvc-436536e6-479d-11e9-bac1-00155d61160d   1Gi        RWO            Delete           Bound    default/www-web-1   robin                   10s
4.1.8. Provisioning Storage for Helm Charts
Helm charts are a popular way to deploy an entire stack of Kubernetes resources in one shot. A helm chart is installed using helm install command. To use Robin CNS for persistent storage one needs to pass it as --set persistence.storageClass=robin command line option as shown below:
$ helm install --name pgsqldb stable/mysql --set persistence.storageClass=robin
This would result in Robin being used as the storage provisioner for PersistentVolumeClaims created by this helm chart.
4.1.8.1. Identifying released volumes
When PVC is created with a ReclaimPolicy of Retain, Kubernetes will not call the CSI driver to delete the backing PersistentVolume when the linked PVC is removed. As a result, in such cases the Robin Adminstrator might need to manually clean up the associated released volumes in order complete the deletion process. To aid the process, a utility named get-unbound-vols is provided within the Robin daemonset Pods. As its name suggests it discovers any unbound volumes which do not have any associated PVCs and thus enables the Adminstrator to complete the deletion process by removing the identified PV objects and their linked Robin volumes (with the same name) using the kubectl delete pv and robin volume delete commands respectively. More information on the ReclaimPolicy concept can be found here.
To run the utility, execute into any Robin daemonset pod, login as the Adminstrator and issue the get-unbound-vols command as shown in the example below:
# kubectl describe robinclusters -n robinio
Name:         robin
Namespace:    robinio
Labels:       app.kubernetes.io/instance=robin
              app.kubernetes.io/managed-by=robin.io
              app.kubernetes.io/name=robin
Annotations:  API Version:  manage.robin.io/v1
Kind:         RobinCluster
Metadata:
   Creation Timestamp:  2021-02-04T09:41:06Z
   Generation:          1
Resource Version:  378697
Self Link:         /apis/manage.robin.io/v1/namespaces/robinio/robinclusters/robin
UID:               7533d2da-8521-47e2-bb52-426df5a07a2b
Spec:
 host_type:            ibm
 image_pull_secret:    all-icr-io
 image_registry_path:  uk.icr.io/docker_registry/docker
 image_robin:          robinsys/robinimg:5.3.4-75
 k8s_provider:         iks
Options:
 cloud_cred_secret:  cloud-cred-secret
 update_coredns:     1
Status:
 connect_command:   kubectl exec -it robin-nfbxx -n robinio -- bash
 get_robin_client:  curl -k https://10.242.64.22:29442/api/v3/robin_server/download?file=robincli&os=linux > robin
 master_ip:         10.242.64.22
 Phase:             Ready
 pod_status:
  robin-nfbxx  10.242.64.22  Running  10.242.64.22
  robin-drdzx  10.242.64.21  Running  10.242.64.21
  robin-57w8h  10.242.64.20  Running  10.242.64.20
robin_node_status:
 host_name:      kube-c0d69ael0c0ce2a8b6b0-asitclus-default-00000b25
  join_time:      1612431722
  k8s_node_name:  10.242.64.22
  Roles:          M*,S
  Rpool:          default
  State:          ONLINE
  Status:         Ready
 host_name:      kube-c0d69ael0c0ce2a8b6b0-asitclus-default-00000a68
  join_time:      1612431745
  k8s_node_name:  10.242.64.20
  Roles:          S,M
  Rpool:          default
  State:          ONLINE
  Status:         Ready
 host_name:      kube-c0d69ael0c0ce2a8b6b0-asitclus-default-00000c21
  join_time:      1612431760
  k8s_node_name:  10.242.64.21
  Roles:          S,M
  Rpool:          default
  State:          ONLINE
  Status:         Ready
  Events:         <none>

# kubectl exec -it robin-nfbxx -n robinio -- bash
[robinds@hypervvm-72-43]#

[robinds@hypervvm-72-43]# robin login admin --password Robin123
User admin is logged into Administrators tenant

[robinds@hypervvm-72-43]# get-unbound-vols
Unbound volumes (without PVCs):
pvc-6732bdf4-58ce-40da-abff-c93089dcdcdf
pvc-15b32f8f-4e85-4d97-a28e-9d760f63769b
4.2. Protecting PVCs using Robin’s Volume Replication
Robin CNS supports storage volume-level replication to ensure that data is always available in the event of nodes and disks failure. To achieve this, Robin CNS uses the protection parameter to configure a volume replication and the replication parameter to set the replica count of a volume.
4.2.1. Protection parameter
To configure volume replication, the protection parameter with options either replication or quorum-replication needs to be specified in the StorageClass:
Replication - Write IOs are only acknowledged to the client once they are made durable on all healthy replicas. The read and write IOs are allowed to the last standing replica. This is the default value of the protection parameter.
Quorum-replication - Write IOs are only acknowledged to the client once they are made durable on majority of replicas. When the number of active replicas are less than the quorum value, only the read IOs are served from the last standing replica and the write IOs are not served in the region of the volume that is out of quorum because of the faults in the cluster. Leader replica makes sure that the write IOs are made to at least quorum replicas before it is acknowledged to the client.
4.2.1.1. Points to consider for quorum-replication protection
After creating a volume, you cannot change the protection type and replication count.
Import of a quorum-based replication volume is supported only if it is imported with the hydration option.
A thick clone volume can have its own protection type, independent of the parent volume.
4.2.2. Replication parameter
To set the replica count of a volume, the replication parameter with options either 2 or 3 needs to be specified in the StorageClass. Robin CNS uses a synchronous replication to ensure high availability of data. Synchronous replication ensures data is written and committed to all the replicas in real time. The benefit synchronous replication provides is guaranteed data consistency between the replicated volumes.
When the replication parameter is set to 2, at least 2 copies of the volume are maintained on different disks or host. If it is set to 3, at least 3 copies are maintained. This ensures that the volume’s data is available in the event of 1 or 2 disks or nodes failure.
Configuring replication can be done by either specifying the replication parameter in the StorageClass or annotating the PVC spec with robin.io/replication: "<count>" and optionally robin.io/faultdomain: disk|host|rack as shown in the YAML below:
apiVersion: v1
kind: PersistentVolumeClaim
metadata:
   name: replicated-pvc
   annotations:
      robin.io/replication: "3"
      robin.io/faultdomain: host

spec:
   accessModes:
       - ReadWriteOnce
   resources:
       requests:
          storage: 1Gi
   storageClassName: robin
Setting the correct value for robin.io/fautdomain to either disk or host or rack ensures that this PVC’s data is available in the event of just a disk or also node failures.
How are faults handled?
Robin CNS uses strict-consistency semantics to guarantee correctness for your mission critical stateful applications. This means that a “write” IO is not acknowledged back to the application until it made durable on all the healthy replica disks.
It is possible that one or more replica disks for a volume can go down for short periods of time (node going through a reboot cycle), or for longer periods of time (node has a hardware fault and can’t be brought online until the part is replaced). Robin CNS handles both cases gracefully.
When a replica disk becomes available during IO, Robin CNS automatically evicts it from the replication group. The IOs continue to go to the remaining healthy replicas. When the faulted disks become available Robin CNS automatically brings them up to the same state as the other healthy disks before adding it back into the replication group. This is automatically handled and transparent to the application.
When a disk suffers a more serious error, for example, an IO error is returned by the disk during a write or read operation. In this case, Robin CNS marks that disk as faulted and generates an alert for the storage admin to investigate.
The storage admin can then determine the nature of the error and then mark that disk as healthy, in which case Robin CNS adds it back into the replication group and initiates a data resync to bring it up to the same level as the other healthy disks.
If the error is serious (for example, SMART counters return corruption), or if the node has a motherboard or IO card fault that needs to be replaced, the storage admin can permanently decommison that disk or node from the Kubernetes cluster. Doing so would also automatically evict that disk from the replication group of the PVC. The storage admin can then add a new healthy disk to the replication group so that the PVC can be brought back to the same level of availability as before.
There is a practical reason why Robin CNS doesn’t automatically trigger rebuilds of faulted disks. Robin CNS is currently being used in mission critical workloads with multiple-petabytes under management by the Robin storage stack. We have seen scenarios where an IO controller card has failed while it has 12 disks of 10TiB each. That is 120 TiB of storage capacity under a single IO controller card. Rebuilding 120 TiB of data takes more time than replacing a faulted IO controller card with a healthy one. Also, moving 120 TiB of data over the network from healthy disks on other nodes puts a significant load on the network switches and the applications running on the nodes from which the data is pulled.
This results in noticeable performance degradation. With our experience managing storage under large scale deployments and taking feedback from admins managing those clusters we have determined that it is best to inform an admin of a failure and let them decide, based on cost and time, whether they want to replace a faulty hardware or want Robin CNS to initiate a rebuild.
4.3. Making Robin the default StorageClass
To avoid typing the name of the StorageClass each time a new chart is deployed, it is highly recommend to set a StorageClass provided by Robin as the default Kubernetes StorageClass. The following steps can be used to achieve this.
Check the current default StorageClass
Inspect if there is already a different StorageClass marked as default by running the following command:
$ kubectl get storageclass
NAME            PROVISIONER             RECLAIMPOLICY   VOLUMEBINDINGMODE      ALLOWVOLUMEEXPANSION   AGE
gp2 (default)   kubernetes.io/aws-ebs   Delete          WaitForFirstConsumer   true                   8d
robin           robin                   Delete          WaitForFirstConsumer   true                   5d5h
Set the non-Robin StorageClass as “non-default”
In order to mark the current default StorageClass as “non-default” run the following command:
$ kubectl patch storageclass gp2 \
   -p '{"metadata": {"annotations":{"storageclass.kubernetes.io/is-default-class":"false"}}}'
        storageclass.storage.k8s.io/gp2
Note
Before patching the storage class ensure that the annotation specified is correct. The above example is specific to a GKE cluster running version 1.12 of Kubernetes.
Make the Robin StorageClass the new default
To set a Robin provided StorageClass as the default for the cluster, run the following command:
$ kubectl patch storageclass robin \
  -p '{"metadata": {"annotations":{"storageclass.kubernetes.io/is-default-class":"true"}}}'
Verify that the Robin StorageClass is now the default
Issue the following command to confirm that Robin is now the default StorageClass:
$ kubectl get storageclass
NAME              PROVISIONER             RECLAIMPOLICY   VOLUMEBINDINGMODE      ALLOWVOLUMEEXPANSION   AGE
gp2               kubernetes.io/aws-ebs   Delete          WaitForFirstConsumer   true                   8d
robin (default)   robin                   Delete          WaitForFirstConsumer   true                   5d5h
To learn more the official documentation on this process can be found here.
4.4. ReadWriteMany (RWX) Volumes
Robin supports the ReadWriteMany (RWX) access mode of Persistent Volumes (PVs). An RWX PVC can be used by any Pod on any node in the same namespace for read and write operations. More information on these types of volumes can be found here.
Robin provides support for RWX volumes by utilizing a shared file system. Specifically the network file system (NFS) is used. These volumes can be mounted within any Pod deployed via Helm or YAML files and consequently can support multiple read/write clients. In addition, support for RWX volumes also extends to non-root application Pods, details for which can be found here.
Note
RWX volumes are not supported within Robin Bundle applications.
4.4.1. Default Configuration for RWX volumes
When you install Robin CNS, Robin creates a sample StorageClass as robin-rwx for RWX volumes. You can use this StorageClass for creating RWX volumes. The default values of the robin-rwx StorageClass for replication factor and faultdomain are 2 and host respectively.
Note
For RWX volumes, you must specify the replication greater than 1 and the faultdomain as either host or rack. These conditions must be met for RWX volumes to be provisioned.
The default values are considered if the robin.io/replication and robin.io/faultdomain annotations are not explicitly defined within the PVC definition YAML.
The following is an example of a PVC definition YAML where the default replication and faultdomain are overridden:
apiVersion: v1
kind: PersistentVolumeClaim
metadata:
    name: nfs-shared-1
    annotations:
        robin.io/nfs-server-type: "shared"
        robin.io/replication: "3"
        robin.io/faultdomain: "rack"
spec:
StorageClassName: robin-rwx
accessModes:
     - ReadWriteMany
resources:
  requests:
      storage: 500Gi
To override the default replication factor such that only 1 replica is provisioned, the robin.io/rwx_force_single_replica: "1" annotation must be specified. If an increased number of replicas are needed (the maximum being 3), the robin.io/replication annotation must be specified with the appropriate value.
The following is an example of a PVC definition YAML where the default replication factor has been overridden such that only 1 replica is provisioned:
apiVersion: v1
kind: PersistentVolumeClaim
metadata:
   name: nfs-shared-1
   annotations:
      robin.io/nfs-server-type: "shared"
      robin.io/rwx_force_single_replica: "1"
spec:
storageClassName: robin-rwx
accessModes:
   - ReadWriteMany
resources:
   requests:
      storage: 500Gi
4.4.2. NFS server Pod
Every RWX PVC results in an NFS export from an NFS server Pod. When you create a PVC, Robin automatically creates an NFS server Pod and configures it on demand. All Robin NFS server Pods are High Availability (HA) compliant. Robin monitors the health of the NFS server Pods and executes a failover automatically if any NFS server Pod is offline.
There are two types of NFS server Pod, shared and exclusive, which are described in the sections below. The default NFS server Pod type is shared. In order to update this value, the following command can be used:
# robin config update nfs default_server_type <pod_type>
Example
# robin config update nfs default_server_type exclusive
4.4.2.2. Exclusive NFS server Pod
With an exclusive NFS server Pod, only one RWX PVC is associated the Pod resulting in a dedicated NFS server Pod for the PVC. To allocate an exclusive NFS server Pod for a PVC, use the following annotation. An example of its usage is shown below as well.
robin.io/nfs-server-type: "exclusive"
Example
apiVersion: v1
kind: PersistentVolumeClaim
metadata:
  name: nfs-excl-1
  annotations:
   robin.io/nfs-server-type: "exclusive"
spec:
  accessModes:
     - ReadWriteMany
  resources:
    requests:
      storage: 1Gi
4.4.3. Set resource limits for exclusive NFS server Pods
The requests and limits for the CPU and memory consumption of exclusive NFS server Pods can be set using PVC annotations. This allows users to control the resource utilization of dedicated RWX volumes and override the default config values for each of the attributes.
To set the requests and limits for CPU, use the respective annotation shown below.
robin.io/nfs-cpu-limit: <limit_value>
robin.io/nfs-cpu-request: <request_value>
To set the requests and limits for memory, use the respective annotation shown below.
robin.io/nfs-memory-limit: <limit_value>
robin.io/nfs-memory-request: <request_value>
Example
apiVersion: v1
kind: PersistentVolumeClaim
metadata:
  name: CSI-PVC-robin
  labels:
    app.kubernetes.io/instance: robin
    app.kubernetes.io/managed-by: robin.io
    app.kubernetes.io/name: robin
  annotations:
    robin.io/media: HDD
    robin.io/compression: LZ4
    robin.io/nfs-server-type: "exclusive"
    robin.io/nfs-cpu-limit: 300m
    robin.io/nfs-memory-limit: 300Mi
    robin.io/nfs-cpu-request: 240m
    robin.io/nfs-memory-request: 240Mi
spec:
  accessModes:
     - ReadWriteMany
  resources:
    requests:
      storage: 1Gi
  StorageClassName: robin
Note
The annotations above must be specified during the initial creation of the PVC otherwise they will not take affect even if given at a later time.
4.4.4. Managing tolerations for NFS server Pods
In certain environments, some nodes within the Kubernetes cluster might have custom taints set in order to differentiate them from the rest of the nodes in the cluster. In this scenario, NFS server Pods (or any Pods for that matter) cannot be deployed on these nodes if they do not have the appropriate tolerations in their definition. As a result, in order to support the deployment of NFS server Pods on nodes with custom taints Robin provides two methods to set the necessary tolerations for the aforementioned pods. Namely these are updating a config attribute or updating the deployment YAML natively and both are described in detail in the sections below. The former method impacts new NFS server Pods to be created whilst the latter focuses on Pods which are already deployed. More information on Kubernetes taints and tolerations can be found here.
4.4.4.1. Utilizing Robin configuration attribute
Robin allows users to utilize the nfs_pod_tolerations config attribute to set the necessary tolerations for all NFS server Pods. This attribute accepts multiple key-effect value pairs in a comma seperated manner which result in multiple tolerations being added to the NFS server Pod. More details on the configuration attribute and how to update it can be found here. For convienence, an example of how to update it is shown below:
# robin config update nfs nfs_pod_tolerations "taintgrp:NoSchedule,node-role.kubernetes.io/control-plane:NoExecute"
The 'nfs' attribute 'nfs_pod_tolerations' has been updated
Note
The tolerations set via the nfs_pod_tolerations attribute will only be reflected in NFS server Pods created after the config attribute is updated. For the existing NFS server Pods, you must add tolerations manually via native commands as described in the section below.
If the node in question is untainted altogether, all of the respective tolerations will have to be removed from the NFS server Pod in order for it to function properly. To ensure this is the case for any new NFS server Pods, the nfs_pod_tolerations config attribute can be reset to its default value of None as shown in the example below:
# robin config update nfs nfs_pod_tolerations none
The 'nfs' attribute 'nfs_pod_tolerations' has been updated
4.4.4.2. Utilizing native commands
If a NFS server Pod without taints is already deployed on node with taints, it will continously fail to reach a Ready state until the appropriate tolerations are appended to its definition. The steps to complete this process are shown below:
Run the following command to edit NFS server Pod’s YAML:
# kubectl edit pods -n robinio <pod_name>
In the
specsection, add the key-effect value pair that mirrors the taints of the appropriate node to thetolerationdictionary within the YAML:tolerations: - key: "<keyname>" operator: "Exists" effect: "<effect>"
Note
Multiple tolerations can be specified by repeating the above key-effect block with the respective values
Save the updated YAML in order to bounce the NFS sever Pod and ensure it reaches the
Readystate
If the tolerations for an existing NFS server Pod ever need to be removed, as is necessary when the respective node is untainted, the above steps can also be followed except instead of appending the toleration dictionary to the YAML file it needs to be removed.
4.4.5. Configure NFS server Pod attributes
Listed below are all the attributes a user can configure with regards to the configuration of the NFS server pods to be created.
Note
These attributes can be seen using the command robin config list nfs
Attribute |
Default value |
Valid Values |
|---|---|---|
|
shared |
|
|
100m |
As needed but should conform to the standard Kubernetes notation for CPU requests as documented here. |
|
200Mi |
As needed but should conform to the standard Kubernetes notation for memory requests as documented here. |
|
UNLIMITED |
As needed but should conform to the standard Kubernetes notation for CPU limits as documented here. |
|
UNLIMITED |
As needed but should conform to the standard Kubernetes notation for memory limits as documented here. |
|
1 |
Can be set to ‘0’ in order to disable failovers and ‘1’ in order to enable them. |
|
8 |
As needed per the planned requirments but has to be an integer. |
|
none |
|
|
600 |
As needed per the planned requirements but must be an integer. |
|
60 |
As needed per the planned requirments but has to be an integer. |
|
100m |
As needed per the planned requirments but has to be an integer. |
|
UNLIMITED |
As needed per the planned requirments but has to be an integer. |
|
1 |
Can be set to ‘0’ in order to disable shared Pod failovers and ‘1’ in order to enable them. |
|
200Mi |
As needed but should conform to the standard Kubernetes notation for memory requests as documented here. |
|
UNLIMITED |
As needed but should conform to the standard Kubernetes notation for memory limits as documented here. |
|
shared |
|
|
None |
Any valid tolerations that match the taints and respective effects already placed on target nodes. The tolerations should be specified in the following format: “key1:effect1,key2:effect2”. |
In order to update an NFS server Pod attribute, run the following command:
# robin config update nfs <attribute> <valid_value>
Example
# robin config update nfs shared_pod_placement SPREAD
The 'nfs' attribute 'shared_pod_placement' has been updated
Note
The modified values only applicable to NFS server Pod to be created. The updated values are not applied to existing NFS server Pods.
4.4.6. List all NFS server Pods
To view the list of all NFS server Pods currently present on the cluster alongside additional details such as the ID, state, Kuberentes name, type and associated host for each Pod, run the following command:
# robin nfs server-list --json
|
Output in JSON |
Example
# robin nfs server-list
+--------+-------------------------+---------------------------------+---------------------+--------+
| Pod ID |      NFS Server Pod     |             Hostname            | NFS Server Pod Type | State  |
+--------+-------------------------+---------------------------------+---------------------+--------+
|  180   | robin-nfs-excl-v108-180 | hypervvm-62-35.robinsystems.com |      EXCLUSIVE      | ONLINE |
|  181   |   robin-nfs-shared-181  | hypervvm-62-35.robinsystems.com |        SHARED       | ONLINE |
|  170   | robin-nfs-excl-v107-170 | hypervvm-62-33.robinsystems.com |      EXCLUSIVE      | ONLINE |
|  185   | robin-nfs-excl-v104-185 | hypervvm-62-34.robinsystems.com |      EXCLUSIVE      | ONLINE |
|  184   | robin-nfs-excl-v110-184 | hypervvm-62-35.robinsystems.com |      EXCLUSIVE      | ONLINE |
+--------+-------------------------+---------------------------------+---------------------+--------+
4.4.7. List all NFS exports
To view the list of NFS exports currently present on the cluster alongside additional details such as the ID, state, associated RWX volume, NFS server Pod and client host for each export, run the following command:
# robin nfs export-list --server <server>
                        --volume <volume>
                        --verbose
|
Filter the list of NFS exports by the specified NFS server Pod. Either the NFS server Pod name or ID should be given |
|
Filter the list of NFS exports by the specified volume. Either the volume name or ID should be given |
|
Include additional information in the output |
Example
# robin nfs export-list
+--------------+-----------+------------------------------------------+-------------------------+-----------------------------------------------------------------------+
| Export State | Export ID |                  Volume                  |      NFS Server Pod     |                             Export Clients                            |
+--------------+-----------+------------------------------------------+-------------------------+-----------------------------------------------------------------------+
|    READY     |     18    | pvc-2985f5f7-fd32-4645-95d1-551bce9ed002 | robin-nfs-excl-v112-175 |                  ["hypervvm-62-33.robinsystems.com"]                  |
|    READY     |     21    | pvc-9b1ea557-f0f5-419d-ad2a-54eed25c22c1 | robin-nfs-excl-v115-179 |                  ["hypervvm-62-33.robinsystems.com"]                  |
|    READY     |     2     | pvc-6ec4aa2d-6b56-4746-85c2-4bc8bf494115 |   robin-nfs-shared-181  |                  ["hypervvm-62-35.robinsystems.com"]                  |
|    READY     |     5     | pvc-6f5747b5-88c9-4e92-9547-0cf7cdf7b12a |   robin-nfs-shared-181  | ["hypervvm-62-35.robinsystems.com","hypervvm-62-33.robinsystems.com"] |
|    READY     |     4     | pvc-a5e14684-761b-4f3e-8f0a-a1828de3fa3f |   robin-nfs-shared-181  |                  ["hypervvm-62-35.robinsystems.com"]                  |
|    READY     |     13    | pvc-7fb597c8-f976-4ea6-9422-5349e37e544d | robin-nfs-excl-v107-170 |                  ["hypervvm-62-34.robinsystems.com"]                  |
|    READY     |     19    | pvc-33827f5a-4004-49fb-b6ef-22f3b0ff6c40 | robin-nfs-excl-v113-182 |                  ["hypervvm-62-34.robinsystems.com"]                  |
+--------------+-----------+------------------------------------------+-------------------------+-----------------------------------------------------------------------+
4.4.8. List all applications associated with an NFS server Pod
To view the list of all applications currently present on the cluster that are linked to a NFS server Pod alongside additional details such as the name, type and associated NFS server Pod for each application, run the following command:
# robin nfs app-list --server <server>
|
Filter applications that are using the respective NFS server Pod. |
|
Output in |
Note
Only applications whose objects (Pods, controllers etc.) have both the app and release labels within their definition or contain the updated app.kubernetes.io/name and app.kubernetes.io/instance labels within their specification will be shown by the above command.
Example
# robin nfs app-list
+-------------+------------------+----------------------+
| Application | Application Type |      NFS Server      |
+-------------+------------------+----------------------+
|    myapp1   |       helm       | robin-nfs-shared-181 |
|    myapp2   |       helm       | robin-nfs-shared-181 |
|    myapp3   |       helm       | robin-nfs-shared-181 |
+-------------+------------------+----------------------+
4.4.9. Show information about a specific application and its NFS usage
Issue the following command to get information about the RWX volume and NFS server Pod associated with a specific application instance:
# robin nfs server-info <name>
|
Name of application to fetch details for |
Example
# robin nfs server-info myapp1
+-------------+------------------------------------------+----------------------+
| Application | Volume Name                              | NFS Server Pod       |
+-------------+------------------------------------------+----------------------+
| myapp1      | pvc-6ec4aa2d-6b56-4746-85c2-4bc8bf494115 | robin-nfs-shared-181 |
+-------------+------------------------------------------+----------------------+
4.4.10. Enable TLS Encryption for RWX Volumes
Robin CNS allows you to configure and manage in-transit encryption for ReadWriteMany (RWX) volumes using the mutual transport layer security (mTLS) protocol. It uses Network File System (NFS) as the underlying transport for volumes. When you enable this feature, Robin CNS deploys a stunnel sidecar container in the NFS server pod. This container handles TLS traffic from the mounting clients, decrypts it, and forwards the traffic to the NFS server container in the same pod.
Note
This feature is applicable only for exclusive NFS server Pods, not for shared NFS server Pods. For more information about the NFS server pod, see NFS server Pod.
Prerequisites
The volume must use an exclusive NFS server Pod.
All worker nodes must be running Linux kernel 6.x or later.
The
tlskernel module must be loaded on all worker nodes.
You can enable TLS encryption for RWX volumes at the following levels:
Cluster level
StorageClass level
Volume level
4.4.10.1. Cluster-level encryption
You can enable cluster-level encryption for RWX volumes. When you enable it, it applies to all volumes that do not have a TLS specified in their storageclass.
Note
By default, the cluster-level encryption is disabled.
Enable cluster-level encryption
To enable cluster-level encryption for RWX volumes, run the following command:
# robin config update nfs tls_state enable
Example
# robin config update nfs tls_state enable
The 'nfs' attribute 'tls_state' has been updated
Disable cluster-level encryption
To disable cluster-level encryption for RWX volumes, run the following command:
# robin config update nfs tls_state disable
Example
# robin config update nfs tls_state disable
The 'nfs' attribute 'tls_state' has been updated
4.4.10.2. StorageClass-level encryption
You can enable StorageClass-level encryption for RWX volumes. To enable StorageClass-level encryption, you must create a StorageClass with the following parameters in the parameters section and provision RWX volumes using this storageclass:
tls_state: enablenfs-server-type: "exclusive"
Note
StorageClass-level encryption overrides the cluster-level encryption.
Sample StorageClass YAML
 apiVersion: storage.k8s.io/v1
 kind: StorageClass
 metadata:
   name: robin-rwx-tls
 provisioner: robin
 reclaimPolicy: Delete
 parameters:
   replication: "2"
   faultdomain: host
   nfs-server-type: "exclusive"
   tls_state: "enable"
4.4.10.3. Volume-level encryption
You can enable volume-level encryption for an individual RWX volume. To enable encryption for an existing volume, you must set the tls_state parameter to enable using the robin nfs export-update command.
Enable volume-level encryption
To enable volume-level encryption for an individual RWX volume, run the following command:
Note
Ensure that the volume is not mounted before running this command.
# robin nfs export-update <volume> --tls_state enable
Example
# robin nfs export-update pvc-c6358434-e8e0-49cf-8c3f-2f9f70b65fd3 --tls_state enable
NFS export for volume pvc-c6358434-e8e0-49cf-8c3f-2f9f70b65fd3 has been updated successfully.
Disable volume-level encryption
To disable volume-level encryption for an individual RWX volume, run the following command:
# robin nfs export-update <volume> --tls_state disable
Example
# robin nfs export-update pvc-c6358434-e8e0-49cf-8c3f-2f9f70b65fd3 --tls_state disable
NFS export for volume pvc-c6358434-e8e0-49cf-8c3f-2f9f70b65fd3 has been updated successfully.
Note
The TLS configuration changes for an existing volume do not apply to active NFS volume mounts. The updated TLS configuration takes effect only for new NFS volume mounts. Existing NFS volume mounts use the previously configured TLS configuration until the pod is restarted.
4.5. Robin StorageClass with GID and UID to Run Non-Root App Pods
In Kubernetes, only the root user can access all the persistent volumes. However, using new parameters in Robin’s StorageClass, you can allow a specific set of users to access the persistent volume. You can provide read and write access for a non-root user to a persistent volume by providing GID and UID when creating a new Robin StorageClass. Use this StorageClass in the PVC and set Pod’s security context with the runAsUser value. When you provide a GID for read and write access to the persistent volumes, any non-root user that belongs to the group ID, including a Pod, is granted access to the file storage.
The following is the sample YAML file:
allowVolumeExpansion: true
apiVersion: storage.k8s.io/v1
kind: StorageClass
labels:
  app.kubernetes.io/instance: robin
  app.kubernetes.io/managed-by: robin.io
  app.kubernetes.io/name: robin
metadata:
        name: robin-gid
parameters:
  gidAllocate: "true"
  gidFixed: "1001"
  media: HDD
  uidFixed: "1001"
provisioner: robin
reclaimPolicy: Delete
volumeBindingMode: WaitForFirstConsumer
Note
There are known Kubernetes permission issues when you mount a volume with subPath for non-root users. As a workaround, you can remove the subPath parameter or use init container to chown the path. More details about this issue can be found here.
4.6. Snapshot Volumes
Just like storage management, which is done by an external storage provisioner such as Robin, taking snapshots of a single Robin volume is also done using a CSI-Snapshotter that is registered with Kubernetes. The official documentation on volume snapshots can be found here. Robin supports native Kubernetes snapshots for Kubernetes versions v1.13 and beyond.
4.6.1. How it works
Snapshots in Robin are incremental in nature. Every snapshot is built on top of the previous snapshot. The previous snapshot is the parent snapshot to the new snapshot and the new snapshot is the child snapshot.
As the snapshots are incremental in nature, every snapshot stores its own data until the previous snapshot is deleted. When you delete a snapshot, its data is not deleted. The child snapshot inherits all the data from its parent snapshot. Sherlock displays the snapshot entry for all snapshots. If the valid data of a deleted snapshot exists, Sherlock displays the snapshot entry for this snapshot also and it shows zero in size.
Example
robin_snap_size{name="snapshot-1684315576.deleted.1684321319",id="1",ctime="0",volumename="pvc-3dc3c881-9ba5-422f-97ea-976ac65079a3",volumeid="1"} 0
robin_snap_state{name="snapshot-1684315576.deleted.1684321319",id="1",ctime="0",volumename="pvc-3dc3c881-9ba5-422f-97ea-976ac65079a3",volumeid="1"} 5
robin_snap_nclones{name="snapshot-1684315576.deleted.1684321319",id="1",ctime="0",volumename="pvc-3dc3c881-9ba5-422f-97ea-976ac65079a3",volumeid="1"} 0
Steps to verify how snapshots work in Robin
The following are the steps to verify how snapshots work in Robin:
Write some data on a volume and capture a snapshot of this volume. Let’s consider 2 GB data is written on this volume.
Run the following command to verify the size of snapshot1, and it must be 2048M (2 GB):
# robin snapshot info snapshot1 | grep -i size
Snapshot Size          : 2048M
Again, write 1 GB of data on the same volume without overwriting the existing data, and create another snapshot.
Run the following command to verify the size of snapshot2:
# robin snapshot info snapshot2 | grep -i size
Snapshot Size          : 1024M
Run the following command to know the total data written on the volume:
# robin volume info pvc-90111007-3890-4a48-b6e0-785c51d52456  | grep -i size
Logical Size                : 10.0G
Physical Size*              : 3.00G

*Size calculation is inclusive of all replicas.
Due to the incremental nature of the snapshots in Robin, the snapshot1 and snapshot2 show the snapshot size as 2 GB and 1 GB respectively instead of 2 GB and 3 GB collectively.
4.6.2. How data in snapshots handled with Garbage Collection
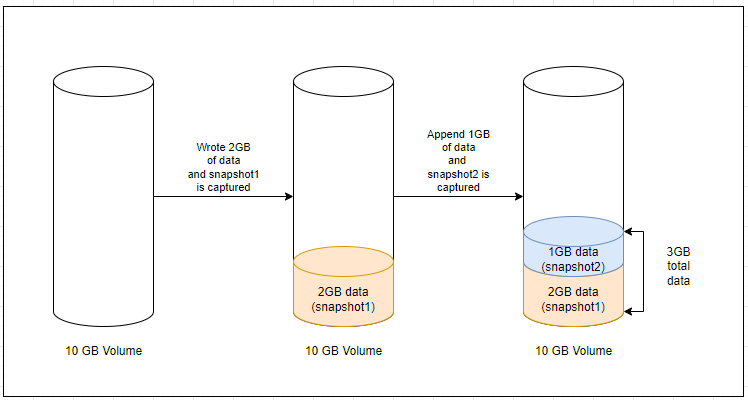
Let’s consider a 10 GB volume with 2 GB of data written on it. The first snapshot is captured with 2 GB of data and is named snapshot1. New data is added to the volume in the following scenarios:
Case 1 (New data is appended without overwriting the existing data) - Let’s consider 1 GB of new data is added to the volume and a new snapshot is captured as snapshot2. Due to the incremental snapshots, snapshot1 contains 2 GB of data and snapshot2 contains 1 GB of data.
After deleting the parent snapshot, the child snapshot inherits all data from its parent snapshot. In this case, snapshot2 inherits all data from snapshot1 and contains 3 GB of total data.
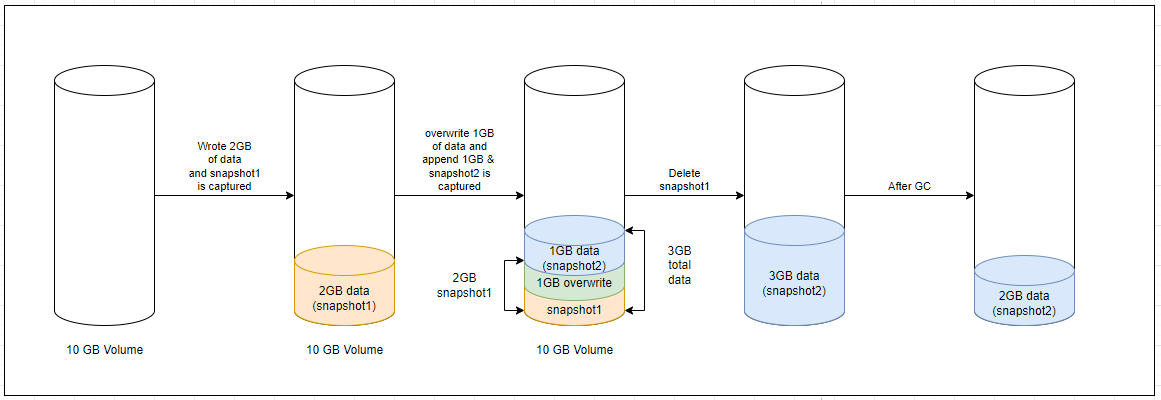
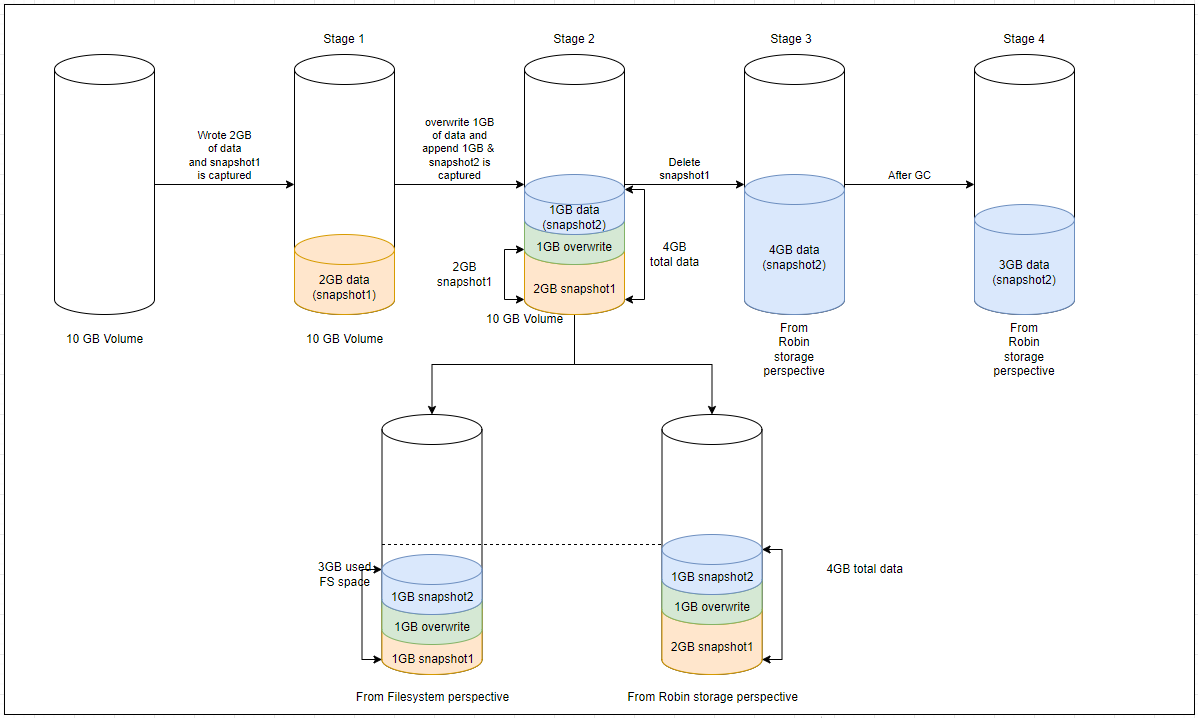
Case 2 (New data overwrites some part of the existing data) - Let’s consider 2 GB of new data is added (1 GB of data is overwritten to existing data and 1 GB of new data is appended) to the volume and a new snapshot is captured as sanapshot2. Due to the incremental nature of the snapshots, snapshot1 contains 2 GB of existing data and snapshot2 also contains 2 GB of data (1 GB of overwritten data and 1 GB of new data).
After deleting the parent snapshot (snapshot1), the child snapshot (snapshot2) inherits all data from its parent snapshot (snapshot1). From the Robin storage perspective, the snapshot2 inherits a total of 4GB of data (2 GB of data from snapshot1, 2 GB of data from snapshot2). At the same time, from the filesystem perspective, only 3 GB of space is occupied (1 GB of non-overwritten data from snapshot1, 1GB of overwritten data, and 1GB of new data from snapshot2).
When you run the Garbage Collection (GC) on snapshot2, it cleans up the overwritten data of snapshot1, which is no longer valid due to snapshot1 being deleted, and now, from Robin storage perspective, snapshot2 also contains only 3 GB of valid data.
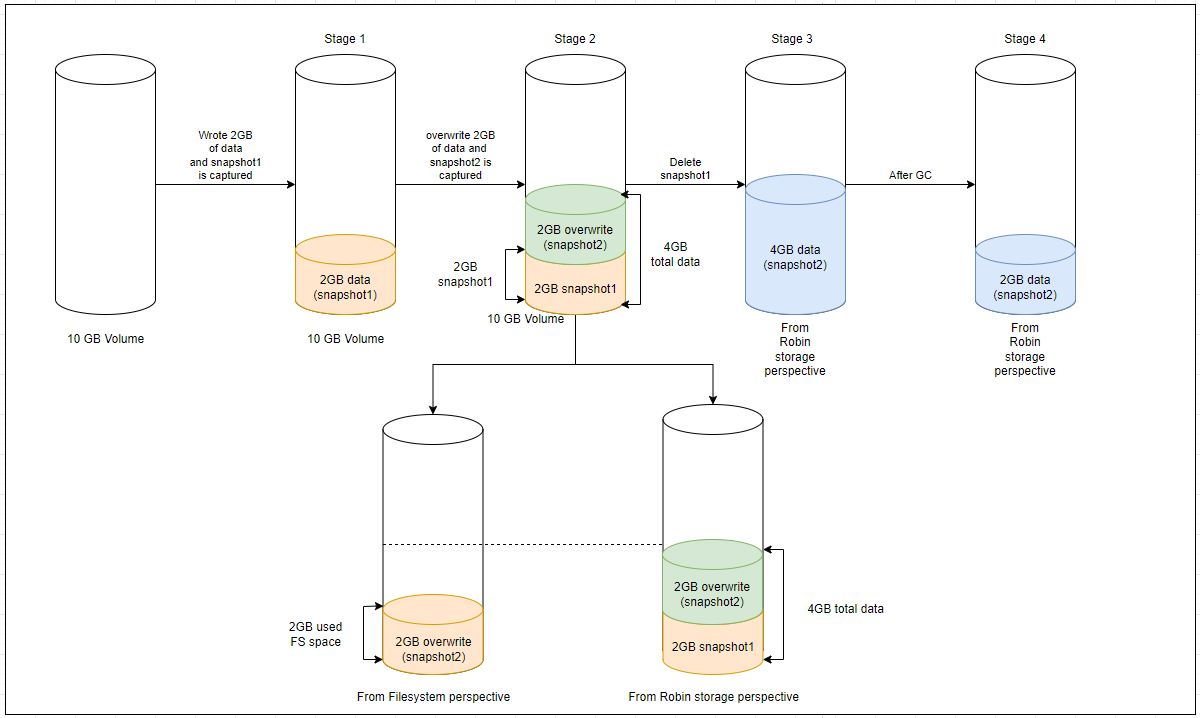
Case 3 (New data completely overwrites existing data) - Let’s consider 2 GB of new data overwrites the entire existing data and a new snapshot is captured as snapshot2. Due to the incremental snapshots, snapshot1 contains 2 GB of existing data and snapshot2 also contains 2 GB of new data as it overwrites the entire existing data.
After deleting the parent snapshot (snapshot1), the child snapshot (snapshot2) inherits all data from its parent snapshot (snapshot1). From the Robin storage perspective, the snapshot2 inherits a total of 4GB of data (2 GB of data from snapshot1, 2 GB of data from snapshot2). At the same time, from the filesystem perspective, only 2 GB of space is occupied (2 GB of overwritten data from snapshot2).
When you run the Garbage Collection (GC) on snapshot2, it cleans up the overwritten data of snapshot1, which is no longer valid due to snapshot1 being deleted, and now, from Robin storage perspective, snapshot2 also contains only 2 GB of valid data.
4.6.3. Create a volume snapshot
Perform the following steps to create a volume snapshot using the native commands:
Note
To create, list, and delete the volume snapshots using the Robin CLI, see Managing Volume Snapshots.
Step 1 - Register a volume snapshot class with Kubernetes
Step 2 - Take a snapshot of a PersistentVolumeClaim
4.6.3.1. Step 1 - Register a volume snapshot class with Kubernetes
Configure a VolumeSnapshotClass object using the following volume snapshot class YAML:
apiVersion: snapshot.storage.k8s.io/v1beta1
kind: VolumeSnapshotClass
metadata:
  name: robin-snapshotclass
  labels:
    app.kubernetes.io/instance: robin
    app.kubernetes.io/managed-by: robin.io
    app.kubernetes.io/name: robin
driver: robin
deletionPolicy: Delete
Run the following command to create the VolumeSnapshotClass:
$ kubectl create -f csi-robin-snapshotclass.yaml
volumesnapshotclass.snapshot.storage.k8s.io/robin-snapshotclass created
Run the following command to verify that a VolumeSnapshotClass is registered:
$ kubectl get volumesnapshotclass
NAME                  DRIVER   DELETIONPOLICY   AGE
robin-snapshotclass   robin    Delete           18s
4.6.3.2. Step 2 - Take a snapshot of a PersistentVolumeClaim
Configure a VolumeSnapshot object with the name of the VolumeSnapshotClass and the PVC that needs to be snapshotted using the following volume snapshot YAML:
apiVersion: snapshot.storage.k8s.io/v1beta1
kind: VolumeSnapshot
metadata:
  name: snapshot-mypvc
  labels:
    app.kubernetes.io/instance: robin
    app.kubernetes.io/managed-by: robin.io
    app.kubernetes.io/name: robin
spec:
  volumeSnapshotClassName: robin-snapshotclass
  source:
    persistentVolumeClaimName: mypvc
Run the following command to create the VolumeSnapshot:
$ kubectl create -f take-snapshot.yaml
volumesnapshot.snapshot.storage.k8s.io/snapshot-mypvc created
Note
Robin CNS allows deletion of a volume even if a VolumeSnapshot object or a clone created from it still exists.
4.6.4. List a volume snapshot
To verify that the VolumeSnapshot for the PersistentVolumeClaim is created, run the following command:
$ kubectl get volumesnapshot
NAME                 READYTOUSE   SOURCEPVC   SOURCESNAPSHOTCONTENT   RESTORESIZE   SNAPSHOTCLASS         SNAPSHOTCONTENT                                    CREATIONTIME   AGE
snapshot-mypvc       false        mypvc                                             robin-snapshotclass   snapcontent-06c17c2b-e7bb-4dc9-86df-e5fd05821977                  4m28s

$ kubectl get volumesnapshotcontent
NAME                                               READYTOUSE   RESTORESIZE   DELETIONPOLICY   DRIVER   VOLUMESNAPSHOTCLASS   VOLUMESNAPSHOT       AGE
snapcontent-06c17c2b-e7bb-4dc9-86df-e5fd05821977                              Delete           robin    robin-snapshotclass   snapshot-mypvc       41s
4.6.5. Delete a volume snapshot
To delete a volume snapshot, run the native kubectl delete command as shown in the example below:
Important
Robin CNS allows deletion of a VolumeSnapshot object even if a volume provisioned from it still exists.
# kubectl delete volumesnapshot -n prod snapshot-1
volumesnapshot.snapshot.storage.k8s.io "snapshot-1" deleted
Note
VolumeSnapshots are namespaced objects so the appropriate namespace will need to be specified for the above command to be successful.
4.7. Volume Clones
Robin CNS supports creating a clone of an existing volume. You can clone any volume (normal or encrypted). You can create a volume clone from an existing volume of type Regular or its snapshot. When you need to create a volume clone using a volume, Robin CNS creates a snapshot of the volume and uses it to create the volume clone. After the volume clone is created, all new writes go to the parent volume, and the volume clone is independent. The official Kubernetes documentation on volume snapshot restores and clones can be found here. Robin supports Kubernetes Clones for Kubernetes v1.13 and beyond.
Starting from Robin CNS v5.4.8, the following two types of volume clones are supported:
Thick clone - A Thick clone is a writable point-in-time copy of an existing volume or volume snapshot. A Thick clone has no dependency on the parent volume or snapshot. You can use a Thick clone only after the data copy is complete to the clone volume.
Thin clone - A Thin clone is a writable point-in-time copy of an existing volume or volume snapshot. A Thin clone has a dependency on the parent volume or snapshot. You can create a Thin clone and start using it immediately.
To create a Thick or Thin volume clone, in the DataSource section of the PVC YAML file, specify from which resource the clone will be created.
The following are the valid choices for the kind key of the DataSource parameter: PersistantVolumeClaim or VolumeSnapshot.
In addition, you need to create a custom StorageClass and add a clonetype parameter specifying which type of clone volume to create. Valid values for the clonetype parameter are thick or thin (clonetype: <thick> <thin>).
Note
If you do not provide the clonetype parameter, then a Thin volume clone will be created by default.
If you have created volume clones prior to Robin CNS v5.4.8, those clones are displayed as Volume Type: Clone in the robin volume info and robin volume list commands output.
Note
Robin CNS allows deletion of a volume even if a VolumeSnapshot object or a clone created from it still exists.
4.7.1. Thick volume clone
A Thick volume clone is essentially a complete new copy of the parent volume. During the Thick clone creation process, Robin CNS creates a volume snapshot automatically if the data source is PVC, and all of the data in the parent volume is copied to the Thick clone, a process known as hydration. While data copy (hydration) is in progress, you cannot mount the volume in a Pod, or access the volume clone for reads and writes.
Once the hydration process is complete, the newly created thick clone volume will have no dependency on the parent volume or volumesnapshot.
Creating Thick clones can be a time-consuming process, depending on the size of the parent volume, as it copies all the data from the parent volume to the volume clone.
4.7.2. Points to consider for Thick clone volume hydration
You must be aware of the following points about thick volume clone hydration in Robin CNS:
When the hydration operation is in progress for a Thick volume clone, the volume remains in the
Pendingstate.The Thick clone volume transitions to the Bound state only after 100% hydration is complete.
If the hydration operation fails due to source errors, network interruptions, or insufficient storage, Robin CNS performs the following actions: - Updates the robin.io/hydration-status annotation to Failed. - Records a clear Kubernetes event on the PVC explaining the failure. - Populates the
robin.io/hydration-errorannotation with the failure details.If you delete a PVC that is in the
Pendingstate, Robin CNS cancels the hydration operation and cleans up the underlying storage and the associated PersistentVolume (PV).If Robin Pods restart during hydration, the hydration operation resumes and completes the hydration operation automatically.
The following volume parameters must be the same in the StorageClass YAML as the parent volume when you are creating a clone in your PVC:
If you do not provide these parameters, Robin CNS takes the parent volume values.
Blocksize
fstype
Compression
Encryption
Note
You must add the parameter clonetype:thick in the Robin StorageCalss if you want to create a Thick clone. And in the PVC YAML, you must provide the volume clone size the same as the parent volume. Also, you must provide the value for the key kind under the DataSource parameter as PersistentVolumeClaim or VolumeSnapshot.
While the data copy is in progress, the robin volume info command output displays the Volume Type as Clone Deferred.
Once the data copy is complete, the Volume Type parameter displays as CLONE_THICK while the clone is being hydrated and REGULAR once hydration is complete.
The Clone type parameter displays as THICK.
4.7.3. Monitor hydration status
You can monitor the status of the hydration operation using the following PVC annotations and Robin CLI.
Note
You must add the following annotations in the PVC YAML before creating thick volume clone. The kubctl describe pvc command output displays the hydration status.
Annotations for monitoring
robin.io/hydration-status: Indicates the current state (such as in-progress, completed, or failed).robin.io/hydration-progress: Displays the completion percentage (for example, 25%).robin.io/hydration-start-time: The timestamp when the hydration began.robin.io/hydration-end-time: The timestamp when the hydration finished.robin.io/hydration-error: Displays a detailed error message if the operation fails.
You can monitor the status and progress of volume hydration by inspecting the PVC annotations or using the Robin CLI.
To check the progress of a hydration task, run the following command:
# kubectl describe pvc <pvc-name>
4.7.4. Check hydration progression status
Robin CLI output displays the percentage of hydration completion.
To check the hydration progression status, run the following command:
# robin volume info <volume-id>
The output displays a progress bar similar to the following along with other volume info details:
Hydration Status : 9% [....................]
4.7.5. Thin volume clone
A Thin volume clone is a copy of a volume or a volume snapshot. The Thin clone type provides a read-and-write copy of the parent volume to users instantly, and the users can access old data from the snapshot. And any new data is written to and read from the cloned volume. You cannot delete a parent or dependent snapshot until the Thin clone exists.
Note
You should have the parameter clonetype:thin in the Robin StorageCalss. If you do not provide the value for the clonetype parameter, however, it still creates a Thin clone by default.
For a Thin clone, the robin volume info command output displays the Volume Type as CLONE_THIN and the Clone type parameter as THIN.
4.7.6. Limitations for volume clones
You must have knowledge of the following limitations related to volume cloning:
If you have clone volumes that were created in an earlier release (any release prior to Robin CNS v5.4.8), they will be available for use after upgrading to Robin CNS v5.4.8. These legacy clones are marked as Volume type CLONE in the volume list. However, you cannot convert them into a Thick clone. The Volume type: Clone is deprecated and is not supported anymore starting from Robin CNS v5.4.8 onwards.
Only the volume type Regular is supported for creating a Thick or Thin clone.
You cannot convert a Thin clone to a Thick clone.
A Thick clone will be available for reads and writes after completing the hydration process.
When the hydration process is in progress for a Thick volume clone, you cannot create another volume clone using the same volume.
Hydration is not supported for Thin clones in this release.
4.7.7. Create a volume clone using a volume
You can create a volume clone type of Thick or Thin according to your requirements.
To create a volume clone, you can use the volume itself or an existing volume snapshot. For more information, see Volume Clones.
Before creating a volume clone, you should be aware of the limitations about volume cloning, For more information, see Limitations for volume clones.
The following procedure provides steps for creating a volume clone using a volume.
Note
For all volume clone types, the following volume parameters must be the same as the parent volume. Other parameters can be different from the parent volume.
Blocksize
fstype
Compression
Encryption
If any of the parameters are not specified in the StorageClass, the volume clone uses the values from the parent.
Complete the following steps to create a volume clone using a volume:
Create a
storageclass.yamlfile with the required parameters and add the parameterclonetype:<thick or thin>using the following sample:
apiVersion: storage.k8s.io/v1
kind: StorageClass
metadata:
    name: <"storageclassname-clone">
provisioner: robin
reclaimPolicy: Delete
parameters:
    media: <SSD, HDD>
    blocksize: <"512", "4096"> <Must be same as the parent volume>
    fstype: <ext4, xfs> <Must be same as the parent volume>
    replication: <"2", "3">
    compression: <LZ4> <Must be same as the parent volume>
    encryption: <CHACHA20, AES256, AES128> <Must be same as the parent volume>
    workload: <ordinary, throughput, latency, dedicated>
    snapshot_space_limit: <"50">
    rpool: <"default">
    robin.io/storagetolerations: <key:value>
    Clonetype: <thick, thin>
Create a
StorageClassusing thestorageclass.yamlfile created in the previous step:# kubectl create -f <storageclass.yaml>
Example
# kubectl create -f robin-sc.yaml
storageclass.storage.k8s.io/clone-sc created
Create a pvc.yaml file to create a PVC using the following sample file:
Note
For volume clones (Thick or Thin), the volume clone size must be same as the parent volume.
apiVersion: v1
kind: PersistentVolumeClaim
metadata:
  name: thick-clone-pvc
spec:
  storageClassName: storageclassname-clone
  dataSource:
    name: volume-parent-test
    kind: PersistentVolumeClaim
  accessModes:
    - ReadWriteOnce
  resources:
    requests:
      storage: 10Gi <Size must be same as the parent volume>
Create a PVC using the pvc.yaml file created in the previous step :
# kubectl create -f <pvc.yaml>
Example
# kubectl create -f pvc.yaml
persistentvolumeclaim/test-pvc created
4.7.8. Create a volume clone using a volume snapshot
The following procedure provides steps for creating a Thick or Thin volume clone using an existing volume snapshot.
Note
Before creating a volume clone, you should be aware of the limitations about volume cloning, For more information, see Limitations for volume clones.
4.7.8.1. Prerequisite
You must have an existing volume snapshot to create a volume clone. For more information on creating a volume snapshot, see Create a volume snapshot.
Note
For all volume clone types, the following volume parameters must be the same as the parent volume. Other parameters can be different from the parent volume.
Blocksize
fstype
Compression
Encryption
If any of the parameters are not specified in the StorageClass, the volume clone uses the values from the parent.
Complete the following steps to create a volume clone using a volume snapshot:
Create a storageclass.yaml file with the required parameters and add the parameter
clonetype:thickorthinusing the following example:apiVersion: storage.k8s.io/v1 kind: StorageClass metadata: name: <"storageclassname-clone"> provisioner: robin reclaimPolicy: Delete parameters: media: <SSD, HDD> blocksize: <"512", "4096"> <Must be same as the parent volume> fstype: <ext4, xfs> <Must be same as the parent volume> replication: <"2", "3"> compression: <LZ4> <Must be same as the parent volume> encryption: <CHACHA20, AES256, AES128> <Must be same as the parent volume> workload: <ordinary, throughput, latency, dedicated> snapshot_space_limit: <"50"> rpool: <"default"> robin.io/storagetolerations: <key:value> Clonetype: <thick, thin>
Create a StorageClass using the storageclass.yaml file created in the previous step:
# kubectl create -f <storageclass.yaml>
Example
# kubectl create -f robin-sc.yaml
storageclass.storage.k8s.io/clone-sc created
Create a pvc.yaml file to create a PVC using the following sample:
Note
For volume clones (Thick or Thin), the volume clone size must be same as the parent volume.
  apiVersion: v1
  kind: PersistentVolumeClaim
  metadata:
    name: thick-clone-pvc
  spec:
    storageClassName: storageclassname-clone
    dataSource:
      name: volume-snapshot
      kind: VolumeSnapshot

    accessModes:
      - ReadWriteOnce
    resources:
      requests:
        storage: 10Gi <Size must be same as the parent volume>
Create a PVC using the pvc.yaml file created in previous step:
# kubectl create -f <pvc.yaml>
Example
# kubectl create -f pvc.yaml
persistentvolumeclaim/test-pvc created
Confirm that the cloned PersistentVolumeClaim is created
One can verify that the clone was successfully created by issuing the following command:
$ kubectl get pvc
NAME                STATUS   VOLUME                                     CAPACITY   ACCESS MODES   STORAGECLASS   AGE
mypvc               Bound    pvc-83ed719a-5500-11e9-a0b7-00155d320462   1Gi        RWO            robin          49m
mypvc-clone-snap1   Bound    pvc-6dd554d1-5506-11e9-a0b7-00155d320462   1Gi        RWO            robin          7m19s
4.8. Expand Volumes
Robin supports volume expansion and thus allows users to resize their data storage to meet their needs accordingly. The official Kubernetes documentation on volume expansion can be found here. The following steps can be used to expand a volume using native commands.
List the PersistentVolumes
In order to list all the available PV’s available on the cluster, run the following command:
$ kubectl get pv -n robinapps
NAME                                       CAPACITY   ACCESS MODES   RECLAIM POLICY   STATUS   CLAIM               STORAGECLASS   REASON   AGE
pvc-651722f9-dad2-4d62-85d9-de556bb8d555   8Gi        RWO            Delete           Bound    robinapps/mysqldb   robin                   14h
Edit the PersistentVolume
Next we need to edit the desired PersistentVolume. Under the
specsection change thestorageattribute undercapacityfield to the desired value as hightlighted below:$ kubectl edit persistentVolume/pvc-651722f9-dad2-4d62-85d9-de556bb8d555 -n robinapps
 -------
 # Please edit the object below. Lines beginning with a '#' will be ignored,
 # and an empty file will abort the edit. If an error occurs while saving this file will be
 # reopened with the relevant failures.
 #
 apiVersion: v1
 kind: PersistentVolume
 metadata:
   annotations:
     pv.kubernetes.io/provisioned-by: robin
   creationTimestamp: "2020-10-06T04:44:39Z"
   finalizers:
   - kubernetes.io/pv-protection
   - external-attacher/robin
   managedFields:
   - apiVersion: v1
     fieldsType: FieldsV1
     fieldsV1:
       f:metadata:
         f:finalizers:
           v:"external-attacher/robin": {}
     manager: csi-attacher
     operation: Update
     time: "2020-10-06T04:44:39Z"
   - apiVersion: v1
     fieldsType: FieldsV1
     fieldsV1:
       f:metadata:
         f:annotations:
           .: {}
           f:pv.kubernetes.io/provisioned-by: {}
       f:spec:
         f:accessModes: {}
         f:capacity: {}
         f:claimRef:
           .: {}
           f:apiVersion: {}
           f:kind: {}
           f:name: {}
           f:namespace: {}
           f:resourceVersion: {}
           f:uid: {}
         f:csi:
           .: {}
           f:driver: {}
           f:fsType: {}
           f:volumeAttributes:
             .: {}
             f:csi.storage.k8s.io/pv/name: {}
             f:csi.storage.k8s.io/pvc/name: {}
             f:csi.storage.k8s.io/pvc/namespace: {}
             f:storage.kubernetes.io/csiProvisionerIdentity: {}
           f:volumeHandle: {}
         f:persistentVolumeReclaimPolicy: {}
         f:storageClassName: {}
         f:volumeMode: {}
     manager: csi-provisioner
     operation: Update
     time: "2020-10-06T04:44:39Z"
   - apiVersion: v1
     fieldsType: FieldsV1
     fieldsV1:
       f:status:
         f:phase: {}
     manager: kube-controller-manager
     operation: Update
     time: "2020-10-06T04:44:39Z"
   - apiVersion: v1
     fieldsType: FieldsV1
     fieldsV1:
       f:spec:
         f:capacity:
           f:storage: {}
     manager: kubectl
     operation: Update
     time: "2020-10-06T19:25:31Z"
   name: pvc-651722f9-dad2-4d62-85d9-de556bb8d555
   resourceVersion: "4678372"
   selfLink: /api/v1/persistentvolumes/pvc-651722f9-dad2-4d62-85d9-de556bb8d555
   uid: 0151065d-fd69-4479-85e2-d4c47c414a90
 spec:
   accessModes:
   - ReadWriteOnce
   capacity:
     storage: 16Gi
   claimRef:
     apiVersion: v1
     kind: PersistentVolumeClaim
     name: mysqldb
     namespace: robinapps
     resourceVersion: "4415500"
     uid: 651722f9-dad2-4d62-85d9-de556bb8d555
   csi:
     driver: robin
     fsType: ext4
     volumeAttributes:
       csi.storage.k8s.io/pv/name: pvc-651722f9-dad2-4d62-85d9-de556bb8d555
       csi.storage.k8s.io/pvc/name: mysqldb
       csi.storage.k8s.io/pvc/namespace: robinapps
       storage.kubernetes.io/csiProvisionerIdentity: 1601911186270-8081-robin
     volumeHandle: "1601911167:5"
   persistentVolumeReclaimPolicy: Delete
   storageClassName: robin
   volumeMode: Filesystem
 status:
   phase: Bound
 -------
 persistentvolume/pvc-651722f9-dad2-4d62-85d9-de556bb8d555 edited
Verify the change to the PersistentVolume
Lastly confirm that the PersistantVolume’s capacity has been increased by running the following command:
$ kubectl get pv -n robinapps
NAME                                       CAPACITY   ACCESS MODES   RECLAIM POLICY   STATUS   CLAIM               STORAGECLASS   REASON   AGE
pvc-651722f9-dad2-4d62-85d9-de556bb8d555   16Gi       RWO            Delete           Bound    robinapps/mysqldb   robin                   14h
4.9. Backup and Import Volumes using Kubernetes specification
Robin supports backup and import of volumes using the Kubernetes specifications. Volume backup allows a user to recover the volume from its backup when required. Robin allows you to push the volume snapshots to a registered external cloud storage repository. Volume backup can coexist with application backup in a cloud storage repository.
Robin enables you to import data from a volume backup and create a new volume on the same source cluster from where the backup is taken or on a different cluster that has access to the same external cloud storage repository. Once the import process is complete, the new volume contains the same data as the source volume. However, there is no relationship between the original volume and the volume created using the backup. You can import a volume from backup on the same source cluster from where the backup is taken or on different cluster that has access to the same external cloud storage repository.
Note
When importing a volume from its backup, the size of importing volume must be the same as the size of the backedup volume.
Creating a volume backup using Kubernetes spec is achieved through volume snapshot specifications which points to a volume snapshot class that has reference to the external cloud storage repository.
To create a backup, first create a volume snapshot class using the storagerepo and purgeOnDelete parameters. Using this snapshot class, take a volume snapshot of the PVC you want to take a backup. Once you take the volume snapshot, Robin automatically pushes it to the external cloud storage repository for backup.
4.9.1. Points to consider for backup and import volume using Kubernetes specification
You cannot create a backup for an existing volume snapshot.
Volume backup using kubernetes spec works based on a PVC which means you can take volume backup that includes a single volume.
By default, the
purgeOnDeleteparameter is set totruein volume snapshot class. When you delete the volume snapshot that is used to take the volume backup, the volume backup is purged or deleted from the external cloud storage repository. If you do not want to delete the volume backup from the external cloud storage repository, you must set thepurgeOnDeleteparameter tofalsein the volume snapshot class.The
purgeOnDeleteparameter cannot be changed after taking a backup.When importing a volume from backup, the size of imported volume must be the same as the size of the backedup volume.
By default, the
hydrationparameter is set totruein the StorageClass which means Robin copies the data from external cloud repository to the cluster disks on which import is done. To override thehydrationparameter in the StorageClass, you must set this parameter asfalse.Import of a quorum-based replication volume is supported only if it is imported with the
hydrationoption.
4.9.2. Create volume backup
A volume backup is backup of a volume snapshot that is stored in a registered external cloud storage repository.
To create a backup, first create a volume snapshot class using the storagerepo and purgeOnDelete parameters. Using this snapshot class, take a volume snapshot of the PVC you want to take a backup.
When you take a volume snapshot by specifying the storagerepo parameter in the volume snapshot class, Robin creates a volume snapshot on the fly and automatically pushes the created volume snapshot to the external storage repository for backup.
By default, the purgeOnDelete parameter is set to true in volume snapshot class. When you delete the volume snapshot that is used to take the volume backup, the respective volume backup is also deleted from the external cloud storage repository. If you do not want to delete the volume backup from the external cloud storage repository, you must set the purgeOnDelete parameter to false in the volume snapshot class.
4.9.2.1. Prerequisites
The following is the prerequisite for backing up a volume:
An external cloud storage repository must be with Robin for backup purposes. For more information, see Register a repo.
Complete the following steps to backup a volume:
Create a volume snapshot class YAML for creating a VolumeSnapshotClass object:
apiVersion: snapshot.storage.k8s.io/v1
kind: VolumeSnapshotClass
metadata:
    name: backup-snapshotclass # snapshot_class_name
parameters:
    storagerepo: gcs-bucket-1 # storage_repo_name
    purgeOnDelete: true/false  # default true
driver: robin
deletionPolicy: Delete
Note
By default, the
purgeOnDeleteparameter is set totruewhich means when a volume snapshot is deleted from the cluster, the respective volume backup is also deleted from the external cloud storage repository. To keep the volume backup permanently in the external storage repository, thepurgeOnDeleteparameter must be set tofalse.Create a VolumeSnapshotClass object using the volume snapshot class YAML:
# kubectl create -f backup-snapshotclass.yaml
volumesnapshotclass.snapshot.storage.k8s.io/backup-snapshotclass created
Create a volume snapshot YAML for creating the VolumeSnapshot object:
apiVersion: snapshot.storage.k8s.io/v1
kind: VolumeSnapshot
metadata:
    name: backup-snapshot  # volume_snapshot_name
    namespace: default   # namespace_name
spec:
    volumeSnapshotClassName: backup-snapshotclass #  snapshot_class_name
    source:
        persistentVolumeClaimName: csi-pvc-robin # volume_name
Create a VolumeSnapshot object for taking a backup of a volume:
# kubectl create -f backup-snapshot.yaml
volumesnapshot.snapshot.storage.k8s.io/backup-snapshot created
After receiving the request to take a volume snapshot, Robin takes the volume snapshot and pushes the volume snapshot as a volume backup to external cloud storage repository. Once the volume backup is successful, you can see the ReadyToUse flag as true in the kubectl get volumesnapshot command and the token#<backup_id> in the snapshotHandle parameter in the kubectl get volumesnapshotcontent <volumesnapshotcontent_name> -o yaml command. You can also see the volume backup in the robin backup list command.
Example
# kubectl get volumesnapshots
NAME                        READYTOUSE   SOURCEPVC   SOURCESNAPSHOTCONTENT   RESTORESIZE   SNAPSHOTCLASS                  SNAPSHOTCONTENT                                    CREATIONTIME   AGE
my-volume-snapshot-backup   true         demo-app                            0             volume-backup-snapshot-class   snapcontent-bc900057-acbf-4e28-8f16-bcde0f2b9582   9s             27s

# kubectl get volumesnapshotcontent snapcontent-bc900057-acbf-4e28-8f16-bcde0f2b9582 -o yaml
apiVersion: snapshot.storage.k8s.io/v1
kind: VolumeSnapshotContent
metadata:
  creationTimestamp: "2024-02-01T13:13:38Z"
  finalizers:
  - snapshot.storage.kubernetes.io/volumesnapshotcontent-bound-protection
  generation: 1
  name: snapcontent-bc900057-acbf-4e28-8f16-bcde0f2b9582
  resourceVersion: "58383088"
  uid: 3be6265b-a4d5-4d76-aec2-92fb75f2604a
spec:
  deletionPolicy: Delete
  driver: robin
  source:
    volumeHandle: 1705528739:273
  volumeSnapshotClassName: volume-backup-snapshot-class
  volumeSnapshotRef:
    apiVersion: snapshot.storage.k8s.io/v1
    kind: VolumeSnapshot
    name: my-volume-snapshot-backup
    namespace: default
    resourceVersion: "58382994"
    uid: bc900057-acbf-4e28-8f16-bcde0f2b9582
status:
  creationTime: 1706793236096508000
  readyToUse: true
  restoreSize: 0
  snapshotHandle: token#b9f0bed0c10311ee8afad3bccf5f0d64

# robin backup list
+----------------------------------+----------------------------------------------------+--------+---------+--------------------------------------------------------------------+--------+
| Backup ID                        | Backup Name                                        | Type   | Repo    | Snapshot Name                                                      | State  |
+----------------------------------+----------------------------------------------------+--------+---------+--------------------------------------------------------------------+--------+
| b9f0bed0c10311ee8afad3bccf5f0d64 | volume-backup-bc900057-acbf-4e28-8f16-bcde0f2b9582 | VOLUME | my-repo | volume-snapshot-volume-backup-bc900057-acbf-4e28-8f16-bcde0f2b9582 | Pushed |
+----------------------------------+----------------------------------------------------+--------+---------+--------------------------------------------------------------------+--------+
Note
the robin backup list command displays the volume backup as Type VOLUME.
4.9.3. Import volume on same cluster
You can import a volume from backup on the same source cluster where backup was taken.
Complete the following steps to import a volume on the same cluster:
Create a PVC YAML to create a PVC with the datasource as volumesnapshotname:
  apiVersion: v1
  kind: PersistentVolumeClaim
  metadata:
    name: restored-pvc    #PVC_name
  spec
    accessModes:
      - ReadWriteOnce
    storageClassName: robin-volume-import  # storage_class_name
    resources:
      requests:
          storage: 6Gi
    dataSource:
        kind: VolumeSnapshot
        name: restored-snapshot              # volume_snapshot_name
        apiGroup: snapshot.storage.k8s.io
Create a PVC to import the volume from its backup using the above YAML file:
# kubectl create -f restored-pvc.yaml
persistentvolumeclaim/restored-pvc created
4.9.4. Import volume on different cluster
You can import a volume from backup on different cluster.
4.9.4.1. Prerequisite
The external cloud storage repository that contains the volume backup must be registered. For more information, see Register a repo.
An export token must be generated for the respective volume backup on the source cluster. For more information, see Export a backup.
Complete the following steps to import a volume on different cluster:
Import the volume backup using backup token generated on the source cluster:
#robin backup import <backup_token>
After importing the backup, you can see the state of backup as Imported in the
robin backup listcommand. Now, the volume is ready to be imported from backup.Create a volume snapshot content YAML by specifying the token#<backup_id> in the
snapshotHandleparameter to create a VolumeSnapshotContent object:apiVersion: snapshot.storage.k8s.io/v1 kind: VolumeSnapshotContent metadata: name: restored-snapshot-content # volume_snapshot_content_name spec: deletionPolicy: Retain driver: robin source: snapshotHandle: token#<backup_id> # backup_token volumeSnapshotRef: kind: VolumeSnapshot name: restored-snapshot namespace: default
Create a VolumeSnapshotContent object using the volume snapshot content YAML file created in step 1:
# kubectl create -f restored-snapshot-content.yaml
volumesnapshotcontent.snapshot.storage.k8s.io/restored-snapshot-content created
Create a volume snapshot YAML to create a VolumeSnapshot object by specifying the VolumeSnapshotContent name in the
sourceparameter:apiVersion: snapshot.storage.k8s.io/v1beta1 kind: VolumeSnapshot metadata: name: restored-snapshot # volume_snapshot_name spec: volumeSnapshotClassName: robin-snapshotclass # volume_snapshot_class_name source: volumeSnapshotContentName: restored-snapshot-content #volume_snapshot_content_name
Create a VolumeSnapshot object using the volume snapshot YAML file created in step 4:
# kubectl create -f restored-snapshot.yaml
volumesnapshot.snapshot.storage.k8s.io/restored-snapshot created
(Optional) Create a storage class YAML file to create a StorageClass object to create a PVC:
  apiVersion: storage.k8s.io/v1
  kind: StorageClass
  metadata:
    name: robin-volume-import   # storage_class_name
  parameters:
    hydration: true/false       # default true
  driver: robin
  deletionPolicy: Delete
Note
By default, the
hydrationparameter is set totruein the StorageClass which means Robin copies the data from external cloud repository to the cluster disks on which import is done. To override thehydrationparameter in the StorageClass, you must set this parameter asfalse.(Optional) Create a StorageClass object using the storage class YAML file created in step 6:
# kubectl create -f robin-volume-import.yaml
storageclass.storage.k8s.io/robin-volume-import created
Create a PVC YAML to create a PVC by specifying the VolumeSnapshot name in the
datasourceparameter:apiVersion: v1 kind: PersistentVolumeClaim metadata: name: restored-pvc #PVC_name spec: accessModes: - ReadWriteOnce storageClassName: robin-volume-import # storage_class_name resources: requests: storage: 6Gi dataSource: kind: VolumeSnapshot name: restored-snapshot # volume_snapshot_name apiGroup: snapshot.storage.k8s.io
Create a PVC to import the volume from backup using the PVC YAML file created in step 8:
# kubectl create -f restored-pvc.yaml
persistentvolumeclaim/restored-pvc created
4.9.5. Delete a volume backup
You can delete volume backups from the cluster if they are no longer needed.
Important
When you delete a volume backup from the cluster that has the purgeOnDelete parameter as true, the volume backup is also deleted from the external cloud storage repository.
Run the following command to delete a volume backup:
# kubectl delete volumesnapshot -n prod snapshot-1
volumesnapshot.snapshot.storage.k8s.io "snapshot-1" deleted
Note
VolumeSnapshots are namespaced objects, therefore, the appropriate namespace must be specified to delete a volume backup successfully.